Quick Fixed: User Profile Service Failed the Logon Windows 10
- Why Receive Windows Update User Profiles Service Failed Error?
- How to Fix User Profile Service Failed the Logon in Windows 10
- Method 1: Enable Built-in Administrator in Safe Mode
- Method 2: Fix User Profile Server Failed to Logon using Registry Editor
- How to Prevent Data Loss from User Profile Service Failed Error Again
- Conclusion
Why Receive Windows Update User Profiles Service Failed Error?
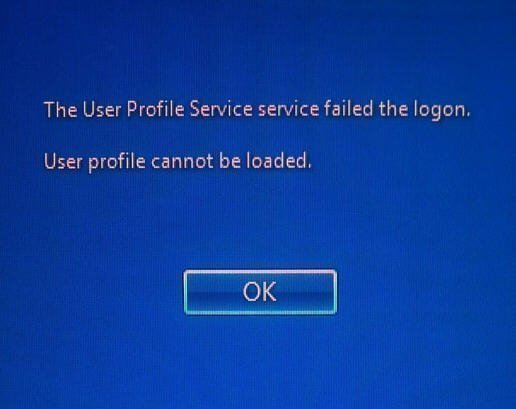
When logging on to a Windows-based computer, such as Windows Vista, 7, 8, 10, or 11, you may encounter the following error message:
"The User Profile Service Service failed the logon. User Profile cannot be loaded" Or "The User Profile Service service failed the sign-in. User profile cannot be loaded."
In general, this may be caused by a temporary profile. Also, Windows might not read your user profile correctly.
How to Fix User Profile Service Failed the Logon in Windows 10
If you're experiencing the "User Profile Service failed the logon" error in Windows, don't worry! This error can be frustrating, but it's often caused by a temporary profile or Windows not reading your user profile correctly. Before trying the following methods, make sure to restart your computer and log on with your user account again to see if the error still occurs.
Method 1: Enable Built-in Administrator in Safe Mode
If you encounter the "User Profile Service failed the logon" error in Windows 10, you may be able to access the Sign in screen or not. Regardless of the situation, you can access Safe Mode, but the method is slightly different in each case.
#1: Go to safe mode with Sign In screen
- Start your computer, hold down Shift and select Power > Restart in the Sign In screen.
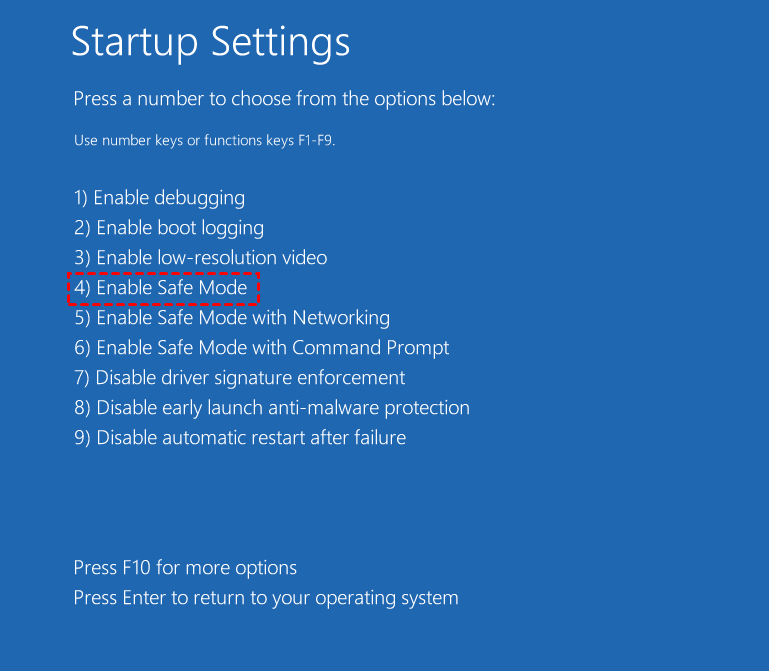
- Then, you computer will restart to recovery environment in Windows 10, click Troubleshoot > Advanced Options > Startup Settings > Restart.
- In the Startup Settings window, click on F6 or select Enable Safe Mode with Command Prompt to boot in Safe Mode.
#2: Go to safe mode when you cannot access Sign In screen
- Are you unable to access the Sign In screen on your Windows 10 computer? Don't worry, there are several troubleshooting steps you can take to resolve the issue. One of the most effective methods is to boot your computer in the recovery environment, which allows you to access advanced troubleshooting tools and options.
- If you're experiencing issues with your Windows 10 computer, accessing the Startup Settings window can be a helpful troubleshooting step. By enabling Safe Mode with Command Prompt, you can run your system with a minimal set of drivers and applications, which can help you identify and resolve the problem more easily.
After accessing safe mode, type the following command to enable built-in administrator. Then, hit Enter to excute it. Then, log off from the current user and switch to the administrator account.
net user administrator /active: yes (Check for the spaces)
Note: If you want to disable the admin account after troubleshooting, type net user administrator /active: no.
Method 2: Fix User Profile Server Failed to Logon using Registry Editor
To edit the registry you'll have to sign in as a different user, but if you have only one user account, you can also use Safe Mode to edit the registry.
Part 1: Check the status of user profile service
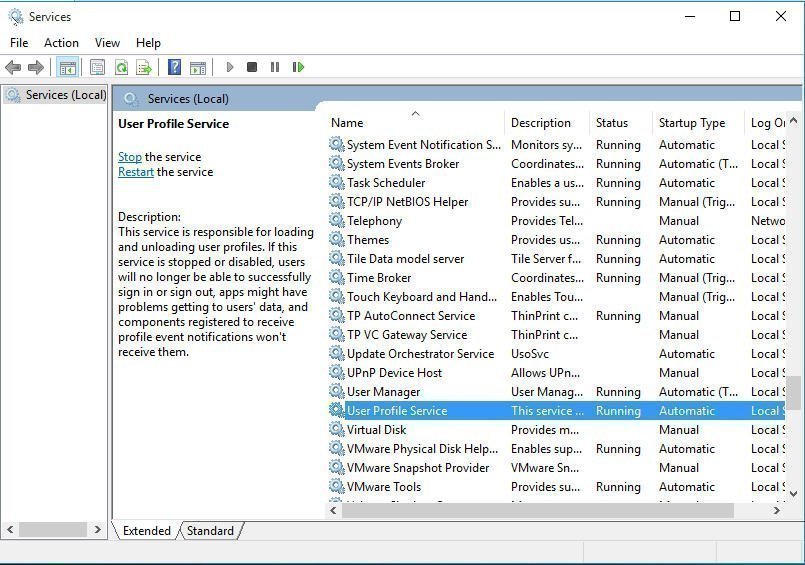
Type services.msc in the search box and select it to open the Service window. Then, find out the User Profile Service, double-click it, set the startup type as Automatic, and click Start under the Service status. After that, check if you can log on with your user account.
Part 2: Check the Registry settings
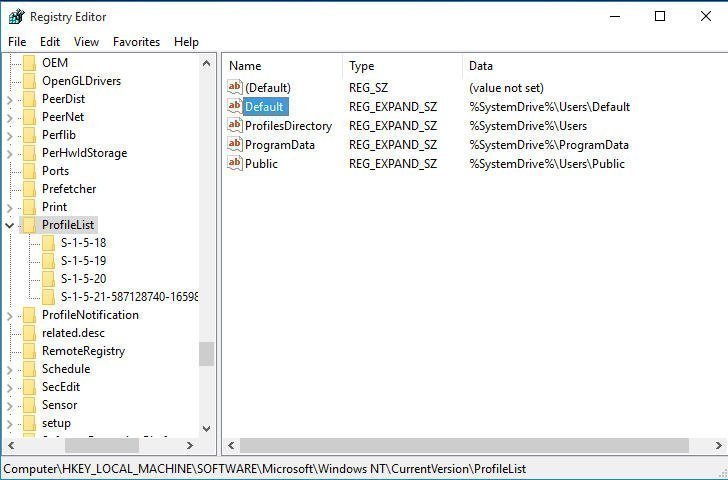
In general, the Default profile key can be %SystemDrive%UsersDefault. However, if you upgraded your computer from a previous version, this may be changed automatically. In this case, you need to open Registry Editor and change back the Default key.
Type regedit.exe in the search box and press OK to open Registry Editor. Then, navigate to the following path, find the Default string and change it to %SystemDrive%UsersDefault.
HKEY_LOCAL_MACHINE\SOFTWARE\Microsoft\Windows NT\ CurrentVersion\ ProfileList
After modifying the Default profile key, verify that the change has taken effect by attempting to log on with your user account. If the change was successful, you should be able to log on with your user account without any issues.
Part 3: Change the Registry
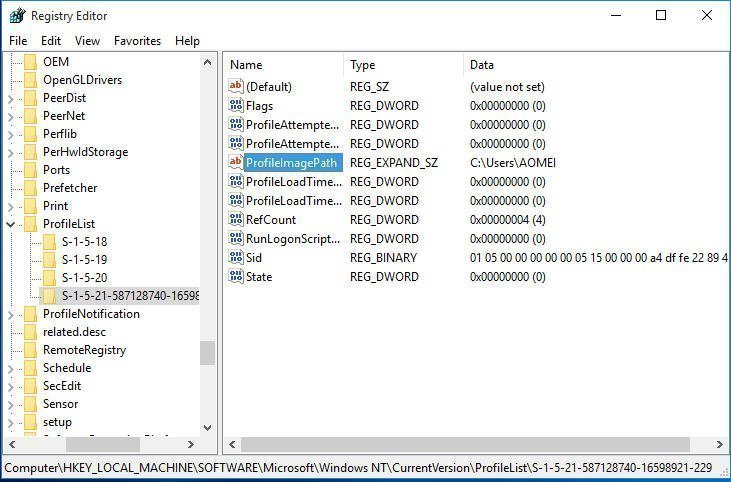
In the Registry Editor window, go to the following path, find the subkey and folders began with S-1-5 (SID key) followed by a long number. Then, Click each S-1-5 folder, double-click the ProfileImagePath entry in the details pane and find out which is the user account profile with the error.
HKEY_LOCAL_MACHINE\SOFTWARE\Microsoft\Windows NT\CurrentVersion\ProfileList
You will encounter two possible scenarios:
- If you are in previous situation, you need to add .bak to the S-1-5 folder without .bak and remove .bak for the S-1-5 folder with .bak.
- If you're dealing with two folders that start with "S-1-5" and one of them has the ".bak" suffix, you'll need to:
Afterward, you will get the S-1-5 folder without .bak, click it and set value of RefCount and State to 0. Then, you can close the Registry Editor and restart your computer, check if you can log on with your user account.
Part 4: Delete the SID and create a new profile
There are two ways to delete user profiles:
#1: Through Computer Properties
Type View advanced system settings in the search box and select it. Then, click the Advanced tab in the System Properties dialog box and then Settings under the User Profiles area. At last, select the profile that you want to delete and click Delete.
#2: Use Registry Editor
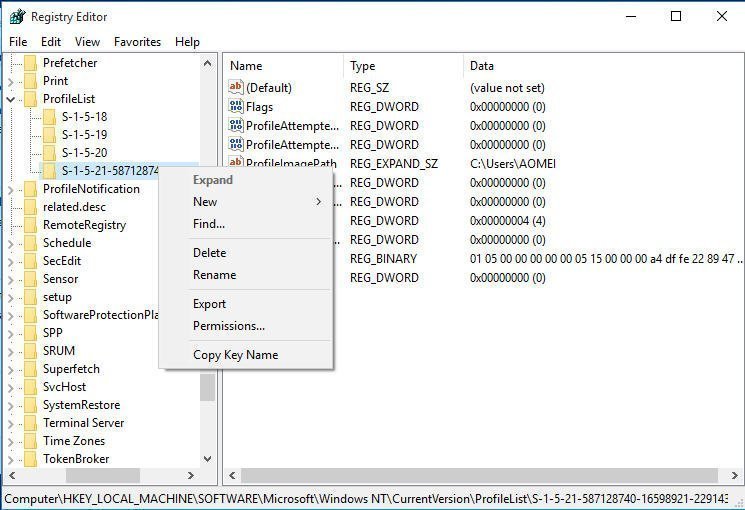
Open Registry Editor, find the following registry subkey. Then, right-click the SID that you want to remove and click Delete. Afterward, log on to the computer and create a new profile.
HKEY_LOCAL_MACHINE\SOFTWARE\Microsoft\Windows NT\CurrentVersion\ProfileList
How to Prevent Data Loss from User Profile Service Failed Error Again
While the methods mentioned earlier can help resolve the User Profile Service Service Failed the Logon issue in Windows 10, they come with some risks. Modifying the registry and deleting user profiles can lead to system instability, crashes, and data loss. Additionally, other computer failures such as error loading the operating system can also cause data loss.
When it comes to backing up your Windows 10 system, Qiling Disk Master Standard stands out as a top choice due to its numerous advantages. Some of the key benefits of using this software include:
- Backup system automatically: It supports daily, weekly, monthly schedule backup, so you can backup system with a specific interval.
- Backup only changed files in the system partition: By default, this software supports block-level incremental backup, which backup only changed block in files. It saves you much backup time and disk space.
- Other Useful features: It uses normal compression, intelligent sector backup, automatic splitting to further reduce backup image size. Also, it is able to create Windows 10 boot repair USB, especially useful when your computer fails.
One of the standout features of Qiling Disk Master Standard is its user-friendly interface. The software is designed to be intuitive and easy to navigate, making it accessible to users of all skill levels.
Are you looking for a reliable and easy-to-use disk management software for your Windows system? Look no further than Qiling Disk Master Standard! This powerful software is designed to work seamlessly with Windows 11/10/8/7/XP/Vista, making it the perfect solution for users of all skill levels.
Step 1: In the main page of Qiling Disk Master Standard, click Backup and System Backup.
When it comes to backing up your data, Qiling Disk Master offers more than just the standard disk backup option. In fact, there are four backup types available in the software, catering to different needs and preferences.
Step 2: Select the destination path to store system image and all the boot-related partitions are selected automatically.
Step 3. Confirm the backup task and click Proceed to create a system image in Windows 10.
When you create a system backup task in Qiling Disk Master, it's essential to understand what's included in the backup. This task only includes the contents currently on the system partition, which means that any changes or new files, installed programs, added after the backup was created will not be included in the system backup.
To ensure that your system backup is always up-to-date, we recommend setting a schedule for this task. This way, you can automate the process and ensure that your files and folders are backed up regularly.
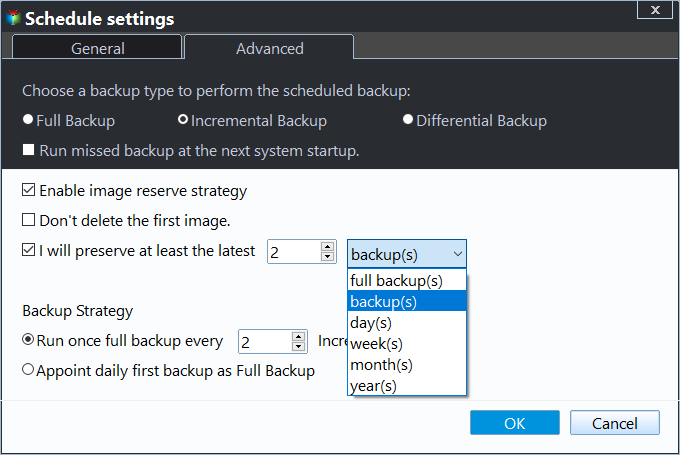
When scheduling backups, it's essential to consider the potential for disk space to become full. By default, this software creates one full backup and six incremental backups, which can lead to a backup disk full issue over time.
When it comes to backing up your data, two popular options are incremental and differential backups. While both types have their own advantages, they also have distinct differences.
In addition to the incremental and differential backup options, you can also take advantage of other features to further customize your backup experience.
When you take a full backup of your system partition, you'll have a complete snapshot of your system at that point in time. This means that you'll have a backup that includes everything on the system partition, from the operating system to all installed applications and data.
If your computer fails to boot, don't panic! You can restore your system to a previous state using a bootable USB or CD/DVD that you created in advance. This is a quick and easy way to get your computer up and running again.
Conclusion
If you're experiencing issues with the User Profile Service failing to logon in Windows 10, there are two methods you can try to resolve the problem.
With Qiling Disk Master, you can restore system images to a new hard drive, even if the original disk is corrupted. This feature is especially useful when you need to replace a faulty hard drive or upgrade to a newer model.
Related Articles
- Fix a Corrupted User Profile in Windows 7/8/10 (4 FREE Ways)
Knowing the causes of a corrupt user profile can help you easily and quickly fix a corrupted user profile in Windows 7/8/10. Thus, please find your cause first and then try 4 FREE ways in this article. - Effective Way to Recreate User Profile on Server 2012(R2)
Are you looking for a good way to recreate user profile on Server 2012? This article offers a method to recreate user profile and an effective preventive way to avoid this kind of issue. - 2 Ways to Recover Deleted User Profile in Windows 7
Can I recover deleted user profile in Windows 7? In this article, you will get the best way to restore a deleted user account and its profile easily, just follow the instructions to get it back. - How to Clean Install Windows 11 without TPM and Secure Boot Easily
You'll learn the solution to easily clean install Windows 11 without TPM and Secure Boot. And how to protect your Windows 11. Please read for more details.
