Disable Windows 10 Backup Notification and Protect Your Files
User case
I'm frustrated with the new notification center, which keeps reminding me to take a backup. However, I've already set up alternative software to handle my backups, so I don't need the reminder.
You can disable the notification by going to Settings > System > Notifications & actions, then toggle off the specific notification you want to turn off. This should not require editing the registry. The Settings app is a more modern and user-friendly interface compared to the old Control Panel.
You're considering the Enterprise Edition as an alternative to the changes in the Standard Edition, which you feel are not suitable for corporate customers. You're looking for a more modern and forward-thinking solution that will meet the needs of your business clients. Is that correct?
Many users are annoyed by Windows 10's backup notification, which insists on creating a file backup, despite already using other backup software. This redundancy can be frustrating, especially if you're already taking care of your file protection needs with alternative tools.
The Windows 10 operating system will prompt you to back up your files after seven days if you don't do so or when you connect an external hard drive, constantly displaying the message until you turn it off completely.
How to Disable Windows 10 Backup Notification
Here are the 3 helpful ways to disable Windows 10 backup notification:
Way 1: Disable Windows 10 backup notification via Security and Maintenance
To disable Windows 10 backup notification, you can open the Security and Maintenance section, where you'll find two options to choose from.
#1: Through Control Panel. To access the Security and Maintenance window, type "control panel" in the search box and select it. From the All Control Panel Items window, select Security and Maintenance.
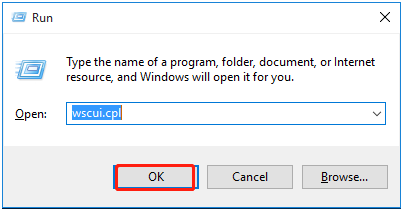
#2: Use the shortcut keys. To open the Security and Maintenance window, press the Windows key + R to open the Run dialog, type "wscui.cpl" in the Run window, and then click OK. This will launch the Security and Maintenance window, allowing you to access various system maintenance and security features.
To disable Windows 10 backup notification, open the Security and Maintenance window, click on "Review your computer's status and resolve any current issues" and then click on "Configure" next to "Backup". In the Backup settings window, uncheck the box next to "Turn on backup" and click "OK" to save the changes. This will disable the Windows 10 backup notification.
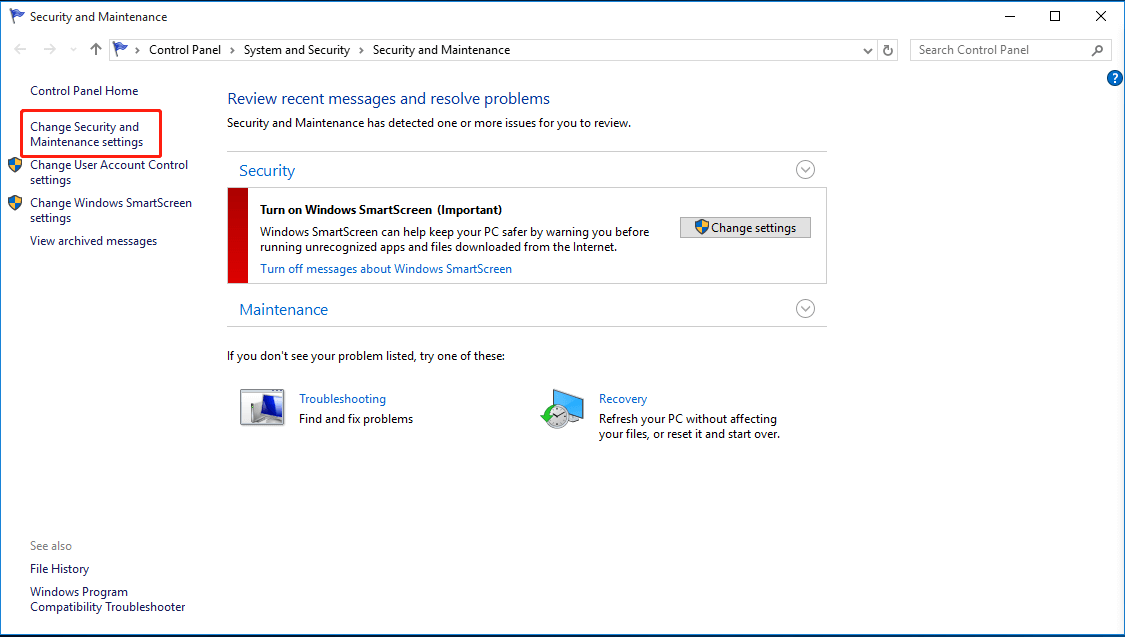
1. Select Change Security and Maintenance settings.
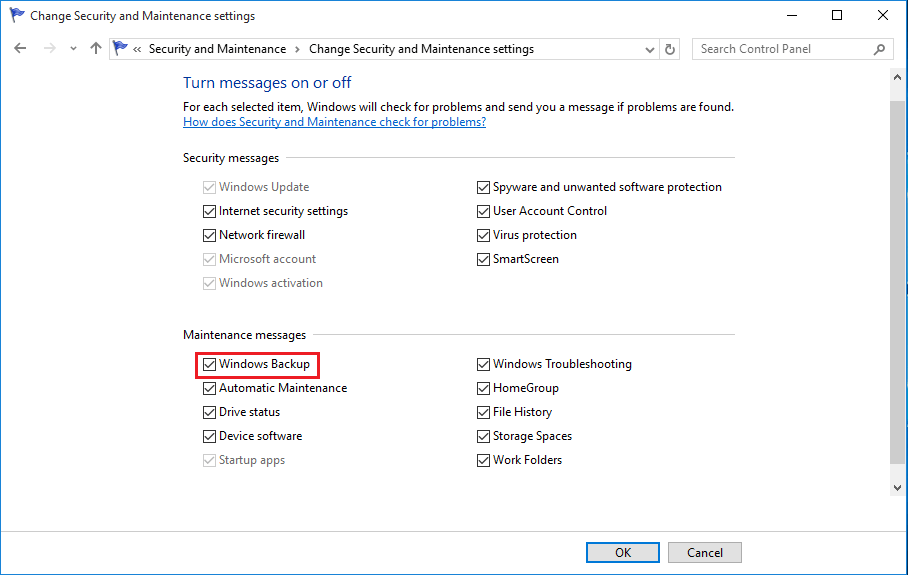
3. To stop Windows 10 backup notifications, go to Maintenance messages, uncheck Windows Backup, and click OK to confirm.
★ Tip: You can check Windows Backup to enable Windows 10 backup notification if you want to use built-in tools for backup.
Way 2: Turn off the backup notification in the Action Center GPO
This method works on turning off the backup notification in Windows Pro and Enterprise. To do this, you need to open the group policy editor.
#1: Through shortcut keys. Press the Windows key + R to open the Run window, type gpedit.msc and click OK to open the Local Group Policy Editor.
#2: Use command prompt. To access the Local Group Policy Editor on Windows, go to the search box, type "cmd" and select "Run as administrator". Then, in the command prompt window, type "gpedit" or "gpedit.msc" and hit Enter. This will open the Local Group Policy Editor, allowing you to make changes to local policies on your Windows system.
1. Open the Group Policy Editor (gpedit.
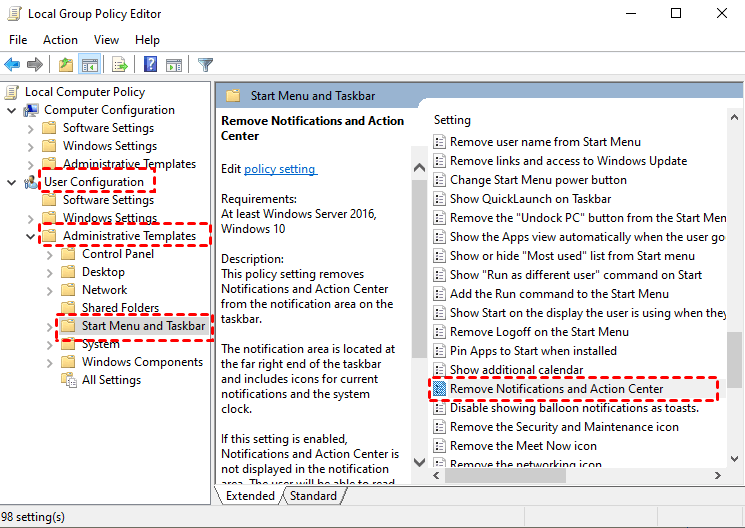
1. Navigate to User Configuration > Administrative Templates > Start Menu and Taskbar.
2. To disable notifications and action center, double-click the "Remove Notifications and Action Center" option in the Settings box.
3. In the Remove Notifications and Action Center window, check Enabled and click OK > Apply.
4. Restart Windows 10 for the changes to take effect.
★ Tip: To re-enable Windows 10 backup notification, you can change the notification and action center settings to Not configured or Disabled. This will allow you to receive notifications again.
Way 3: Stop backup notification in Windows 10 using Registry Editor
To stop backup notification in Windows 10, you can use the Registry Editor. To access it, you can open the Run dialog box by pressing the Windows key + R, typing "regedit" in the box, and clicking "OK", or you can search for "Registry Editor" in the Start menu and open it. Once open, you can follow the instructions to stop backup notifications.
#1: Through search box. The command to open the Registry Editor is to type regedit in the search box on the taskbar and then select Registry Editor from the results.
#2: Use shortcut keys. To open the Registry Editor, press the Windows key + R, type "regedit" in the Run window, and click OK. This will open the Registry Editor application.
To stop Windows 10 backup notification, access the Registry Editor by pressing the Windows key + R, typing "regedit," and pressing Enter. Navigate to the "HKEY_LOCAL_MACHINE\SOFTWARE\Policies\Microsoft\Windows\Backup" key, and create a new DWORD (32-bit) value named "NoQuickVault" and set its value to 1.
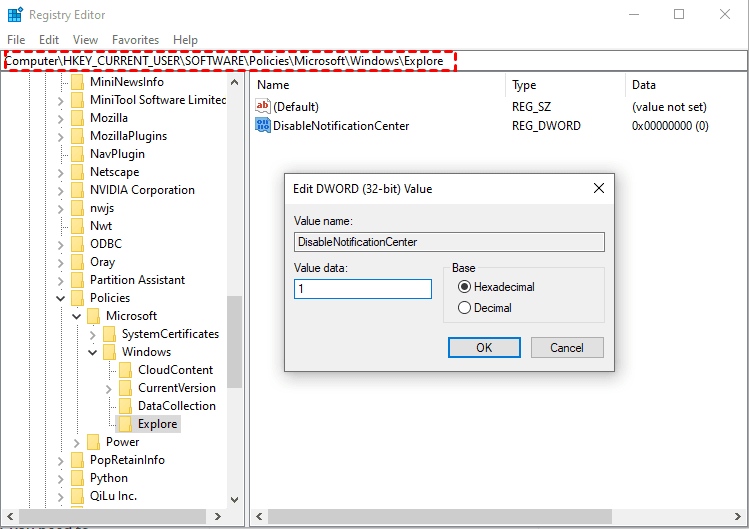
1. Navigate to the registry key, right-click on the "Windows" folder, select "New" > "Key", and create a new key named "Explorer".
Computer\HKEY_CURRENT_USER\SOFTWARE\Policies\Microsoft\Windows
2. To create a new value on the right side of the Explorer folder, right-click on it and select "New" followed by "DWORD (32-bit) Value", then name it "DisableNotificationCenter".
3. Double-click the DisableNotificationCenter value and change its value data to 1.
4. Close the Registry Editor and restart Windows 10 for the changes to take effect.
★ Tip: To enable Windows 10 backup notification, you can set the DisableNotificationCenter value data to 0.
How to Protect Your Files in Windows 10 Safely with Notification
If you're not a fan of built-in backup tools, there's still hope. Third-party backup software like Qiling Disk Master Standard offers an alternative. This software is not only simple and effective but also feature-rich, making it a great option for those looking for a reliable backup solution.
- Back up files automatically with less space. This backup system allows you to schedule backups daily, weekly, or monthly, keeping track of all changes made in a scheduled task. It also uses �ncremental backup, which only backs up changed files, reducing the backup image size and disk space used, especially over time.incremental backup, which only backs up changed files, reducing the backup image size and disk space used, especially over time.
- The backup process also employs normal compression and automatic splitting to minimize the backup image and disk space usage, in addition to incremental backups.
- Get backup success or failure notification timeThe Windows 10 Backup tool allows you to receive notifications about the success or failure of backups via email if you enable email notifications.
- Multiple file restore methods. It can restore files from all types of backups, including file, system, disk, and partition backups, even when Windows isn't booting properly.
The app has an intuitive interface that makes it easy for users to understand and use, with all operations based on a user-friendly design. You can download it to try it out.
The free version of the software is only compatible with Windows 11/10/8/7/XP/Vista, and for server users, a separate version called Qiling Disk Master Server is recommended.
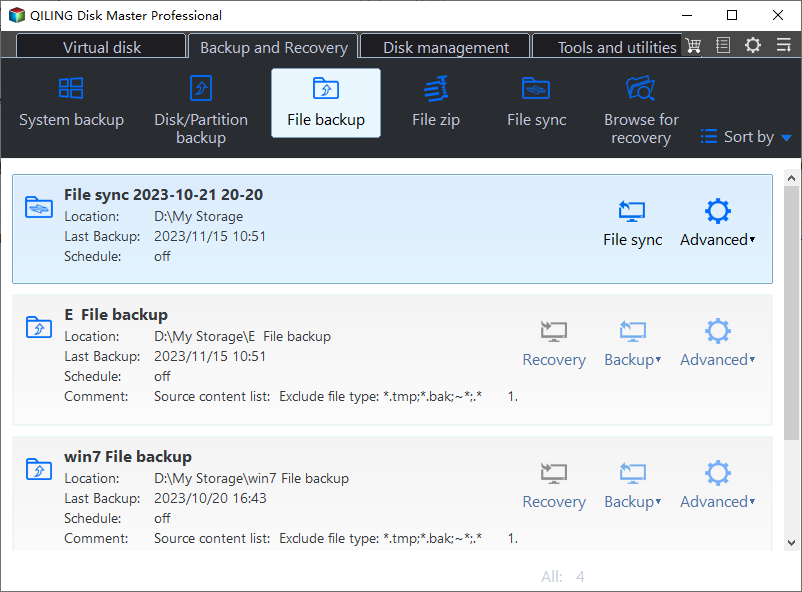
1. Launch this software, choose "Backup" and "File Backup" subsequently.
2. Select files you want to protect.
3. To select a destination path, click the folder-shaped button and choose where you want to backup your files, such as an external hard drive, USB flash drive, network drive, or NAS.
4. I can help you with that. What feature do you need to set up?
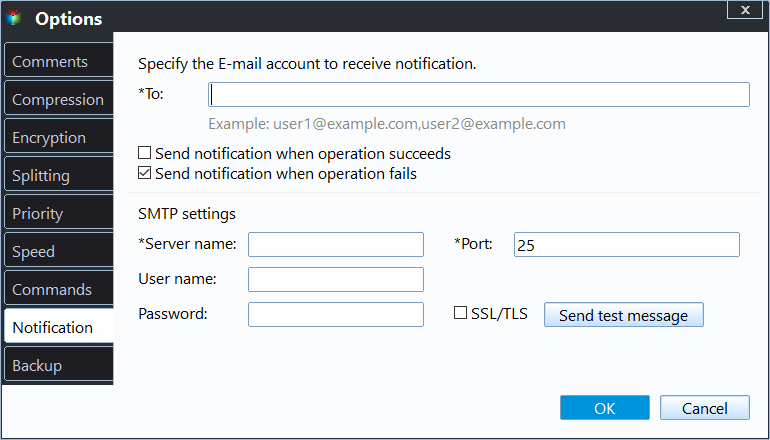
To get backup success or failure notifications, go to Options, then General, and select Email notification to turn it on in Windows 10. This setting also allows you to configure high compression, customized splitting, and other preferences.
★ Tips:
✿ To configure your mailbox and email server, click on the title bar's "Settings" and select "Notification" then "Enable email or SMS notifications". Set it up, then send a test notification in advance.
✿ For Standard edition, You could only use Gmail Server or Hotmail Server to specify your corresponding email to get the notification.
✿ For advanced editions In the paid version, you can use Qiling SMS, Qiling Server, or Custom SMTP to configure your phone number or email to receive notifications.
✿ Notification settings allow you to specify the conditions under which Qiling Disk Master will send you notifications, and also enable you to choose a preferred email format.
✿ This notification can be used in various backup and sync tasks, including system backup, disk backup, partition backup, and �eal-time sync, among others.real-time sync, among others.
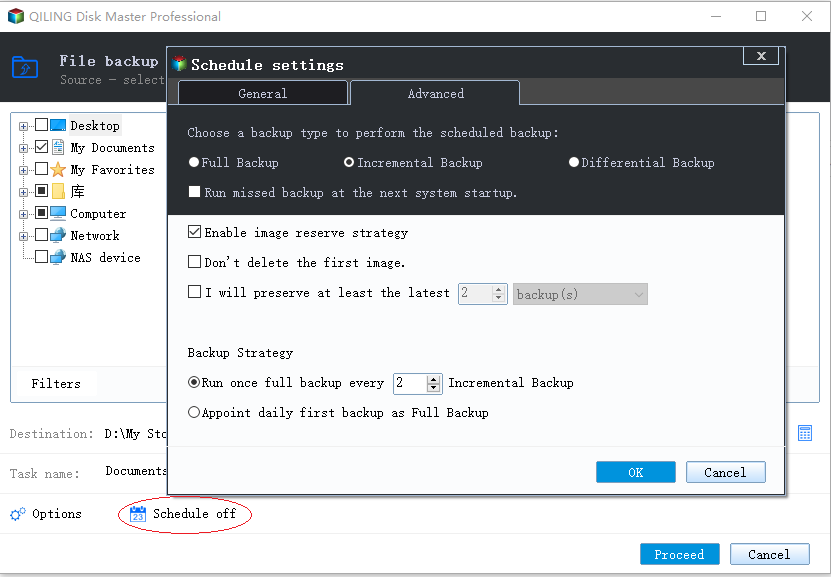
To automatically backup files, click on "Schedule Backup" and then "Enable Schedule Backup", selecting the desired frequency, which can be daily, weekly, or monthly, or set to trigger on specific events or when a USB device is plugged in, options available on the �rofessional version.professional version.
Upgrading now allows you to enjoy more advanced features, including differential backup and automatic backup cleanup, which can be customized by quality, time, daily, weekly, or monthly. This is particularly helpful in resolving backup disk full issues caused by accumulated backups and limited space.
5. After clicking "Proceed", the backup process will automatically start, and you will receive an email or SMS notification within a few minutes, indicating the outcome of the backup task, whether it was successful, failed, or encountered other issues.
Conclusion
This article helps you disable Windows 10 backup notification, but it's also a reminder that having a file backup is crucial to prevent data loss in case of a disaster. To avoid receiving this notification, you can use one of the methods mentioned, but a more effective solution is to use a simple and reliable backup software like Qiling Disk Master Standard to protect your files safely.
This backup software allows automatic file backup, reduces disk space usage, and sends email notifications with backup status updates, ensuring you have a readily available copy of your files and can easily restore to the latest version in case of an issue.
Related Articles
- How to Transfer Programs to External Hard Drive in Windows 10?
In this page, I am going to show you how to transfer programs to external hard drive without reinstalling on Windows 11/10/8/7, and offer a step-by-step guide. - Best Free QNAP NAS Backup Software (Step-by-Step Guide)
Hunting for free backup software for QNAP NAS to backup data to external drive or local PC drive in Windows 7, 8, 10, 11? Here you got best QNAP backup solution Qiling Disk Master. - How to do QNAP NAS to NAS Incremental Backup? - Qiling Disk Master
There are several ways to do QNAP NAS to NAS incremental backup, most of which are complicated in operation. So I'd like to introduce you a free and easy solution. - Real-Time File Replication for Windows
In this article, you will find the easiest way to perform real-time file replication in Windows 11, 10, 8, 7 with the real-time file synchronization software. let's find out.

