Two Methods to Create WinPE Bootable Disk in Windows 10 Effectively
What is WinPE Bootable disk?
A WinPE Bootable Disk is a compact version of Windows used for tasks like deploying PCs, troubleshooting operating systems, and more, designed for offline use.
A WinPE Bootable Disk can be loaded from various media such as USB flash drives or hard disks. It's used by major corporations and OEMs like Dell, HP, Asus, Acer, Lenovo, and others to preinstall operating systems on PCs during manufacturing, ensuring computers come with Windows already installed.
• Facilitates the installation of the Windows operating system.
• Enables the configuration of hard drives before installing Windows 11/10/8/7.
• Allows the creation and application of Windows images.
Runs recovery tools like Windows Recovery Environment (Windows RE) to restore system files.
• Assists in troubleshooting system boot failures.
• 1. Disk partitions that are not formatted with a file system supported by Windows, such as ext2, ext3, or HFS.formatting the C drive.
• Provides a platform for running third-party disk cloning software.
How to create WinPE bootable disk Windows 10?
To create a WinPE bootable disk for Windows 10, you can use either the Windows ADK tool or a professional tool. The Windows ADK tool allows you to create a WinPE boot disk, while a professional tool can also be used for this purpose.
Method 1. Create a WinPE bootable drive for Windows 10 manually
This method is suitable for professional users, but the steps are complicated.
Step1. To download the Windows ADK for Windows 10, you can download the Windows ADK, which contains the CopyPE and MakeWinPEMedia command-line utilities. This will allow you to create a Windows PE environment.
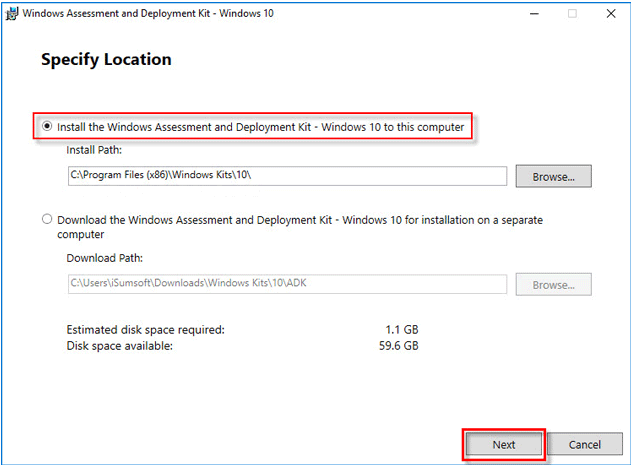
Step 2. Launch the ADK tool, select "Install the Windows Assessment and Deployment Kit-Windows 10 to this computer" and click "Next".
Step 3. On the subsequent page, click "Next" and then "Accept".
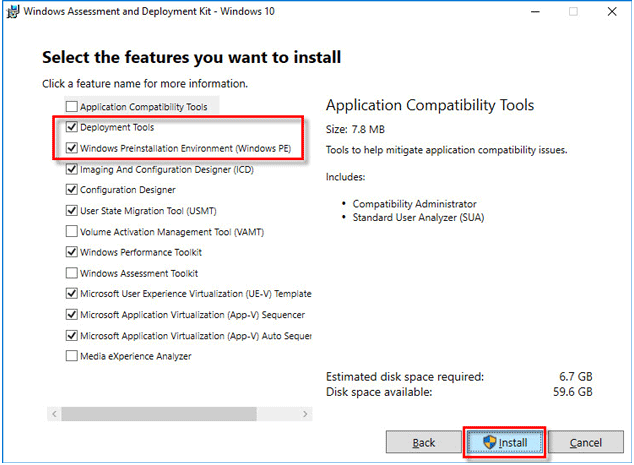
Step 4. To install Windows 10, select the "Deployment Tools" and "Windows Preinstallation Environment (Windows PE)" options and click "Install".
Step 5. When the installation process is finished, click "Close".
Step 6. To open the Deployment and Imaging Tools Environment as an administrator, go to the Start menu, navigate to "Windows Kits", right-click on "Deployment and Imaging Tools Environment", and select "Run as administrator".
Step 7. When the command is run, execute the command: copype amd64 G:\WinPE_x64 (replace G:\ with your drive letter).
Tip: 1. Create a directory named "WinPE" on your local drive.
Step 8. Execute the MakeWinPEMedia command to create a WinPE ISO file, specifying the output directory and ISO file name, such as MakeWinPEMedia /ISO G:\WinPEx64 G:\WinPEx64\WPE64.iso, which creates a WinPE ISO file named WPE64.iso in the G:\WinPEx64 directory.
Step 9. Now you can navigate to the G drive where you created the WinPE files. There you will see a WinPE iso file.
You can connect the target disk to the computer, and burn ISO files to it to make it bootable, using Windows To Go, available in Windows 10 Education/Enterprise/Pro and Windows 8/8.1 Enterprise.
Step 10. Type "Windows To Go" in the search box to launch this tool.
Step 11. The software will automatically search for all inserted USB drives. Once the destination USB drive is chosen, the user can proceed by clicking "Next".
Step 12. To add a search location for the Windows installation ISO file, click on the "Add search location" button and then select the mounted ISO file from the list of available search locations.
Step 13. In the next window, set a BitLocker password to encrypt your Windows To Go workspace.
You will finally get a WinPE bootable disk for Windows 10, which is a significant achievement in the process.
▶ Common risks of manually creating WinPE bootable disk:
While creating and using a WinPE bootable disk, you may encounter some common issues.
• Booting problems: The computer's BIOS must be set to boot from the correct device, such as a USB drive or DVD, and the WinPE bootable disk creation process should be double-checked for any errors.
• Driver compatibility issues: If hardware components aren't recognized or working properly in WinPE, you might need to add the relevant drivers during the customization process to resolve the issue.
• Network connectivity problems: To ensure network connectivity within WinPE, it's crucial to include and correctly configure the necessary network drivers. This involves checking the network settings and connectivity options within the WinPE environment to guarantee a stable and functional connection.
Method 2. Create WinPE bootable disk automatically
If you're looking to create a Windows 10 Preinstallation Environment disk, you have two options. The first method is a complex process involving 13 steps, but if you're seeking a simpler solution, you can use Qiling Disk Master Professional, which is compatible with all editions of Windows 11/10/8/7 and Windows XP/Vista.
The "Make Bootable Media Wizard" allows you to create a Windows 11/10/8/7 PE USB drive, which can be used to repair system boot issues.
Step 1. Insert a 13GB or larger USB flash drive into your Windows 10 computer and ensure it is detected by the system.
Note: Before proceeding, please back up any necessary files on the USB drive to a safe location, as this operation will completely erase all data on it.
Step 2. To create a bootable USB drive, download and execute the program, then select the option "Tools" > "Make Bootable Media" from the main interface.
Step 3. To create a WinPE bootable disk for Windows 10, select the "USB Boot Device" option and choose the prepared USB drive, then proceed to create the bootable disk.
● Burn to CD/DVD: You can create a bootable CD/DVD.
● To export an ISO file, you can create a bootable Windows 10 PE ISO file, which can then be burned to a USB drive or CD/DVD for use.
After creating the WinPE bootable disk in Windows 10, you'll have a tool to troubleshoot system failures caused by issues like file boot bcd errors or missing BOOTMGR. This disk allows you to boot into a Windows PE environment, providing a platform to diagnose and resolve problems that prevent your system from booting normally.
Rebuild MBR: rebuild Master Boot Record within 3 steps.
Check PartitionCheck the system partition for errors or bad sectors and fix them when necessary.
Further tips: How to boot from WinPE bootable disk
If your system crashes or malfunctions, you can use WindowsPE to repair it. By booting your machine to a Windows PE drive, you can follow simple procedures to fix your disk issues and get your system up and running again.
Step 1. Connect the WinPE bootable USB drive to your system.
Step 2. If your system is already running, then you need to restart it. Else, you can just turn it on.
Step 3. To start your Windows PC, turn it on and press the key that launches the boot menu, which is specific to your system.
Step 4. From here, you can select the USB drive as a source.
When you select the bootable USB drive with Windows PE, the command "Wpeinit" appears on the screen as it loads the WinPE.
Final Words
To create a WinPE bootable disk for Windows 10, you can use Qiling Disk Master, which offers an easier method. This tool also provides advanced features such as command line partitioning, quick partition, and allocating free space from one partition to another. Additionally, it can migrate OS from MBR disk to GPT or vice versa, convert MBR to GPT without losing data, and manage dynamic disks.
If you have a server computer, you can try using Qiling Disk Master Server or nlimited edition to optimize the partition structure and troubleshoot system problems.Unlimited edition to optimize the partition structure and troubleshoot system problems.
Related Articles
- Solved: How to Recover Data from Corrupted Windows OS
You will learn how to easily recover data from corrupted Windows OS? Get the reason in your case and recover files with corresponding way. Here are 5 ways intotal. - Best 2 Ways to Fix "Virtual Disk Service Error Clean Is Not Allowed"
Get the virtual disk service error clean is not allowed while using diskpart command to clean a HDD/SSD? we give you the best two ways to fix the problem. - Windows Cannot Format The System Partition On This Disk [Solved]
When receive 'Windows cannot format the system partition on this disk' error, you can refer this post to solve it. - Easily Fixed: Windows Has Detected File System Corruption on Disk C
Get “Windows has detected file system corruption on local disk (C:)” error on system restore? Find quick fixes to file system corruption on local disk C.


