How to Backup User Profile in Windows 11 Easily
- What is User Profile?
- Why need to back up Windows 11 User Profile?
- 3 quick methods to backup User Profile in Windows 11
- Method 1: Backup Windows 11 User Profile using Windows Backup Utility
- Method 2: Backup and Copy User Profile in Windows 11 via advanced system settings
- Method 3: Best free Windows 11 User Profile backup software
- Conclusion
What is User Profile?
A User Profile is a collection of settings and information associated with a user, containing personal data, system needs, Desktop, Downloads, Documents, system restrictions, app data, and applications.
The system creates a User Profile when a user logs on to the computer for the first time. During subsequent logins, the system loads the user's configuration file, and other system components configure the user environment based on the file's information. The settings in the User Profile are unique to each user and cannot be accessed by others. Changes made to a user's profile do not affect other users or their profiles.
Why need to back up Windows 11 User Profile?
Some users have reported encountering a "User Profile Service failed the logon" error message in Windows 11. Specifically, they have found that their user profile is corrupted. What causes the corruption of the user profile in Windows 11?
● Cause 1. Failed Windows updates or automatic updates to Windows, which involve an upgrade of critical system files (especially service pack installations), that update the user profile may result in this error.
● Cause 2. A damaged hard drive file system, caused by write errors, power outages, or virus attacks, may result in this error.
The User Profile holds all your essential files and settings. To prevent data loss and the occurrence of the above situation, it's crucial to back up your User Profile regularly.
When you get a new computer or reinstall Windows on a fresh drive, customizing your Windows 11 setup can be a time-consuming process. However, if you've backed up your User Profile, you can restore it to save time and effort, giving you a head start on setting up your new system exactly as you like it.
3 quick methods to backup User Profile in Windows 11
A User Profile is a crucial component for many Windows users. To ensure its safety, it's essential to learn how to back it up in Windows 11. For detailed instructions on how to do this, please refer to the guide provided below.
Method 1: Backup Windows 11 User Profile using Windows Backup Utility
Backup User Profile in Windows 11 via Backup and Restore (Windows 7)
To back up your Windows 11 User Profile, you can utilize the **Backup and Restore (Windows 7)** feature. It's a good idea to save the backup to an external hard drive, network drive, or another offsite location to ensure its safety.
- Connect an external hard drive or USB to your PC to save the backup image of the User Profile.
- Click on the Search icon (magnifier) in the center of the taskbar and type Control Panel in the search box. Click on the search result.
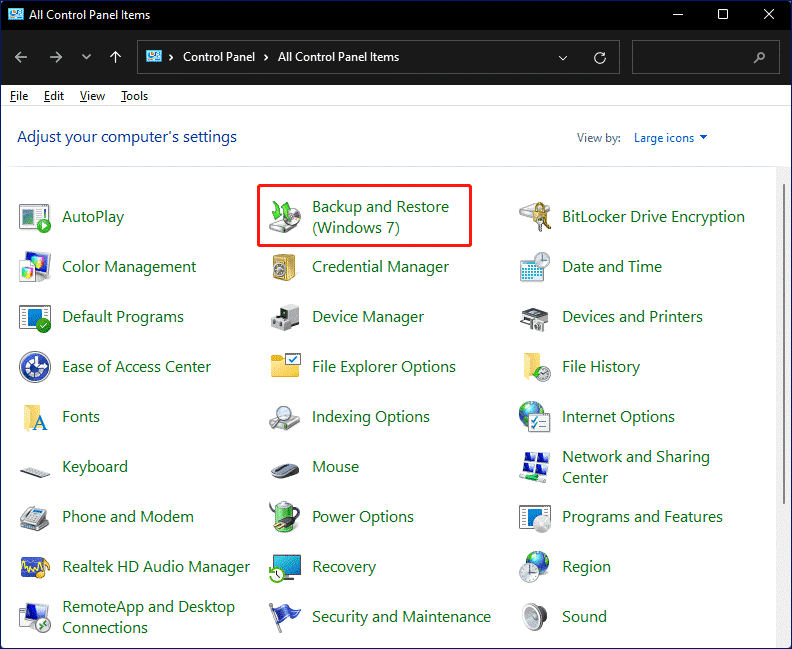
- Click on Backup and Restore (Windows 7) in Control Panel.
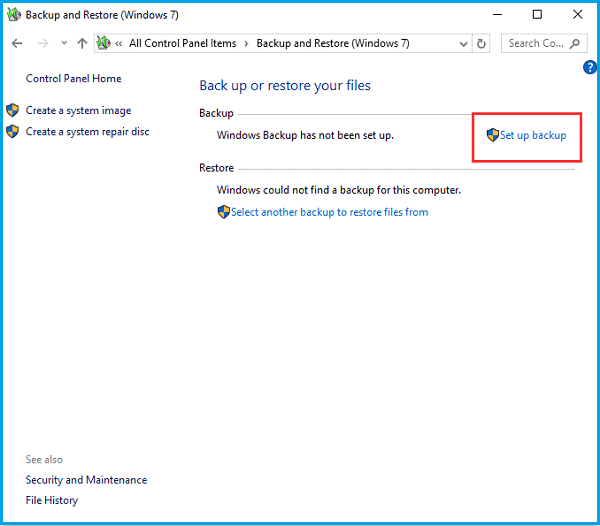
- Click Set up backup on this screen.
Note✍: If you've already set up a backup schedule, you'll see a different window. In that case, click on Change settings.
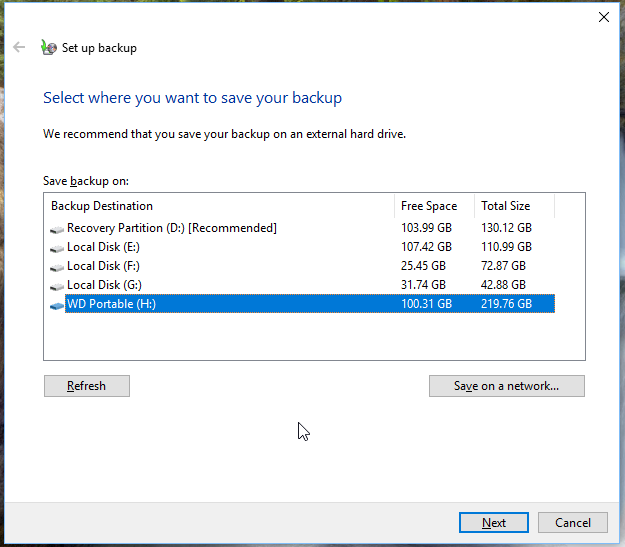
- Select the external drive as the location to save the Windows 11 User Profile backup and click Next to continue.
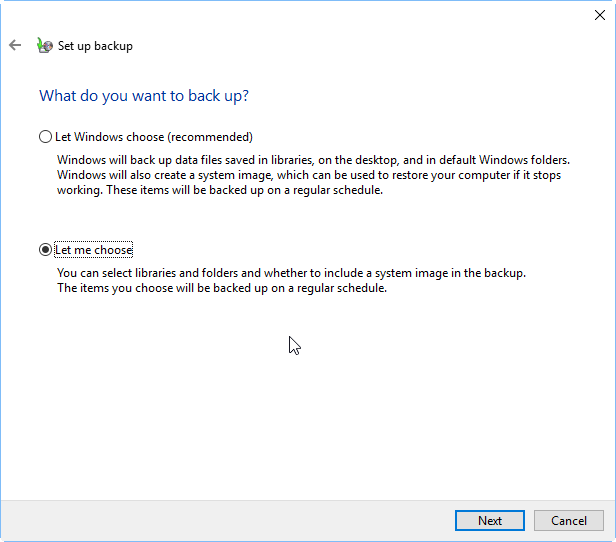
- On the next screen, select Let me choose and click Next.
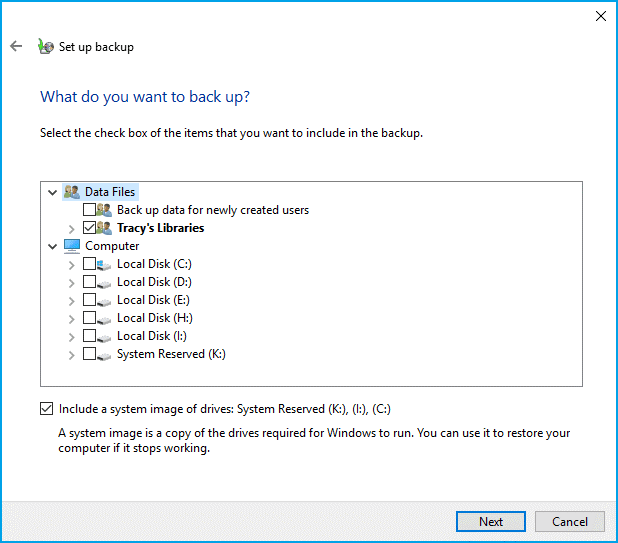
- Select a specific user library or all created User Profiles you want to back up. If you only want to back up the User Profile, please uncheck the "Include a system image" option and click Next.
- On the next screen, it will provide you with a summary of this backup operation. You can customize the backup frequency by clicking Change schedule. If there is no problem, click Save settings and run backup.
Restore User Profile in Windows 11
- Connect the external hard drive with your User Profile backup to Windows 11.
- Open Backup and Restore (Windows 7) in the Control Panel.
- Click Select another backup to restore files from to select the backup that contains Window 11 User Profile, and click Next.
- Click Browse for folders and select the User Profile folder. Then click Next.
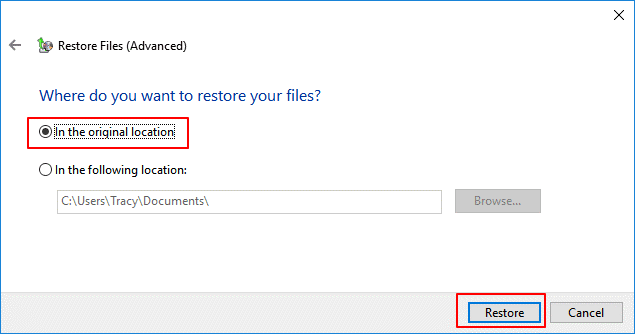
- Select In the original location and click Restore.
Method 2: Backup and Copy User Profile in Windows 11 via advanced system settings
To copy your User Profile in Windows 11, use the advanced system settings. Here are the detailed steps:
- Right-click on This PC, select Properties to enter into the Windows settings menu.
- Click System -> Advanced system settings.
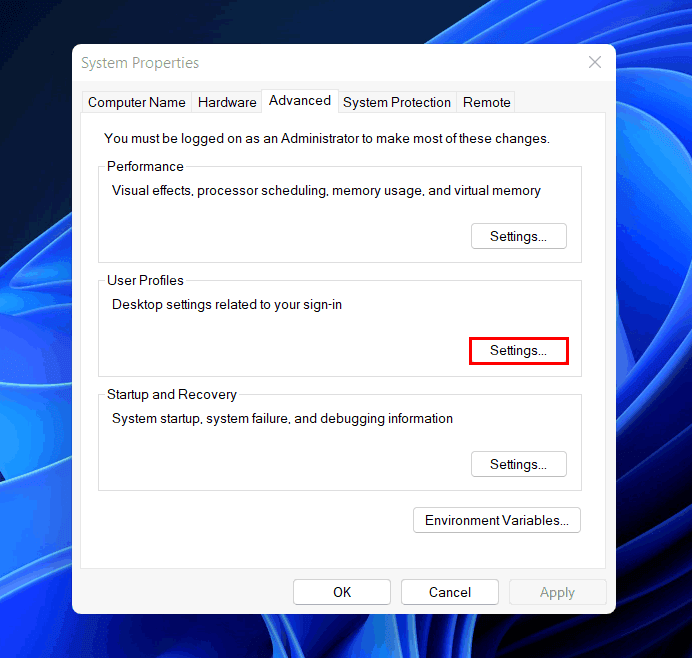
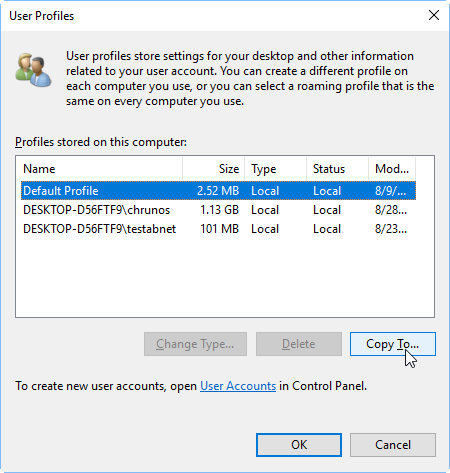
- Click Settings in the User Profiles section.
- Select the Default Profile and click Copy To.
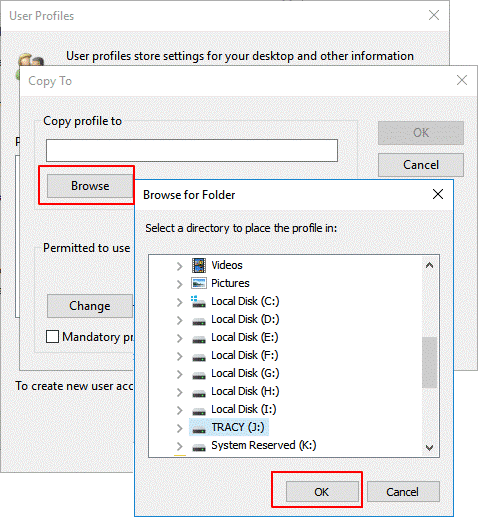
- Click Browse to save the Windows 11 User Profile to the external hard drive you connected and click OK.
Method 3: Best free Windows 11 User Profile backup software
The third method is more straightforward than the first two. You can use a reliable backup software, specifically Qiling Disk Master, to backup your User Profile in Windows 11. This software is equipped with various features to safeguard your computer. With it, you can:
✸ Back up various files/folders and any system to different storages, including internal/external hard drives, cloud drives, network location and NAS devices. For instance, you can set auto backup to USB drive.
✸ Perform incremental or differential backups which take less time than a full backup and keep your data up to date. Differential backup is available after upgrading to higher versions.
✸ Transfer your data and system to another drive easily. You can move Windows 11 to a new hard drive with this free software. Just a few clicks!
Learn how to backup User Profile in Windows 11 via Qiling Disk Master from the following tutorial.
Step 1. Download this freeware and install it on your computer.
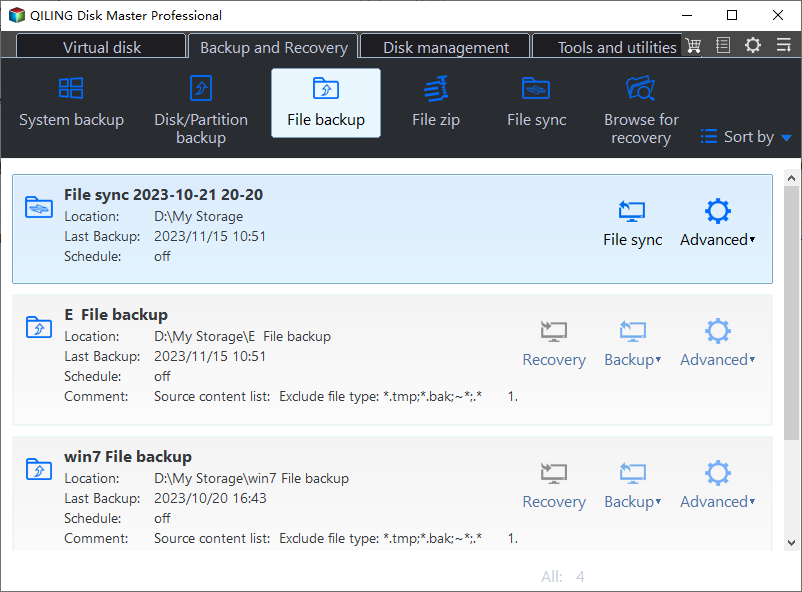
Step 2. Launch Qiling Disk Master, click Backup and select File Backup.
Step 3. To add the Windows 11 User Profile folders to the backup, click the Add Folder button. This will allow you to select multiple User Profile folders to back up simultaneously.
Step 4. To choose where to save the User Profile, click the box below the arrow. This will allow you to select a location for the backup.
Step 5. If you want the backup process to run automatically, you can configure the frequency or interval using the **Schedule** option. To do this, click on **Schedule** in the left corner of the interface. This will allow you to set up the automatic backup process.
Tip:
✭ Scheme: If you're looking to save storage space, you can take advantage of the auto-delete feature for old backups. This option is available in the Pro edition and allows you to automatically delete older backups, freeing up space on your device.
Step 6. Click Proceed to run the operation.
Conclusion
That's all for our guide on how to backup your User Profile in Windows 11. You now have three methods to choose from, each with its own advantages. If you're looking for a simple and effective solution, I highly recommend trying the third method, which utilizes a powerful software. This software can protect your data from various angles, making it a great choice for backing up specific folders in Windows 11. Try it out now and enjoy the peace of mind that comes with knowing your data is safe!
Related Articles
- Top Two Ways to Recover Deleted User Profile in Windows 10
- Effective Way to Recreate User Profile on Server 2012 (R2)
- Top 3 Ways to Backup Windows 10/11 to Network Drive/NAS
- This Topics You May Like
Qiling Disk Master doesnt recognize the drives or doesnt recognize correctly
