What Is BSOD? How To Fix Blue Screen of Death on Windows 11
- User case of blue screen of death
- What is blue screen on Windows 11?
- What is causing the blue screen of death on Windows 11?
- How to fix the blue screen of death on Windows 11
- Quick Fix: Restart Your Computer
- Fix 1. Remove Any Additional Hardware
- Fix 2. Run Memory Diagnostics Tool
- Fix 3. Scan PC for virus or malware
- Fix 4. Update System Drivers
- Fix 5. Run SFC scan
- Fix 6. Rebuild Master Boot Record
- Fix 7. Perform system restore
- The best solution to prevent all system errors
- FAQ on Blue Screen of Death (BSOD) in Windows 11
- To sum up
User case of blue screen of death
How to fix the blue screen of death on Windows 11?
Hi! I just bought my laptop a few weeks ago, an Asus TUF 15, and it worked very well! It started lagging during the Zoom call, I restarted it and a blue screen showed up. I literally tried every single option available and looked on the internet for a solution, but nothing. Someone, please help :)
- Question from Microsoft Community
If you are troubled by this problem like the above-mentioned users, please read this article to overcome your dilemma.
What is blue screen on Windows 11?
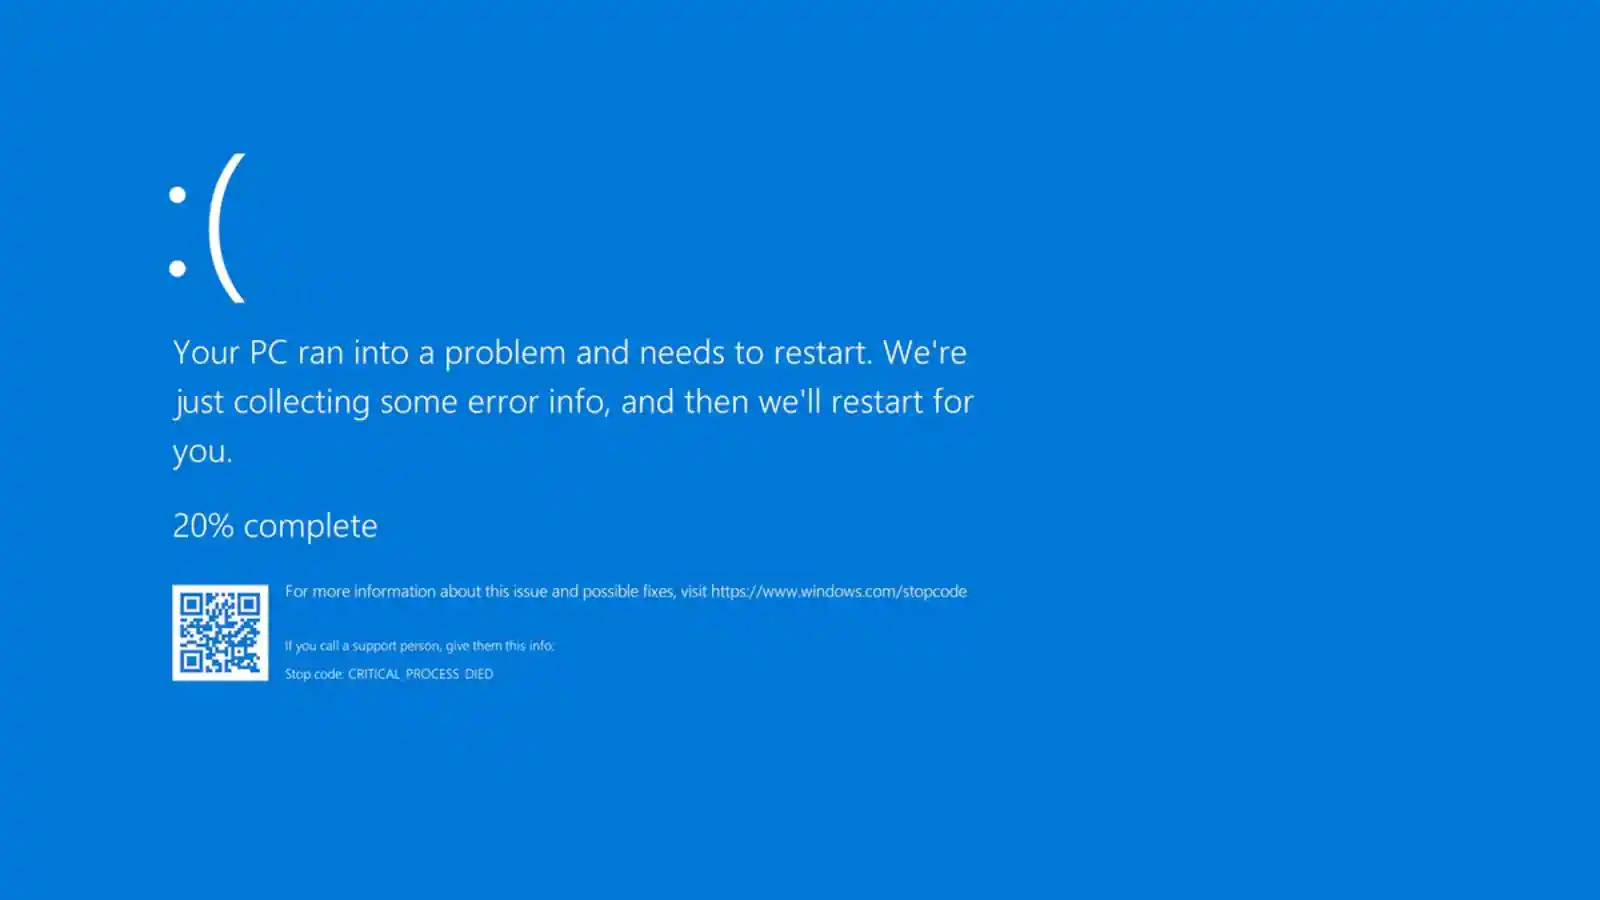
Blue screen, also known as Blue Screen of Death (aka BSOD). This is a screen image displayed by Microsoft's Windows operating system, which aims to protect the computer system files when an unresolvable system error is encountered. The Blue Screen of Death alert has become an iconic screen. Mostly, it is a system crash phenomenon. Typically, you can locate specific error codes and descriptions on the screen, which you can scan or search for support.
After Microsoft launched Windows 11, it changed its famous blue screen of death (BSOD) to a black screen of death. This issue is essentially the same, often due to running an older version of Windows 11. However, after Microsoft launched the new version of Windows 11 Build 22000.346 system, the Black Screen of Death was changed back to the blue screen.
If you are also plagued by the same problem, read below to learn more about the blue screen of death on Windows 11 and find out what method works best for you.
What is causing the blue screen of death on Windows 11?
Before we jump into how to fix the blue screen issue on Windows 11, it is essential to understand what causes it. Typically, you can locate specific error codes and descriptions on the screen, which you can scan or search for support. When your computer faces a critical issue, it may restart abruptly to avoid further damage. Listed below are some possible causes of Windows 11 stop code.
☪ Application incompatibility issues
☪ Memory stick incompatibility/corruption or poor contact
☪ Hardware failure
☪ MBR (Master Boot Record) or system file error
☪ Driver issues
☪ Virus or malware attack
☪ BCD errors
In the next section, we have listed the following possible solutions for you, and you can choose one of them to fix the Windows 11 Black Screen of Death error.
How to fix the blue screen of death on Windows 11
Quick Fix: Restart Your Computer
When you encounter the Windows 11 blue screen of death, the first instinct is often to restart your computer. Restarting triggers the automatic troubleshooting and repair process in Windows 11. Many times, this simple restart can resolve the issue, bringing your computer back to normal.
Tip: Stop Automatic Reboot
If you prefer to prevent your Windows 11 computer from rebooting automatically after a blue screen error, follow these steps:
- Press Win + I to open the Settings window.
- Navigate to System > Advanced system settings.
- Click on the Settings button under the Startup and Recovery section.
- In the System failure section, uncheck Automatically restart.
- Click OK to save the changes.
Always note the error code displayed during a blue screen event, then reboot your computer to allow Windows to attempt automatic repairs.
However, if the issue persists after a restart, you might need to try additional solutions.
👉 Fix 1. Remove Any Additional Hardware
👉 Fix 2. Run Memory Diagnostics Tool
👉 Fix 3. Scan PC for virus or malware
👉 Fix 4. Update System Drivers
👉 Fix 5. Run SFC scan
👉 Fix 6. Rebuild Master Boot Record
👉 Fix 7. Perform system restore
🌟Latest News:
Microsoft has identified an issue impacting Windows endpoints that are running the CrowdStrike Falcon agent. These endpoints might encounter error messages 0x50 or 0x7E on a blue screen and experience a continual restarting state. To get this error fixed, you can do one of the following things:
● Enter safe mode as mentioned below. Then, search for any files that match "C-00000291*.sys" and delete them.
● Perform system restore to get your computer back to a normal state.
Fix 1. Remove Any Additional Hardware
Sometimes, the external hardware of your PC can cause the BSOD issue. Your computer may not work properly with other hardware installed on it. If you experience a computer crash, you may need to disconnect peripheral devices. For example, external hard drives, Bluetooth mice, keyboards, USB devices, etc.
🔔 Important: If you choose one of the six methods below, please start your computer in safe mode first to prevent any problems that may occur when fixing the black screen of death error.
Boot Windows 11 in safe mode:
1. Turn your system completely off, then turn it on. Once your system starts booting, force it to shut down again. Repeat twice more to enter WinRE.
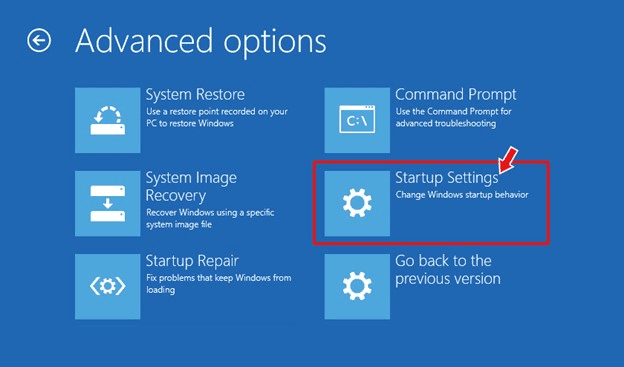
2. Click Advanced options > Troubleshoot > Advanced options > Startup Settings.
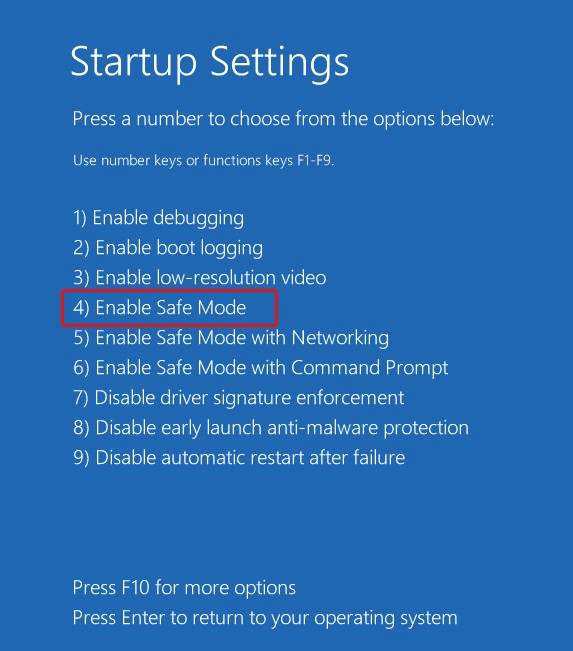
3. Then, click Restart, and once the system is rebooted, press F4 to enable safe mode.
Fix 2. Run Memory Diagnostics Tool
The Memory Diagnostic Tool is a very handy tool that can be used to correct any software or hardware-related problem. It can test your memory function and see if the BSOD is occurring due to a memory, motherboard, or any hardware failure.
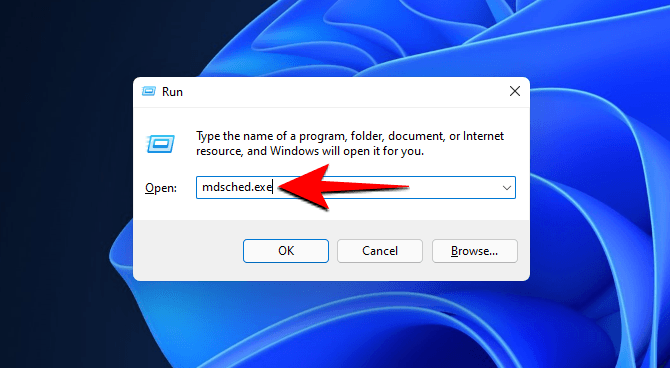
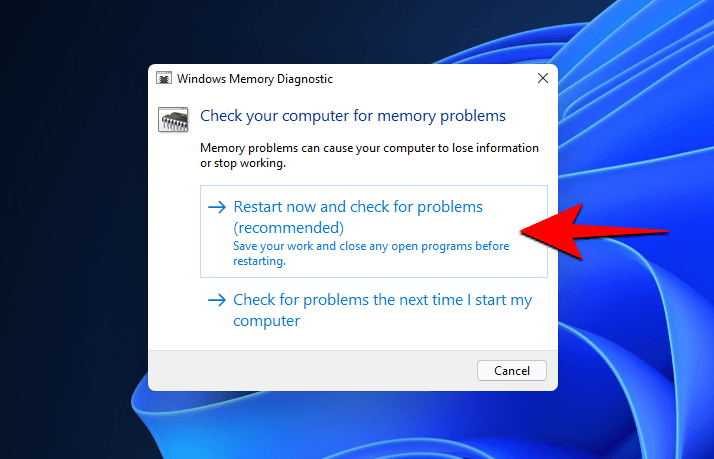
1. While your PC is in safe mode, Press Win+R to open the RUN dialog box, type mdsched.exe, and press Enter.
2. Click on Restart now and check for problems to test for RAM errors.
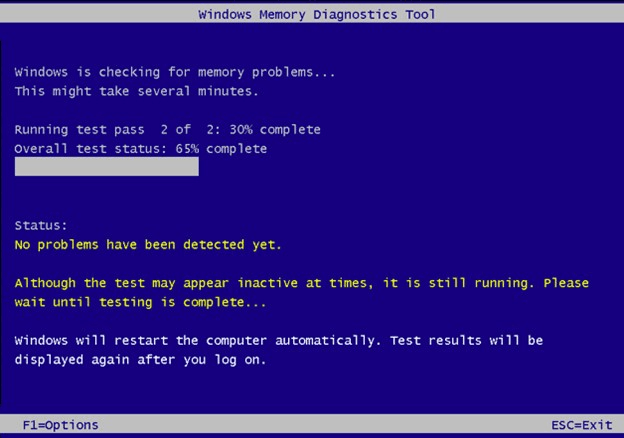
3. Your system will reboot, and upon reboot, a diagnostic test will initiate. It will show you if there are any errors in your memory.
4. Once the test is completed, restart your PC again and check if the problem is fixed. If it shows some big issues in the RAM, then it is better to replace it.
Fix 3. Scan PC for virus or malware
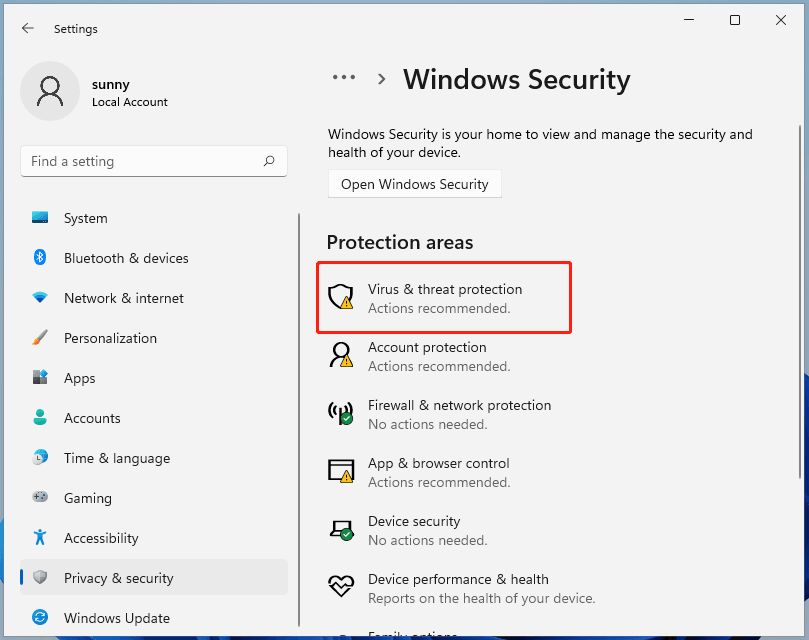
1. Open the start menu, Type Windows Security into the search field, and hit Enter.
2. Click on the Virus & Threat Protection option.
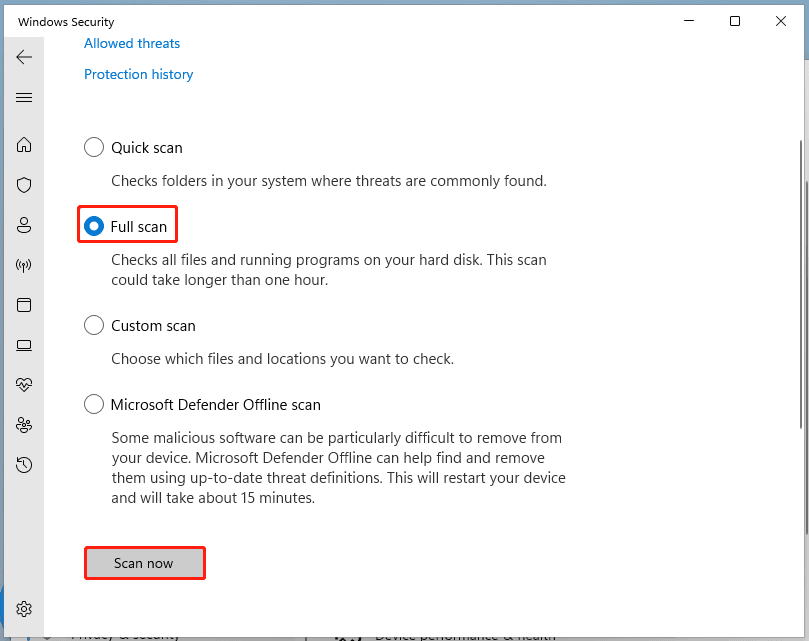
3. Choose to perform a Full scan, and click Scan Now to begin the process.
Fix 4. Update System Drivers
Your computer needs driver software to operate the hardware installed within the system. If these drivers are outdated or do not support these devices, then the system will malfunction. Therefore, you must update them regularly to ensure that defect-free drivers are installed on your computer. You can follow these steps to update your drivers.
1. Press Win+X to open a dialog box and select Device Manager.
2. If you see a yellow triangle icon for any entry, this indicates that there may be a problem with the driver. Right-click these entries and click Update Driver.
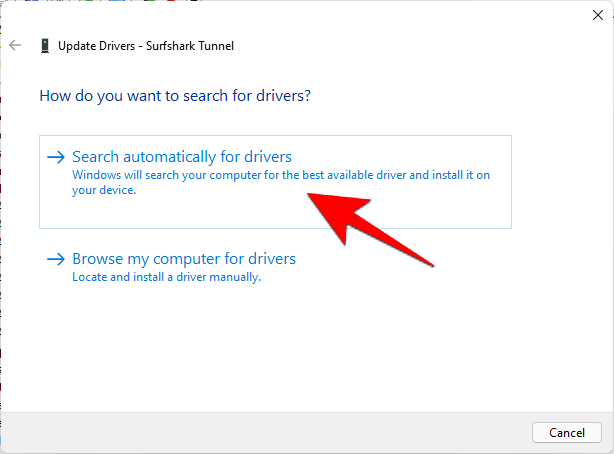
3. Click on Search automatically for drivers to let Windows install the necessary updates.
Fix 5. Run SFC scan
Using an SFC scanner is one of the best ways to fix memory problems as well as other system errors. Here is how to perform this operation.
1. Press Win+R to open the RUN box, type "cmd", and hit Enter.
2. Right-click on the Command Prompt option and click Run as Administrator. In this prompt, type SFC /Scannow and press Enter. The scan will run and fix your errors if detected.
Fix 6. Rebuild Master Boot Record
1. Insert Windows 11 installation disk or USB to your PC. Restart the PC and boot from the disk or USB. Click Repair your computer on the Install Now screen.
2. Select Troubleshoot -> Advanced options -> Command Prompt.
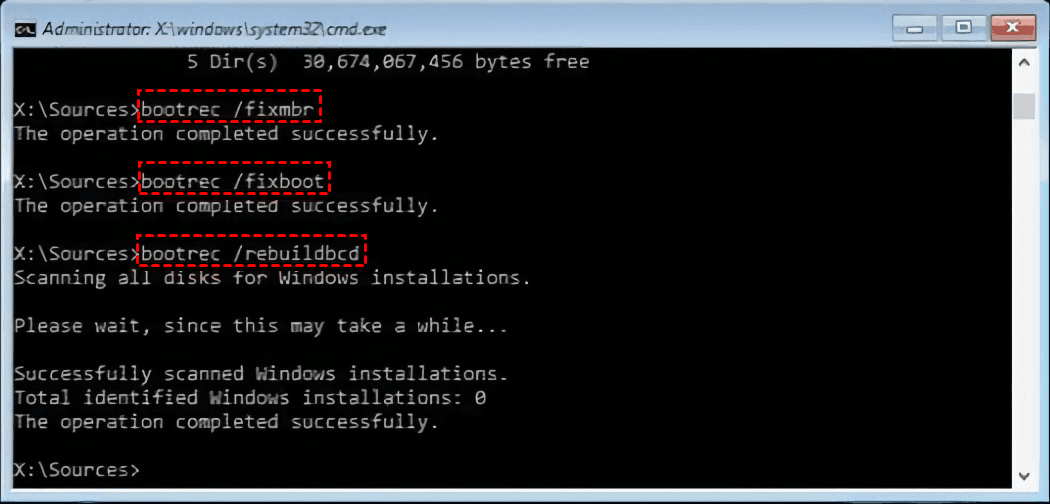
3. Enter the following three commands in turn, following each by pressing the Enter key:
- bootrec /fixmbr
- bootrec /fixboot
- bootrec /rebuildbcd
4. Restart the computer with the installation media removed to check if the repair worked.
Fix 7. Perform system restore
If the Blue Screen problem still appears even after trying all of the above solutions, then you can restore your system to the previous date. Here are the detailed steps.
1. Click on Start>Search, type System Restore, and select Create a Restore Point.
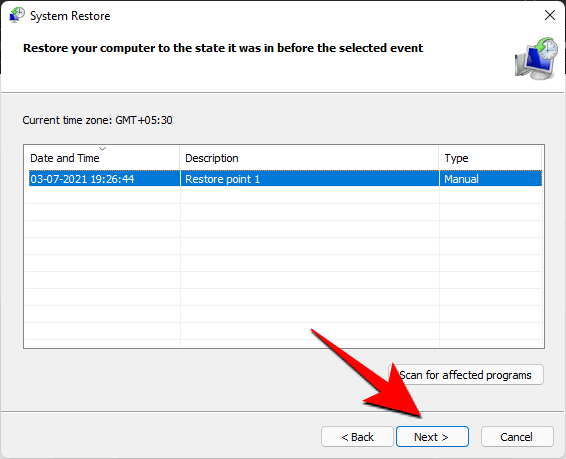
2. In the pop-up window, click on System Restore, then you can choose a date you wish to go back.
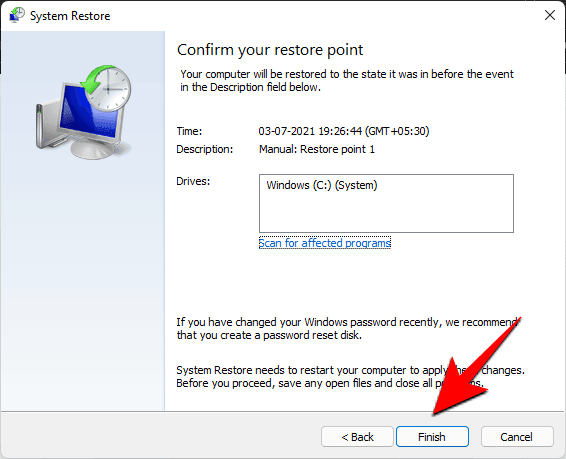
3. Click on Finish to confirm your restore point.
Verify that restoring the computer to a previous date solves the blue screen problem.
The best solution to prevent all system errors
In order not to lose any data after encountering the Windows 11 blue screen of death when using your computer now and then, it is recommended that you create a computer backup in advance. To do that, the full-featured free backup software—Qiling Disk Master Standard can help you from system failure problems. Some features of it are listed below:
◊ It enables you to backup files/system/disk/partition to different locations such as local disks, external hard drives, network share, NAS devices, cloud drives, etc.
◊ It allows you to use incremental or differential backup (differential backup is available in the paid edition) to optimize backup efficiency.
◊ Also, you are allowed to create bootable media in case of system failure or hard drive crashes.
Now download and install Qiling Disk Master on your computer to have a try.
✦ Backup Windows 11 to USB with Qiling Disk Master:
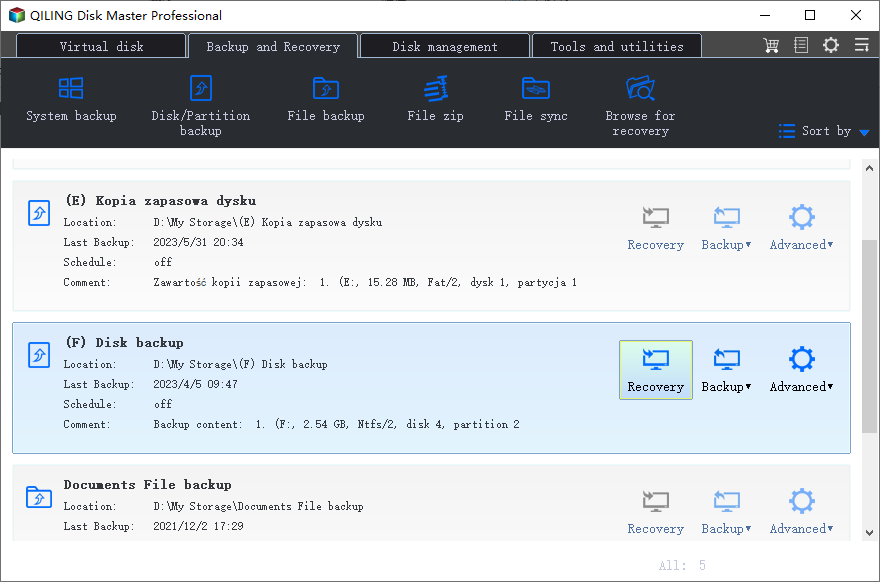
When you open this freeware, click Backup on the left side, and then select System Backup. The program automatically chooses the system-related partition(s) as the source data. You just need to select a destination path.
✦ Restore the system image backup when a system problem occurs:
Click Restore > Select Task or Select Image File. Then, follow the wizard to complete the system recovery process.
FAQ on Blue Screen of Death (BSOD) in Windows 11
1. Is the Blue Screen of Death fixable?
Yes, it is. Restarting your computer can often resolve the issue by terminating ongoing processes and resetting the system. Windows will also perform an automatic troubleshooting and repair process to address the underlying causes of the BSOD. Additionally, consider disabling the automatic restart option for better control.
2. How do I find out what caused a blue screen?
You can use Driver Verifier, a tool that helps identify problematic drivers, which are responsible for about three-quarters of BSODs. Driver Verifier runs in real-time, checking the behavior of drivers and their use of memory resources to pinpoint issues.
3. Does a blue screen damage a computer?
Typically, a BSOD does not harm your computer. However, frequent BSOD occurrences can lead to data corruption. To safeguard against this, regularly back up your important files, keep your system updated, and ensure it is free from malware.
To sum up
That's all about what is BSOD and how to fix the blue screen of death on Windows 11. Hope one of the mentioned methods can meet your needs and solve the BSOD error successfully. From my perspective, I think the easiest way to do this is to create a system backup in advance with powerful software—Qiling Disk Master so that if you face any system problems, you can use this backup to easily restore your computer to a previous healthy state.
In addition, if you are stuck with any other issues such as how to clone SSD to SSD on Windows 11, this full-featured freeware can help you a lot. Don't hesitate to explore more and try it now!
Related Articles
- Fixed: Windows 11 Black Screen After Update
Recently, some users have encountered Windows 11 black screen after update. Microsoft is changing the screen color of BSOD error from Blue to Black. You can find the cause and 7 solutions of this error in this tutorial.
