How to Deploy Window 11 Image via WinPE USB Disk
- What is WinPE bootable disk?
- How to create a Windows 11 WinPE bootable USB
- Method 1: Create a WinPE bootable USB via Media creation tool
- Method 2: Create a bootable WinPE media with the most convenient software
- Guide to Window 11 image deployment via WinPE USB disk
- Method 1: Deploy Windows 11 image via Windows 11 Media Creation Tool
- Method 2: Restore Windows 11 image via WinPE USB disk
- Conclusion
What is WinPE bootable disk?
WinPE, or Windows Preinstallation Environment, is a lightweight operating system designed to provide a minimalistic environment for installing, deploying, and repairing various Windows operating systems, including desktop editions and Windows Server.
To utilize Windows PE, you must first create a bootable disk, which can be done using a USB drive, CD/DVD/ISO, or virtual hard drive. However, Windows PE is not intended to be used as a primary operating system. Originally designed to replace MS-DOS booting, WinPE allows for a preloaded environment to be loaded from various media, such as USB drives or CD Roms, making it a convenient tool for various purposes.
How to create a Windows 11 WinPE bootable USB
The Windows Preinstallation Environment (WinPE) offers a streamlined and efficient way to install primary Windows. In this guide, we will walk you through the process of creating a bootable WinPE USB in Windows 11, making it easily accessible and ready to use in no time.
Before creating a Windows PE bootable USB, there are a few essential items you'll need to have on hand. Let's take a moment to review these requirements, ensuring you're fully prepared to proceed with the process.
Before creating a Windows PE bootable USB, it's crucial to take a few precautions. First, backup any important files on the USB drive, as the entire contents will be overwritten during the process. Additionally, ensure you have a stable internet connection, as you'll need it to download Windows. Lastly, make sure you have a USB drive with a minimum of 8GB of storage space, as this will be required to create the bootable drive using the Media Creation tool.
Method 1: Create a WinPE bootable USB via Media creation tool
- Insert a USB flash drive (8GB minimum) to your computer.
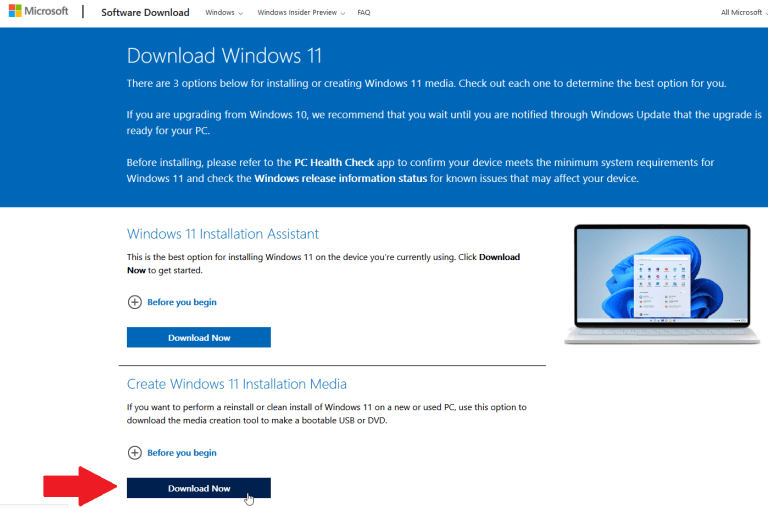
- Click on the official link from Microsoft to open the software download page. Find Create Windows 11 Installation Media and click on Download Now.
- After downloading the media creation tool for Windows 11, run it on your PC. You will be asked to accept the license terms. Once you have done this, you will see a screen that says " Getting a few things ready."
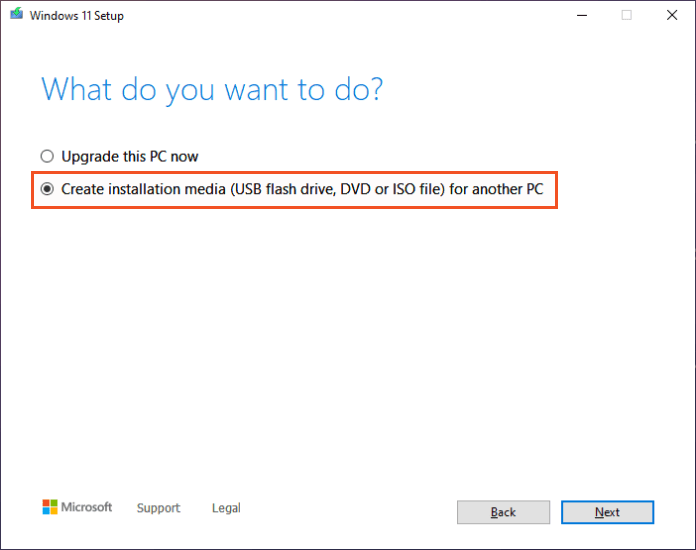
- Next, you will see two options on the screen, select “Create installation media for another PC” and click on Next.
- Then, it will automatically fill in the configuration of your PC. If you want to change these options, simply uncheck the option that says “Use the recommended options for this PC” and make the necessary changes. Then click the Next button.
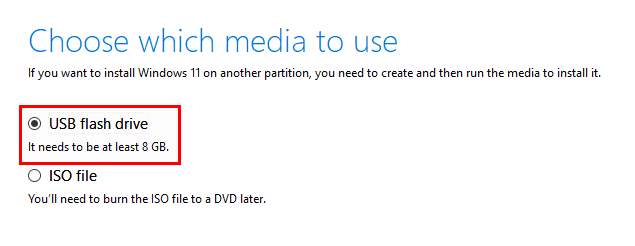
- Now select the “USB flash drive” option and click Next.
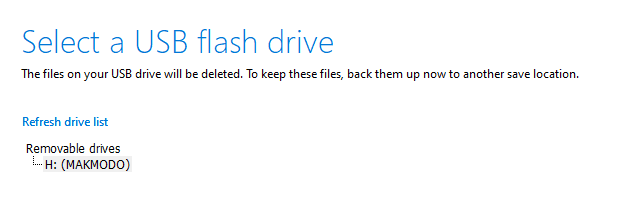
- The tool will automatically detect the USB flash drive you have previously connected. If not, click the Refresh drive list option. If everything is normal, click the Next button.
- This will begin the creation of installation media of Windows 11 operating system. Once finished you will get a Windows 11 WinPE bootable USB.
Method 2: Create a bootable WinPE media with the most convenient software
In addition to the Media Creation tool, Qiling Disk Master Professional is another reliable option for creating a Windows 11 WinPE bootable USB. This powerful software allows you to create bootable media and easily deploy Windows system images to another computer with different hardware, making it a useful tool for system administrators and IT professionals.
Qiling Disk Master is a versatile tool that enables you to create bootable media for your computer. It allows you to create two types of bootable discs: Linux boot discs and Windows PE boot discs, providing a convenient solution for system administrators and users alike.
To create a bootable WinPE media using Qiling Disk Master, follow these steps. [Note: the original text is missing, so I'll leave this blank for now.
Step 1. To get started, download the Qiling Disk Master Pro software and install it on your computer. This will provide you with the necessary tools to create a bootable WinPE media.
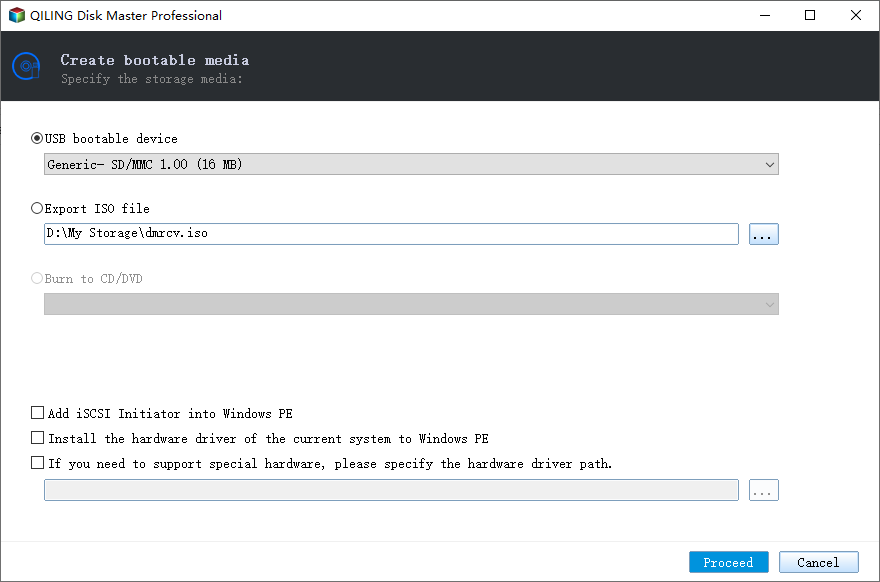
Step 2. Launch the Qiling Disk Master Pro software and navigate to the Tools tab. From there, click on the Create Bootable Media option to proceed with creating a bootable WinPE media.
Step 3. Next, you'll be prompted to choose the type of bootable media to create. Select the USB Boot Device option if you want to create a Windows 11 WinPE bootable USB drive, and then click the Next button to proceed.
Guide to Window 11 image deployment via WinPE USB disk
There are various tools available to deploy Windows 11 and applications, such as DISM commands, Windows System Image Manager (Windows SIM), and Windows Preinstallation Environment (Windows PE). Once you've created a bootable Windows PE USB drive, you can deploy the Windows 11 image using the WinPE USB disk to multiple computers. This guide provides two methods for deployment, allowing you to choose the one that suits your needs.
Method 1: Deploy Windows 11 image via Windows 11 Media Creation Tool
- Plug the bootable USB drive you previously created with Media Creation Tool into the computer which you want to deploy Windows 11. Start the PC.
- On prompt, press any key to boot from the Windows 11 bootable USB.
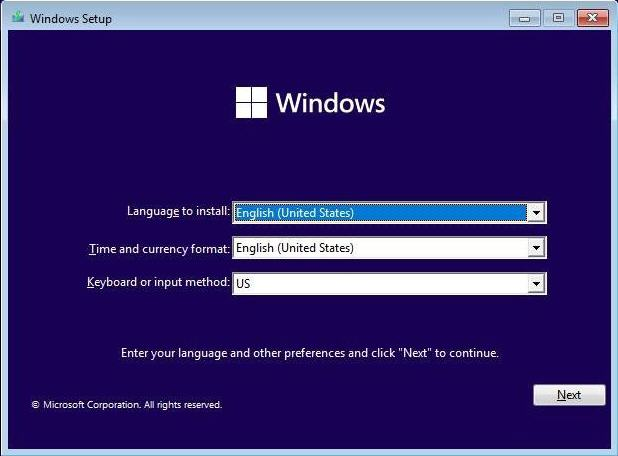
- On the "Windows Setup," click the Next button.
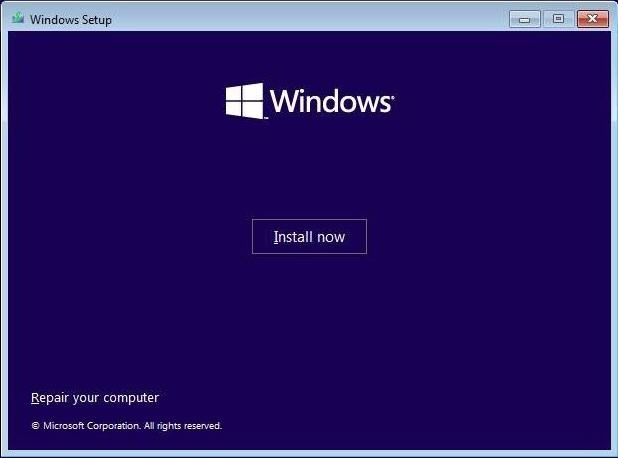
- Then click on Install now button.
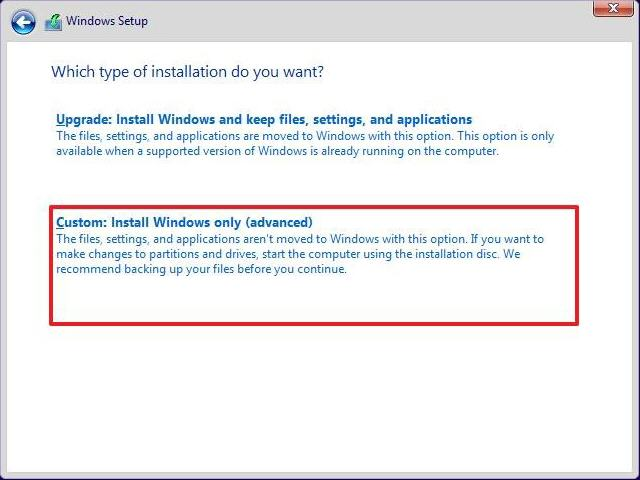
- Next, you will be asked to choose which type of installation you want. Select Custom: Install Windows only (advanced).
- Select the partition with the current installation (usually "Drive 0"), and click the Delete button.
Note✍: If "Drive 0" has multiple partitions, you must delete each partition individually to make the entire hard drive available for the new installation.
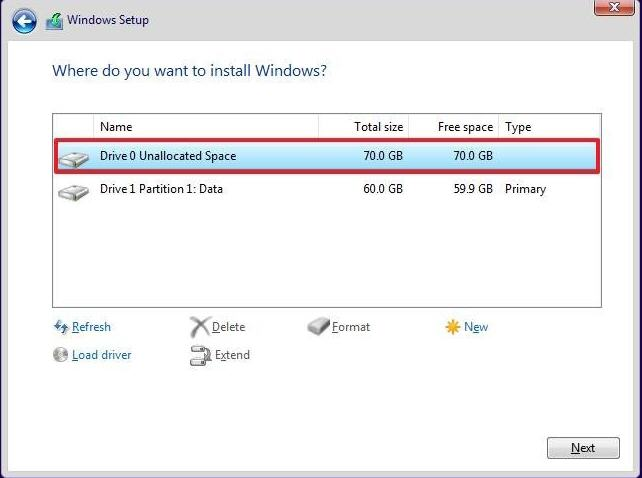
- Then select the empty drive (Drive 0 Unallocated Space) and click on Next.
After completing the setup process, a fresh copy of Windows 11 will be installed, and you'll need to set up the system from scratch afterwards.
Method 2: Restore Windows 11 image via WinPE USB disk
You can use Qiling Disk Master, a Windows PC backup software, to deploy a Windows 11 image via a WinPE USB disk, which saves time and effort by not requiring a system reset from scratch.
Qiling Disk Master's Universal Restore function supports restoring system images to different hardware in various Windows versions, including Windows 11, 10, 8, 7, XP, and Vista.
Before deploying a Windows 11 system image, it's essential to take several preparatory steps to ensure a smooth and successful deployment.
To create a Windows 11 system image, you'll need to use Qiling Disk Master to store the image on an external hard drive, USB flash drive, or network drive that can be accessed by another computer.
Next, I'll demonstrate how to use Qiling Disk Master to deploy the stored Windows 11 system image to new hardware using a WinPE USB disk, assuming the image is located on a network drive.
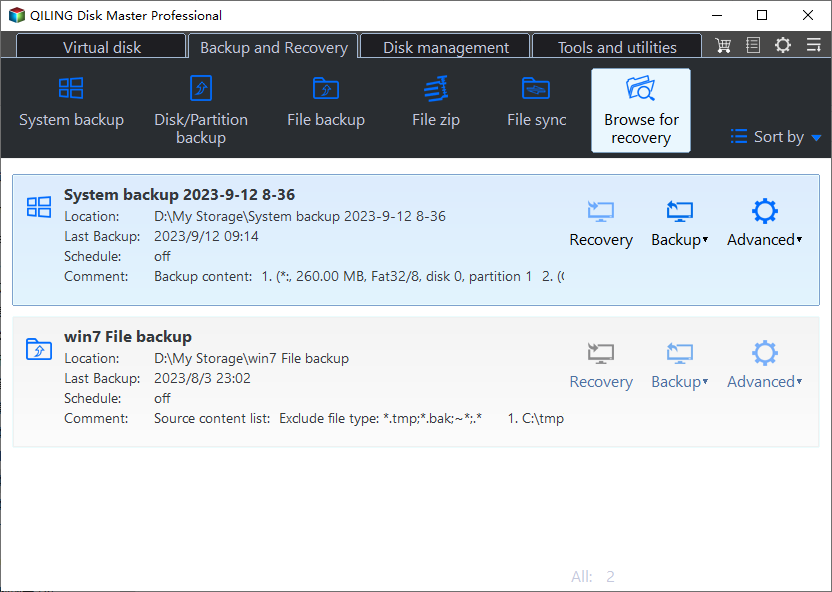
Step 1. Insert the bootable media into the target computer and start it in Windows PE, then navigate to the Restore tab and click Select Image File.
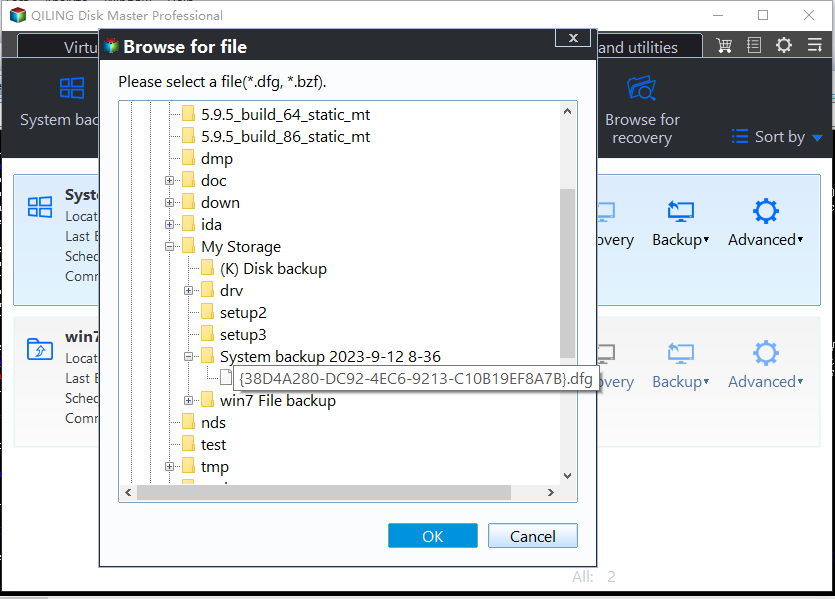
Step 2. Click OK to select the system image backup stored on a network location.
Step 3. Verify the Universal Restore option and choose Restore this system backup, then click Next.
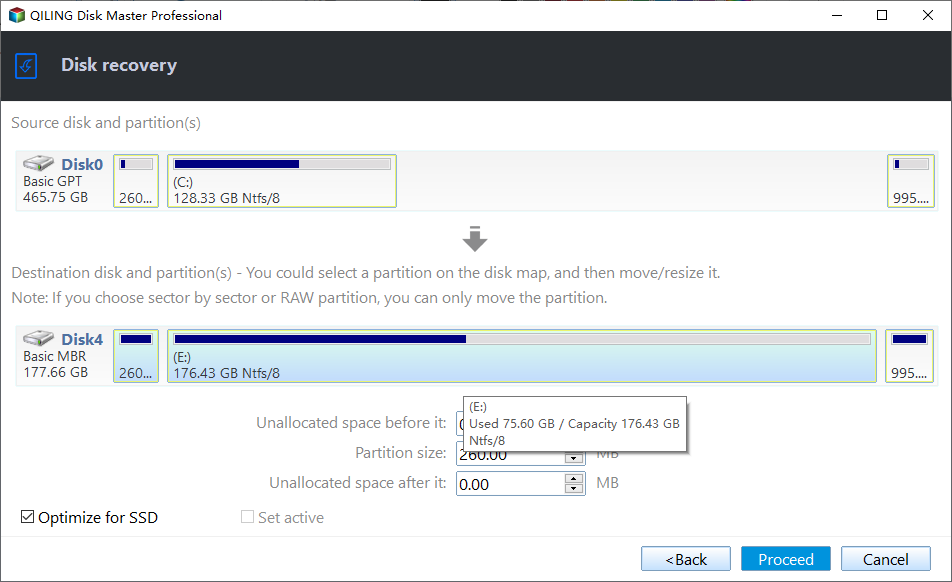
Step 4. Choose the destination where you plan to restore the system image and click Next, noting that it will overwrite any existing data on the target partition if necessary.
Step 5. Confirm the operation, click Proceed.
Tips✍:
✬ When restoring to an SSD, consider enabling SSD Alignment for improved performance, and note that the bootable disk is best suited for one or two computers, with PXE boot tools available for larger deployments. (Note: I removed the unnecessary link and the star symbol)
Step 6. When the progress reaches 100%, click Finish to exit.
Note:
Upgrading to Qiling Disk Master Technician allows for easy simultaneous restoration of system image files to multiple client computers over a network. (Note: I removed the unnecessary link)
Conclusion
To deploy a Windows 11 image via a WinPE USB disk without encountering issues with the Media Creation tool, use the professional backup tool Qiling Backuppper instead. (Note: I removed the unnecessary link and combined the information into a single sentence)
In addition to deploying the Windows 11 image, the software can also be used to protect your data and system by performing a bootable clone, allowing you to transfer your data and system to a new computer or storage device with ease. (Note: I removed the unnecessary link and combined the information into a single sentence)
Related Articles
- Restore Windows 10/11 System Image to New Hard Drive | 2 Ways
- Learn How to Deploy Windows 10 Image via WinPE USB Disks
- 4 Effective Ways to Restore Windows 10, 11 from Recovery USB
- How to Enable APP Password to Send Email Notifications in Qiling Disk Master?
You can use the Email Notification in Qiling Disk Master to send a report of the backup or sync execution result. To use Gmail Server for notification sending, you need to first get an APP Password and then enter the password in the email notification settings.
