How to Free Up Space on Windows 11 Easily and Safely (3 Ways)
Why Free Up Space on Windows 11?
Since the release of Windows 11, many users have upgraded from the old system to the new system. However, many users, especially Windows 10 users, report that after upgrading to Windows 11, the free space on the computer disk is obviously insufficient. As a result, you may no longer be able to install important Windows updates in the future and your PC performance may suffer.
As for why this lack of space occurs, it's because Windows keeps a copy of the system files from your old Windows installation so that you can roll back to the previous version if you run into problems after an upgrade. But if you don't encounter any problems and you want to know how to free up space on Windows 11, then you can read on to learn 3 easy ways to free up space.
How to Free Up Space on Windows 11
Next, this article will introduce 3 useful methods in turn to show you how to free up space on PC. You can use Disk Cleanup, Windows 11 storage features, or free third-party software to help you. Each method includes a detailed graphic tutorial. Keep reading for more details.
Method 1. Free Up Space on Windows 11 by Disk Cleanup
The first method to solve the lack of Windows 11 disk space usage is to use the Windows' own disk cleanup tool. You can follow the steps below.
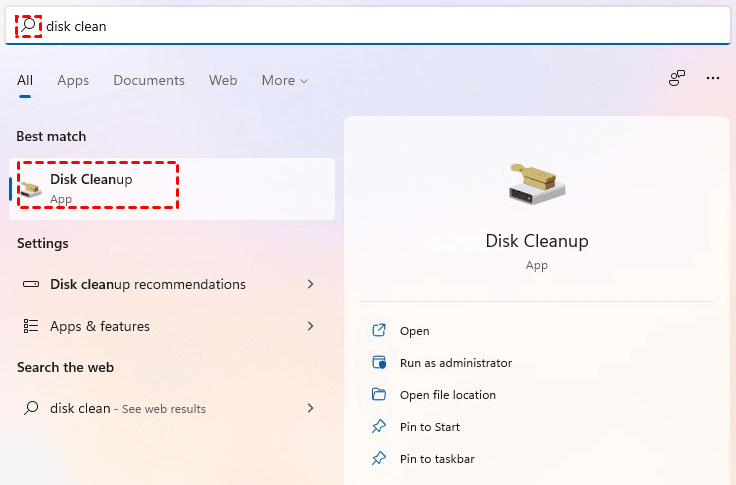
Step 1. Type disk cleanup in the Windows search box and open the Disk Cleanup app. This application should come pre-installed in your system.
Step 2. Select the drive that you need to clean. If this is your first time running this program, it is suggested that you run it on Drive C: or the main disk.
Step 3. Click OK and wait for Windows 11 to sift through your files to look for items that can be safely deleted. After loading, Windows will show a list of different types of eligible items. The Disk Cleanup tool will pre-select items that it believes are safe to delete.
Step 4. Select other item types that you wish to delete. You should notice that the total amount of disk space you can gain changes as you select or deselect items.
Step 5. Click OK and wait for the cleanup tool to load. Now you have automatically deleted some files thus freeing up some drive space.
Note: If you wish to scan your system files for some deletable files, click Clean up system files on the window shown in step 5.
Method 2. Free Up Space on Windows 11 by Storage Setting
The second way to free up space on Windows 11 is to use the cleanup feature in Windows 11's storage settings. You can follow the steps below.
Step 1. First, open Windows 11 Settings and click System > Storage.
Step 2. Scroll down to the Storage management section and click Cleanup recommendations. You will be redirected to the Cleanup recommendations page.
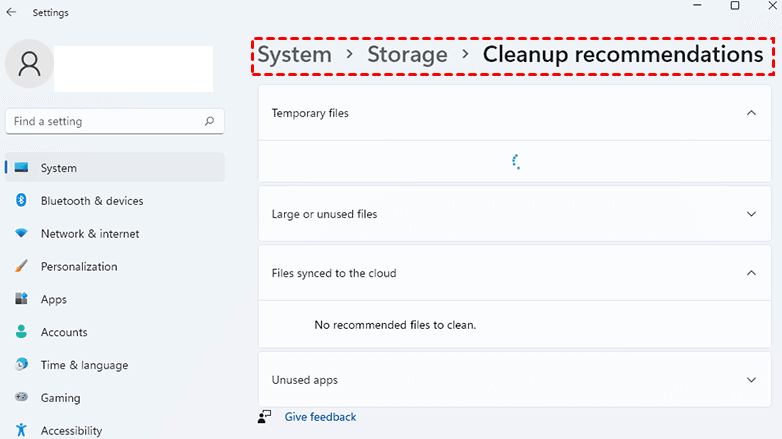
Step 3. Wait for Windows to scan the system for excess files. Once done, it will segregate these files under four sections, namely Temporary files, Large or unused files, Files synced to the cloud, and Unused apps.
Step 4. Open each section and select the files to be cleaned. Be careful when selecting file groups, such as Downloads and Recycle Bin. Windows will delete all these files if you select them.
Step 5. Select Clean up for each section after you choose the files or file groups to be deleted.
Method 3. Free Up Space on Windows 11 by Third-party Backup Software (Easiest)
Apart from the above two methods, there is one easiest way to free up disk space in Windows 11. That is to use the free file backup software Qiling Disk Master Standard to help you back up files to external disks or the cloud, so that you will not be afraid of data loss caused by deleting local files, and can effectively free up disk space.
Next, take backup files to an external disk as an example to demonstrate the operation steps. You need to download this freeware first and install it. If you are a Windows Server user, you can choose the Qiling Disk Master Server version.
Step 1. Connect the external disk and make sure it can be detected by your computer.
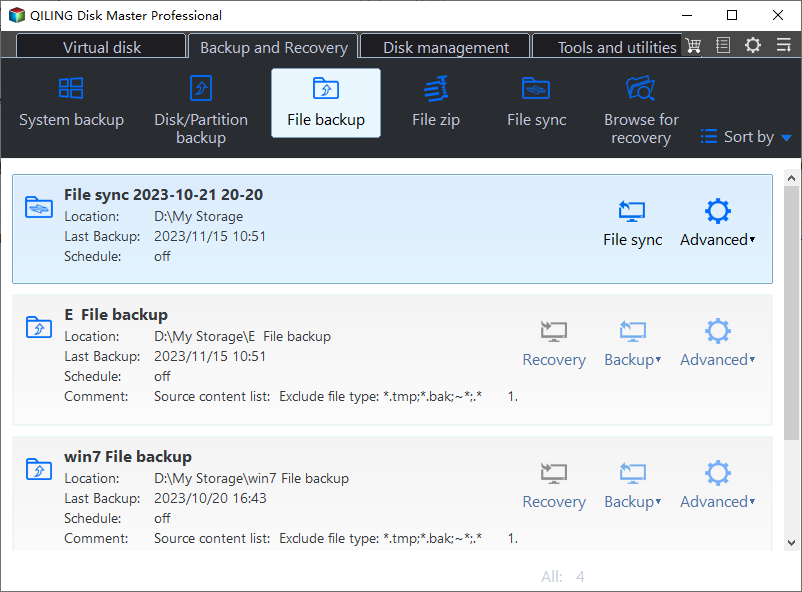
Step 2. Open Qiling Disk Master Standard and click Backup > File Backup.
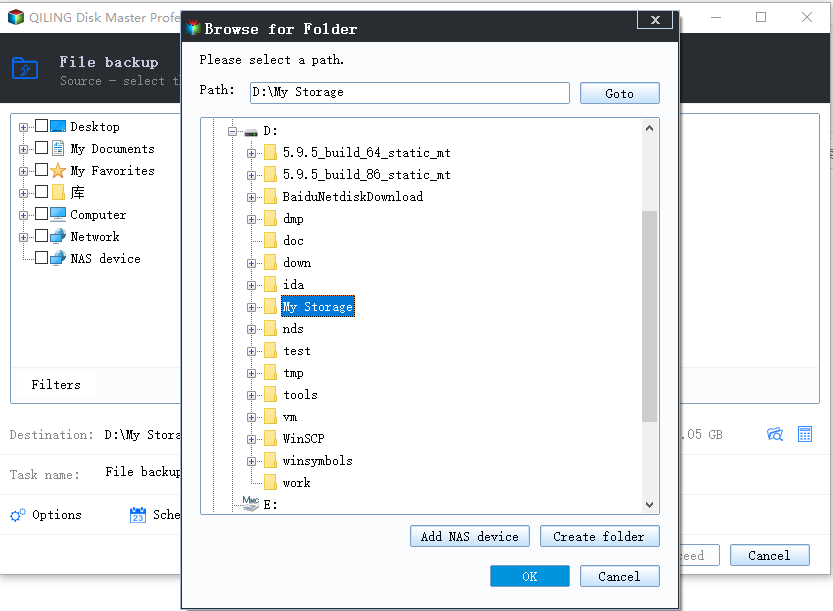
Step 3. Click Files or Folders to select the files or folders you want to backup to external disk.

Step 4. Choose the external hard drive as the backup destination.
Step 5. Confirm all your operations and click Proceed to free up space on Windows 11.

Notes:
- Options: The software allows you to set email notifications, compress or split backup files and write comments.
- Schedule Backup: You can set different backup frequencies including Daily, Weekly, Monthly, Event trigger and USB plug in. The last two features are available in the professional version.
- Backup Scheme:Backup Scheme You can select different backup methods. And you can upgrade to Qiling Disk Master Professional to enjoy the differential backup method which can easily restore your scheduled backup. After the upgrade, you can also enable automatic backup cleanup feature to save disk space.
Summary
Many users report that they are running out of disk space after upgrading to Windows 11, and that is because Windows saves the installation files of the old system. Not regularly cleaning up unneeded files and applications, as well as temporary file and picture buildup, can also cause low disk space.
The 3 useful methods described in the article can tell you how to free up space on Windows 11. One of the easiest ways is to use the free backup software Qiling Disk Master Standard to back up files to an external disk or cloud, which will not lose data and effectively free up disk space. It supports a variety of backup methods and Windows operating systems, and you can also use it to schedule backups. Regularly backing up files is more conducive to protecting data security.
Besides, it also provides functions such as System Backup, Disk Backup and Partition Backup to meet your various backup needs. If you need to Restore a backup or use the Clone function, this free software can easily help you achieve your goals. You can download this software to explore more functions.
Related Articles
- 3 Ways to Safely Delete Windows 11 Windows.old Folder
Is it safe to delete the Windows 11 Windows.old folder? How to do this to free up space? Read this article to find out. You can also find an effective way to protect your system. - Complete Guide: Windows 11 Free Upgrade from Windows 10
Microsoft plans to release Windows 11 to the general public on October 5. Many users want to know how to perform Windows 11 free upgrade from Windows 10. You can find the answer and have a comprehensive understanding of Windows 11 in this article. - How to Clone Hard Drive in Windows 10 64/32 Bit?
You may want to clone Windows 10 64 bit hard drive for data protection or hard drive upgrade. No matter which is your case, Qiling Disk Master enables you to clone hard drive easily while ensuring secure boot.