2 Easy Ways to Migrate Windows 11 to a New Computer
- Want to move installed Windows 11 to a new PC?
- Before transferring Windows to a new computer
- Best Windows migration tool for Windows 11/10/8/7
- How to migrate Windows 11 to a new computer step by step
- Solution 1: move OS to a new computer with same hardware
- Solution 2: migrate OS to a new PC with different hardware
- To sum up
Want to move installed Windows 11 to a new PC?
Microsoft released its latest operating system, Windows 11, on October 5, 2021. To install Windows 11 on your computer, there are three methods provided:
1. Windows Update in Settings (recommended)
If you're currently running Windows 10, you can wait until you're notified that the upgrade to Windows 11 is ready for your device. Microsoft has stated that all eligible devices are expected to be offered the free upgrade to Windows 11 by mid-2022.
2. Windows 11 Installation Assistant
If you don't want to wait for the free upgrade to Windows 11, you can use the Installation Assistant to install Windows 11 on your current device. This is the best option for installing Windows 11 on your current device.
3. Windows 11 Installation Media
If you want to reinstall or clean install Windows 11 on a new or used PC, you can use the media creation tool to download the installation media. This tool allows you to create a bootable USB or DVD that can be used to install Windows 11 on your device.
To start the installation process for Windows 11, you'll need to download the Installation Assistant or media creation tool from the official Windows 11 software download page. Before proceeding, it's essential to ensure that your device meets the �inimum system requirements for Windows 11.minimum system requirements for Windows 11.
If you've successfully installed Windows 11 on your PC, you may want to transfer Windows 11 to a new computer in the following situations:
- Your new computer is preloaded with Windows 10 and you want to change it to Windows 11.
- You bought a bare machine (or bare metal) which has no intervening operating system, and you want to move existing Windows 11 to your new device instead of doing a clean install.
Then, how to move Windows 11 to a new PC? What issues should you pay attention to before system migration? Please read on.
Before transferring Windows to a new computer
When migrating your Windows 11 system to a new PC, there are several issues you should be aware of to ensure a smooth transition. Here are some of the key concerns:
▶ Windows license
Windows 11 licenses aren't cheap, so it would be great if you can transfer the old Windows license to the new computer. Whether your old license is transferrable depends on how you got it.
- If your old device is using a retail copy, the product key can be transferred as long as the prior configuration is properly deactivated.
- If your old license is an OEM license, then it is tied to the first PC and you can't transfer it to another device. However, if you upgraded from Windows 11 Home to Windows 11 Pro through the Microsoft Store, you can move the license to a new computer since the product key is transformed into a digital license connected to your Microsoft account.
▶ Computer hardware
If you're planning to transfer Windows 11 to a new computer, you may encounter boot errors due to dissimilar hardware. This can happen if the new PC has a different motherboard, CPU, or RAM compared to the old one. To avoid this issue, you can either choose a new PC with the same hardware as the old one or use a powerful migration tool to resolve the hardware incompatibility issue.
Best Windows migration tool for Windows 11/10/8/7
If you're looking for a powerful Windows migration tool, you might want to consider Qiling Disk Master Professional. Here are some of its key features:
★ Easy-to-use clone functions
Qiling Disk Master Professional offers two primary functions to facilitate the migration process: System Clone and Disk Clone.
★ Full backup and restore solutions
It is embedded with the System/Disk/Partition/File Backup & Restore features, allowing you to backup different kinds of data and restore it whenever needed. Besides, the Universal Restore feature can deal with hardware incompatibility issues perfectly and ensure a secure boot after moving OS to a new computer.
★ Bootable media creation
Qiling Disk Master Professional offers a convenient feature called **Create Bootable Media**, which allows you to create a bootable USB, CD, or DVD. This feature is particularly useful in situations where you need to boot a computer that is experiencing issues. By creating a bootable media, you can easily boot the computer and access the operating system, even if it's corrupted or in a bare-metal state.
Download and install Qiling Disk Master on your PC now!
Easiest Windows backup, restore and clone software for personal use.
How to migrate Windows 11 to a new computer step by step
Transferring Windows 11 to a new computer using Qiling Disk Master can be done in two ways: cloning the existing Windows 11 installation and transferring the Windows 11 installation to a new computer using a bootable media.
Solution 1: move OS to a new computer with same hardware
If the new computer has the same hardware as the old computer, you can use the "System Clone" feature in Qiling Disk Master to transfer the Windows 11 installation to the new computer. This method is convenient and doesn't require any additional software.
Step 1. To transfer the Windows 11 installation to the new computer, you can use the "System Clone" feature in Qiling Disk Master. However, if the new computer has the same hardware as the old computer, you can make use of the "System Clone" feature.
Step 2. Load Qiling Disk Master on the old PC. Then, click Tools and utilities tab page and select System Clone.
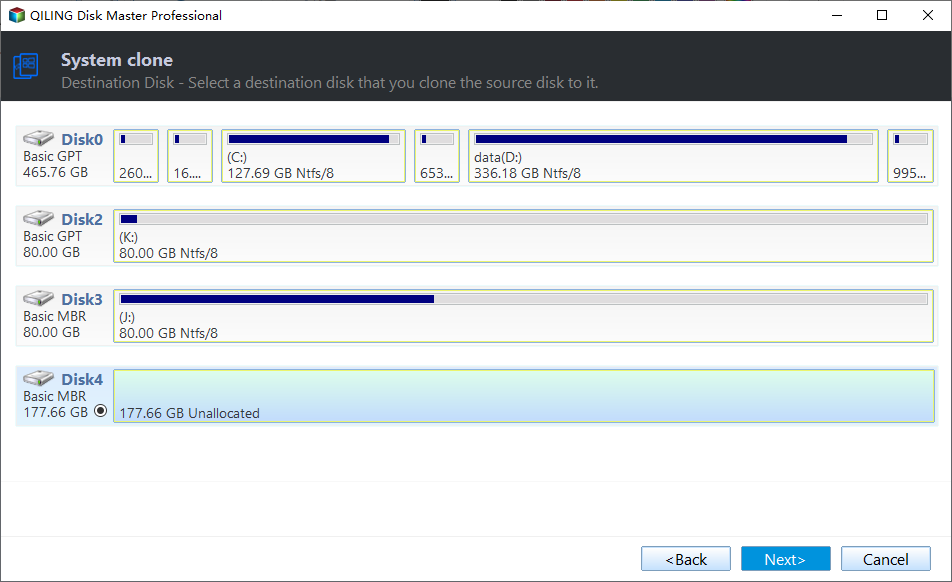
Step 3. To proceed with the system clone, you need to select the destination location where the cloned data will be saved. By default, the system-related partitions are selected, but you need to choose the newly connected hard drive as the destination.
Note: If the newly connected hard drive contains data, you'll be prompted to back it up before proceeding with the cloning process. This is because the destination disk will be overwritten after cloning, and you'll want to preserve any existing data on the new hard drive.
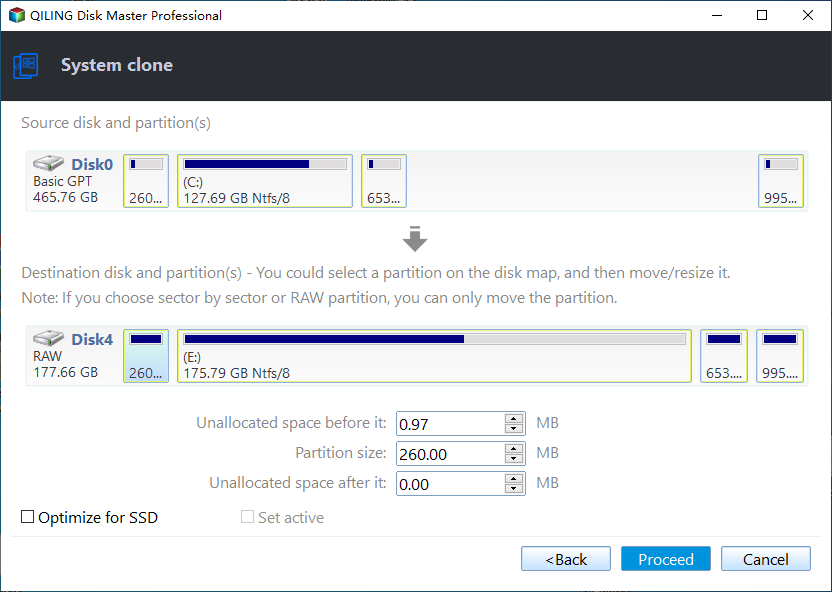
Step 4. If the new hard drive is a solid-state drive (SSD), you'll have the option to optimize its performance. To do this, check the box labeled Optimize for SSD. This will ensure that the SSD is configured for optimal performance.
Step 5. Once the cloning process is complete, it's time to install the cloned hard drive in your new computer. This is the final step in the process, and it's essential to ensure that the new device boots successfully.
Solution 2: migrate OS to a new PC with different hardware
If the new PC has different hardware from the old PC, the "Universal Restore" feature can be a lifesaver. Before you start, make sure to prepare your old computer in the following steps:
◑ To prepare your old computer for cloning, you'll need to create a bootable disk with Qiling Disk Master. This will allow you to access the old computer's operating system and create a system image.
To migrate Windows 11 to dissimilar hardware, you'll need to create a system image using Qiling Disk Master. This will allow you to transfer your operating system, settings, and data to a new computer.
Step 1. Plug the bootable disk into your new computer and boot from it. If you have saved the system image on an external device, connect it as well.
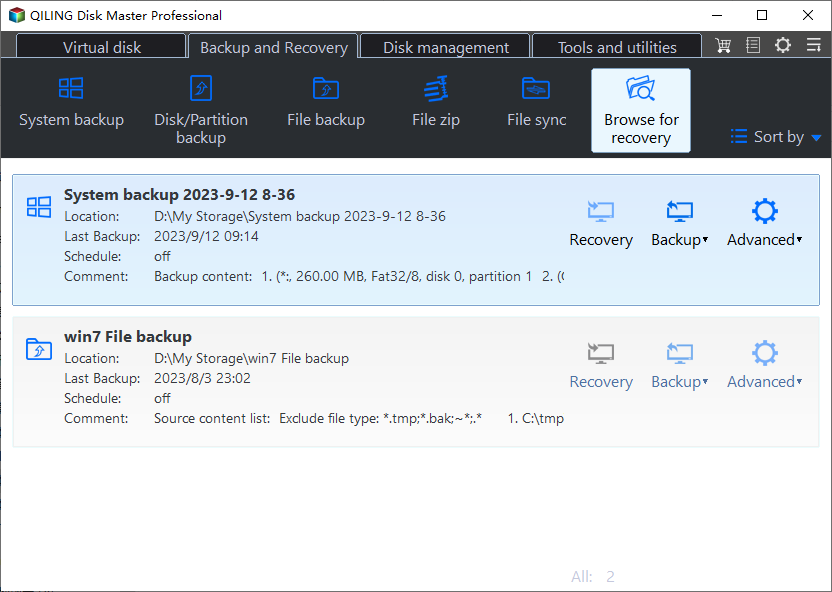
Step 2. Qiling Disk Master loads up automatically. Click Backup and recovery > Browse for recovery to locate the system image file you've created.
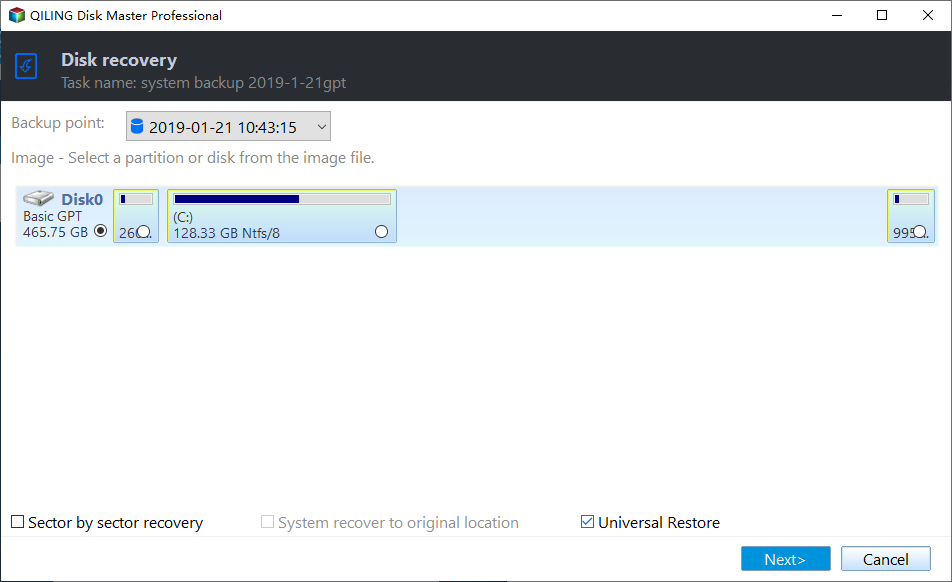
Step 3. On the Image Information page, tick Universal Restore option in the bottom to ensure a bootable system.
Step 4. To proceed with the system restoration, follow these steps:
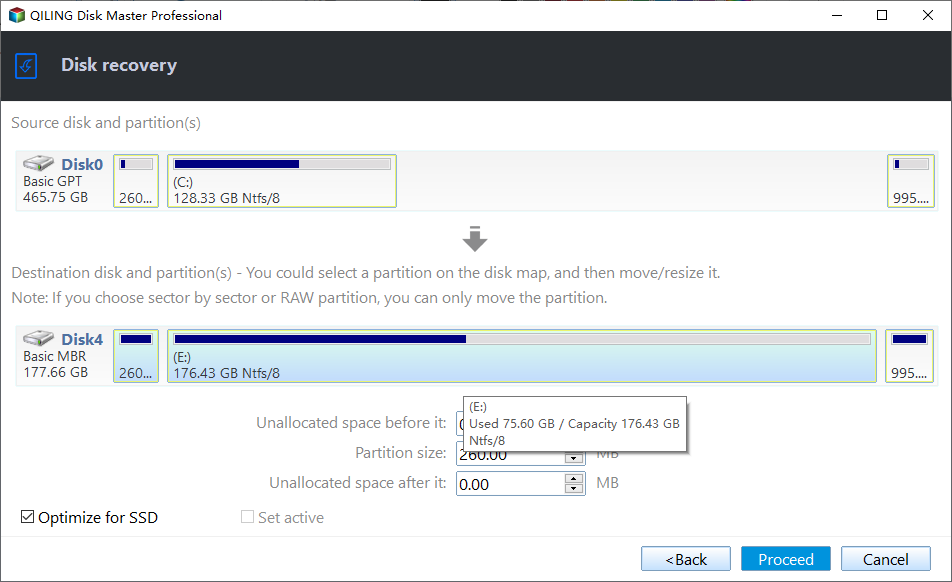
Step 5. Review the operation to be executed. Then, tick Optimize for SSD to optimize SSD disk and click Proceed to proceed.
To sum up
To confirm the system restoration, follow these steps:
Related Articles
- Easily Migrate Windows 11 to SSD without Reinstalling
You can learn an easiest way of migrating Windows 11 to SSD. It's using a professional disk clone software. - Simple Way to Move a Windows 10, 11 Hard Drive to a New Computer
In this article, you'll learn how to move your old hard drive to a new computer without losing secure boot or your Windows 10/11 activation. The greatest thing is that you won't need to reinstall Windows 10/11 on your PC. - Top Two Ways to Help You Install Windows 11 to SSD
This article will show you how to install Windows 11 to another drive. After that, you can enjoy a faster speed and more effective system. - Solved: SCCM PXE Boot Not Working
This tutorial focus on how to solve the problem of SCCM PXE boot not working. To boot client computers easily, you can turn to Qiling Disk Master Professional.

