How to Make Windows 11 Boot from USB (Top 2 Ways + 1 Tip)
Scenario
How do I force Windows to boot from USB?
Hi, I just received my new Dell XPS 17 with Windows 11 installed. Learning from previous experiences, I want to make a backup before changing anything to the machine at all.
I am able to select an option from within Windows that shows a USB, but it brings me to some https help system. Don't want that. How can I start the machine from USB as if I am able in Windows 10? Thanks in advance.
- Question from ElevenForum

Why need to use USB to boot Windows 11?
There are many situations where you may want to use USB to boot Windows 11 on your computer. I've listed 3 common reasons here.
- Boot new Windows system. Maybe because you want to try the latest release of Windows 11 22H2, but you think it has instability and uncertainty, so you want to install it on the USB to boot and prevent it from affecting the version you are running.
- To troubleshoot. The second reason is that your computer's operating system just won't boot properly, shows you the blue screen on Windows 11, or keeps crashing due to viruses, malware, corrupted files, system upgrades, etc. That's when you need a bootable USB disk to boot your computer properly.
- Enjoy same configurations on multiple PCs. You need to copy the operating system, data, settings, etc. from the current computer you are using to another or a new computer. Booting the new computer from a USB bootable disk with your old system will allow you to enjoy the same computer configuration.
No matter what your reason is, this can be an easy and simple task to fix. This article shows you two different ways to use a bootable USB drive to boot your computer in different situations.
Make Windows 11 boot from USB in 2 secure ways
You may encounter two main scenarios when you want to boot from USB on Windows 11. One is that your computer is working properly and you can access the boot disk settings from the Windows Settings app portal. The other is that your computer has an error and the system crashes and doesn't work properly, then you need access to boot menu to start your computer from USB in BIOS. Now let's check each method one by one together.
- Way 1. PC can start normally – from Settings
- Way 2. PC cannot start normally – from Boot Menu
- Tip: Make a Windows 11 bootable USB with best backup freeware
Way 1. PC can start normally – from Settings
Follow the given steps below to boot Windows 11 from USB with your computer still running smoothly.
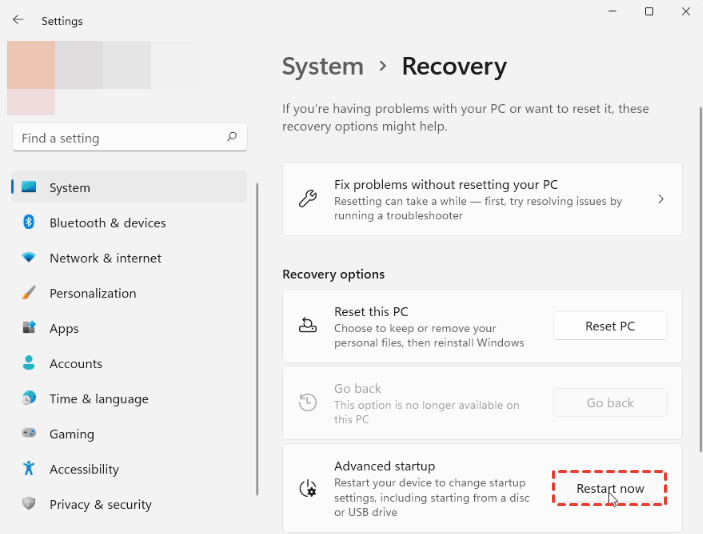
1. Plug a bootable USB flash drive into a USB port on your Windows 11 computer. Press Windows + I to open Settings, then select System>Recovery option.
2. Click on the Restart now button to the right of Advanced startup. In the pop-up window, Windows 11 will let you know that it will restart your device, so you'd better save your work before that. Then click or tap the Restart now button from the dialog.
3. After that, your PC will restart and load into recovery environment. Under Choose an option window, select Use a device option.
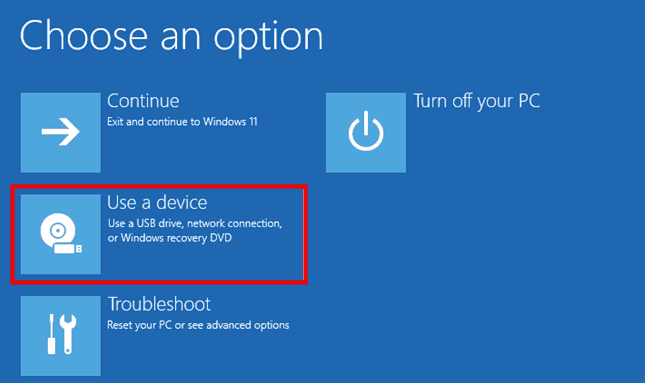
Note: If the Use a device option is not there it means that the USB device you've created is not bootable.
4. Next, your PC will list the bootable devices that your computer can use, which includes the USB drive you have connected to your PC before, so click or tap on it.
Finally, your computer can restart and then boot from the USB drive you have set up.
Way 2. PC cannot start normally – from Boot Menu
1. Connect the bootable USB drive to the USB port. Press the Power button to boot your PC. When it starts loading, keep tapping the appropriate Boot Menu option key like ESC, F2, F8 , or F10 (It can vary depending on the motherboard's manufacturer and model) to enter your BIOS setup.
2. In the boot menu, look for the Boot order and move the USB drive that you want to boot from to the top of the list.
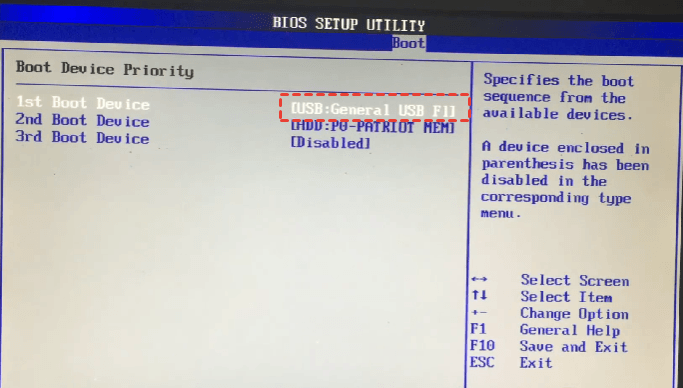
3. When you confirm your settings, press F10 key to save and exit. Upon exiting your PC will boot from the USB flash drive.
Tip: Make a Windows 11 bootable USB with best media creation tool
Before you can use a bootable device to boot Windows 11, first you need to create and have one in advance. If you have no idea what is the best and most secure way to do that, here is a professional bootable media creation tool for you - that is Qiling Disk Master Standard.
With Qiling Disk Master Standard, you can not only create Windows 11 recovery USB for the current computer, but also it can be applied to all Windows PCs, including Windows 11/10/8/7/Vista and XP (Both 32 bit and 64 bit). You can enjoy more powerful features as follows:
◑ It enables you to create bootable DVD/CD or USB that can be used to start a crashed computer of various brands. And the created media is able to boot in both BIOS and UEFI mode.
◑ As a comprehensive data protection solution, it allows you to create system backup, disk backup, file backup and partition backup at scheduled internals such as daily, weekly and monthly to various locations like local disk, external hard drive or network share, cloud, etc.
Moving on, download and install the Windows 11 bootable USB media creator – Qiling Disk Master Standard to your computer to have a try.
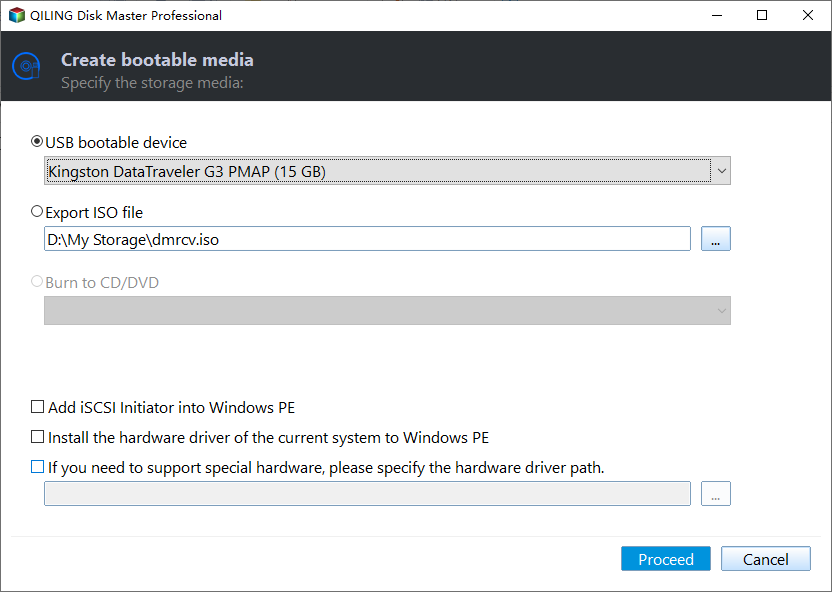
Step 1. Insert a blank USB drive into your computer. Open Qiling Disk Master, click Tools and then select Create Bootable Media.
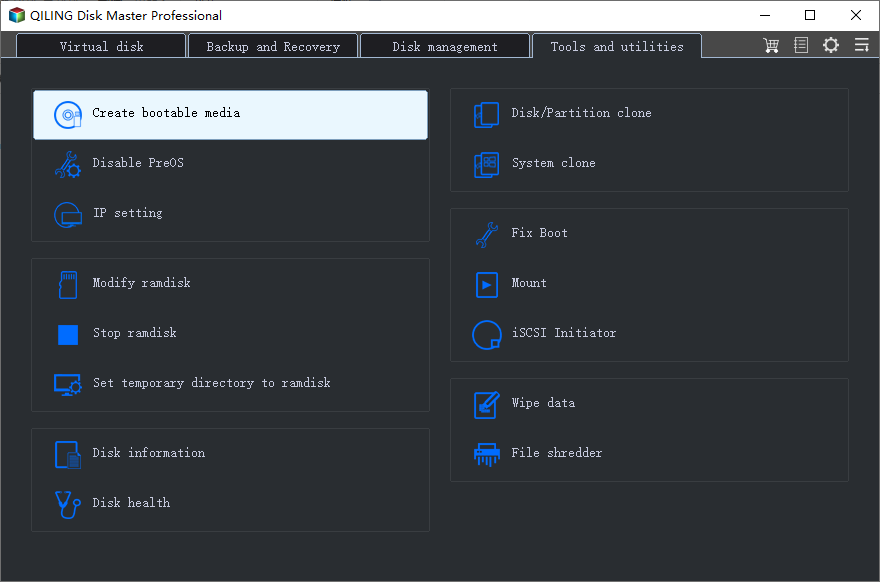
Step 2. Select USB Boot Device and click Proceed to run this process.
Helpful tip: If you don't have any CD/DVD or USB drive, you can create recovery environment that can be accessed from Windows boot menu, so no bootable device is needed to boot a failed system. (Upgrade to higher editions to enjoy this feature).
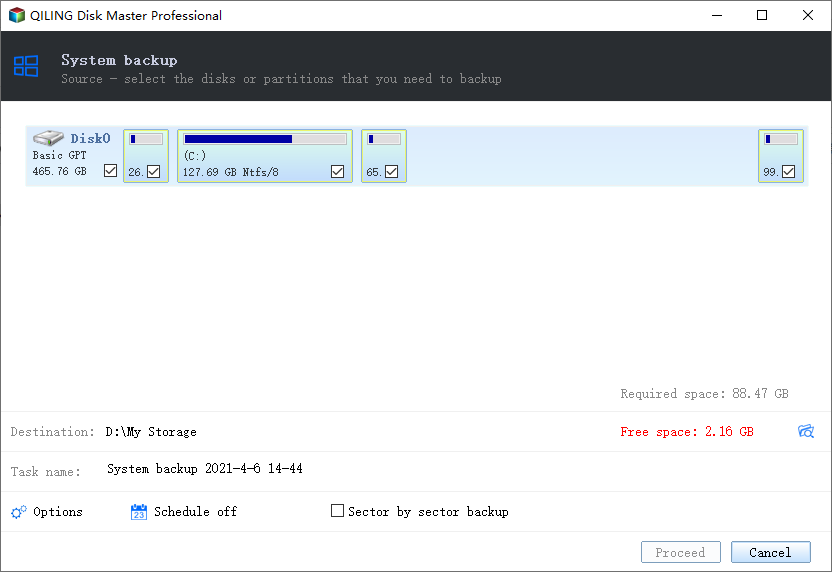
✨ Bonus tip: create a system backup image with Qiling Disk Master:
To prepare a system image that can be used to roll back a crashed system to the previous state in case of a disaster, you can go to Backup and recovery > System Backup to prepare a disaster recovery solution for your current operating system. Just follow the wizard to backup Windows 11 to USB drive or other storage devices.
Conclusion
If you want to make Windows 11 boot from USB but don't know how to do it, then you can refer to the methods in this tutorial to solve this problem easily and effortlessly. This article also recommends you the best free tool for creating bootable media – Qiling Disk Master. With it, you can easily create a secure USB boot disk to boot Windows 11 in case of computer failure. Meanwhile, you can create a system image of your old operating system with its help so that you can roll back to a normal state when something goes wrong.
It is an all-in-one data protection solution that brings together remarkable features such as backup and recovery, clone and sync. As the best Synology backup software, you can backup Windows 11/10/8.1/8/7 files to Synology NAS with just a few clicks. Now, download and explore more features on your own.
Related Articles
- How to Create Windows 11 Bootable USB | 2 Ways Included
A bootable USB of Windows 11 can help to repair or reinstall Windows 11 as necessary. Scroll down and learn two easy ways to create Windows 11 bootable USB below. - How to Copy Windows 11 to USB and Make It Bootable (3 Cases)
Looking for solutions to make a copy of Windows 11 on a USB drive and make the drive bootable? Read this article carefully to learn 3 different ways. - How to Fix Windows 10, 11 Bootable USB Not Working (5 Ways)
Need to install, upgrade or repair Windows, but Windows 10/11 bootable USB not working? Read this article and you will learn why and how to fix it. Also, an easier repair is included. - How to Install Windows 11 on Pendrive and Run It Directly
Want to install Windows 11 in pendrive but don't know how? Read this article to get a stepwise guide.