Complete Guide to Windows 11 NVMe Installation - Without Any Boot Problems
What Is NVMe?
NVMe (Non-Volatile Memory Express) NVMe (Non-Volatile Memory Express) is a new protocol for accessing high-speed storage media, offering several benefits compared to legacy protocols. NVMe is commonly used for solid-state storage, main memory, cache memory, or backup memory. In this article, we will explore the advantages of NVMe-based PCIe SSDs over other storage types.
NVMe (Non-Volatile Memory Express) is a protocol designed to harness the power of high-performance non-volatile storage media, such as solid-state drives (SSDs). This technology is particularly well-suited for demanding, compute-intensive setups where speed and efficiency are paramount.
Requirements for Using NVMe SSD as Boot Drives
To install Windows 11 on an NVMe SSD and securely boot from it, your computer must meet the following requirements:
🍇 Newer computer hardware. NVMe (Non-Volatile Memory Express) is a high-performance storage interface that is compatible with a wide range of computers. However, its performance is optimized with newer chipsets.
🍏 One M.2 PCI-E x4 slot. If your motherboard is older and doesn't support NVMe, you may need a PCIe x4 adapter to use an NVMe SSD. This adapter can help bridge the compatibility gap between your older motherboard and the newer NVMe SSD.
🍉 UEFI boot mode. Legacy Boot Mode and UEFI Boot Mode are two different ways your computer can start up. Legacy Mode is an older method, while UEFI Mode is a more modern and secure approach.
🍒 UEFI firmware. Booting from an NVMe (Non-Volatile Memory Express) Solid-State Drive (SSD) requires a specific set of system configurations. One of the key requirements for booting from an NVMe SSD is the presence of a UEFI (Unified Extensible Firmware Interface) enabled system.
How to Install Windows 11 on NVMe SSD
When it comes to installing Windows 11 on your computer, choosing the right storage drive can make a significant difference in your overall experience. One of the most popular options is an NVMe (Non-Volatile Memory Express) Solid-State Drive (SSD). By installing Windows 11 on an NVMe SSD, you can unlock the full potential of your operating system and enjoy faster speeds, better performance, and a smoother overall experience.
You can refer to the following method to complete the Windows 11 NVMe installation. There are three parts in total: installing and initializing the NVMe SSD, cloning Windows 11 to the NVMe SSD, and booting from the cloned SSD. Continue reading to see the specific steps.
Part 1. Install and Initialize A New NVMe SSD
- Install the NVMe SSD onto your computer.
🖥️ For desktop PC installation: First confirm the available PCI Express slots on your motherboard. Then insert the NVMe SSD into the slot and secure it with screws. Then connect the SATA cable from the SSD to an available SATA port on the motherboard.
💻 For laptop installation: Most commonly, the NVMe SSD is connected to your laptop via the USB port. You will need to prepare a USB to NVMe SSD adapter. Insert the NVMe SSD into the adapter, connect the USB cable, and then plug the other end of the computer into the laptop.
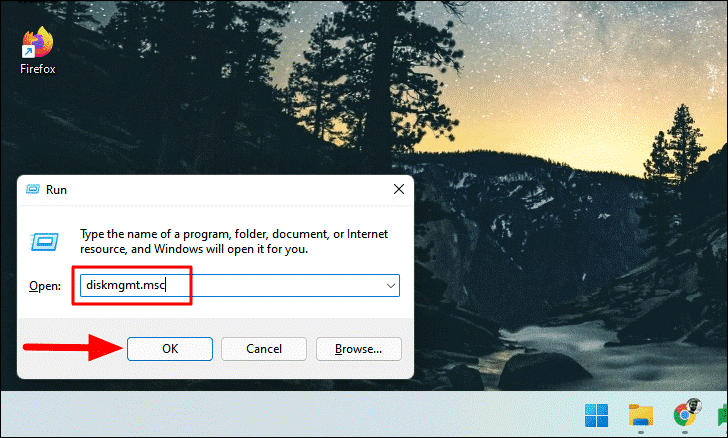
- Next, restart your computer. Press Win + R to open the Run dialog box, type diskmgmt.msc and click OK to open Disk Management.
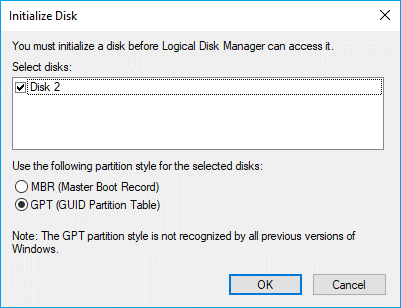
- Right-click on the new NVMe SSD and select Initialize Disk. Set the partition style the same as the source disk (MBR or GPT) and click OK to confirm.
📚 Note: In order to have better compatibility with Windows11, it is recommended to choose GPT.
Part 2. Migrate Windows 11 to NVMe SSD without Any Boot Issues
When you want to migrate Windows 11 to a new NVMe SSD to improve the overall performance of your computer, you can use the most reliable disk cloning software - Qiling Disk Master to help you do this. With its help, you don't have to reinstall your system, which saves you a lot of time and effort.
Qiling Disk Master offers a wide range of features to ensure the safety of your data. You can use it not only to migrate your system, but also to transfer data on the whole disk, synchronize folders to different locations, backup the whole disk, etc.
Its Intelligent Clone feature allows you to clone a larger drive to a smaller drive. It also allows you to clone system disks from MBR to MBR, GPT to GPT, MBR to GPT or GPT to MBR. With its help, you can clone HDDs, SATA SSDs, NVMe M.2 SSDs, USB flash drives, and SD cards, etc.
Please follow the illustrated tutorial for details on installing Windows 11 to an NVMe SSD.
📚 Note: The data on the target location will be overwritten after cloning process. If you plan to clone Windows 11 to a used SSD and there are some important data on it, please backup files in advance.
- Download and install Qiling Disk Master on your computer.
- To begin the cloning process, launch the cloning software on your computer. The interface you see will be a dark blue color. To proceed, click on the **Clone** tab and then select **System Clone** from the dropdown menu.
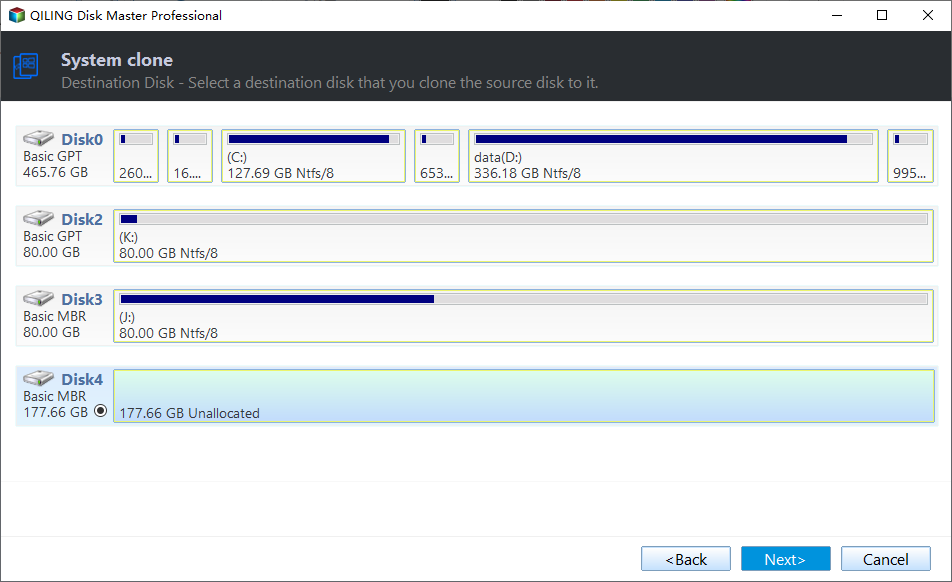
- It will automatically select the System drive and related drives by default. Select the target NVMe SSD as the destination disk and click Next to continue.
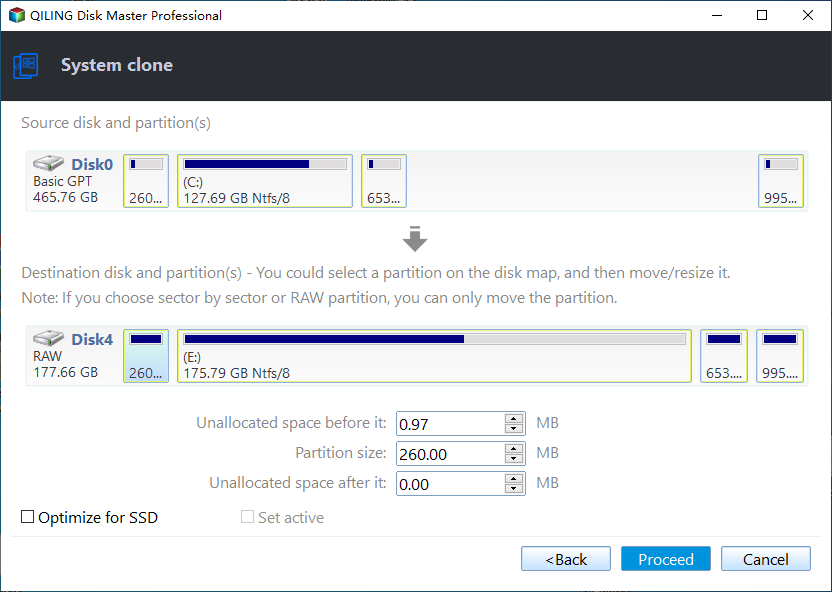
- Confirm all your settings. Check SSD Alignment to improve the reading and writing speed of the target SSD. Then, click Proceed to perform this operation.
✨ Tip: When you choose to clone a disk or partition using the sector-by-sector method, you're essentially creating an exact replica of the original source disk or partition. This approach involves copying every single sector, including those that are blank or logically bad, to the target hard disk or solid-state drive (HDD/SSD).
Part 3. Boot from the Cloned NVMe SSD with Windows 11
If the original drive contains your operating system - Windows 11 - you will need to follow the steps here to make the newly cloned NVMe SSD bootable.
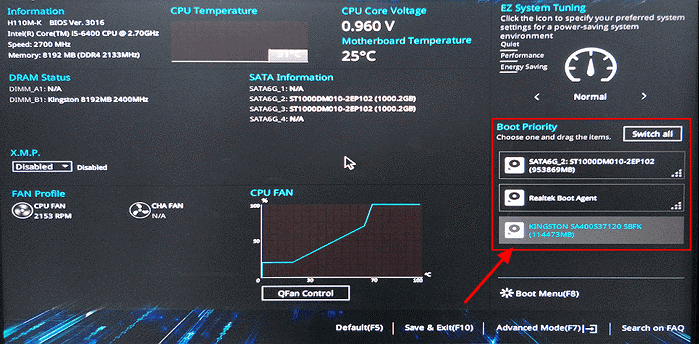
- Restart the computer and press F2/F10/Del key to enter BIOS.
- Go to the Boot Menu, at the boot priority section, set the new NVMe SSD as the boot drive.
- Press F10 to save all the changes and restart the computer.
Wrapping Up
This article gives you a complete guide to Windows 11 NVMe installation. You can follow the illustrated tutorial step by step. With the help of AOEMI Disk Master, you will not encounter any data loss issues and boot problems.
The Qiling Disk Master is a powerful software that offers a comprehensive solution for Windows 11 installation and system protection. With its user-friendly interface and robust features, you can easily install Windows 11 on your NVMe SSD and protect your computer from various system issues.
Related Articles
- How to Clone Windows 10, 11 to NVMe SSD (Step by Step Guide)
- Windows 11 NVMe Not Detected? Top Ways to Fix It Now!
- Top Two Ways to Help You Install Windows 11 to a New SSD
- 2 Quick Ways to Restore Folders in Windows 10
How to restore folders in Windows 10? Read this guide to get two practical methods to find your lost folder.


