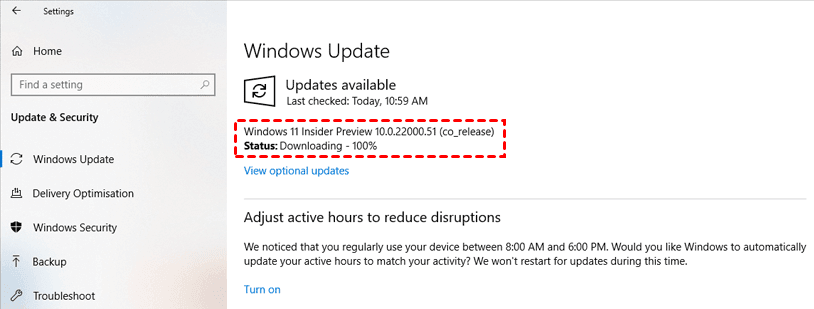
[Easy Fixes] Windows 11 Update Stuck or Failed
Microsoft publishes Windows updates regularly, and they are critical for keeping Windows 11 secure and correcting system issues. The business provided a Windows 11 upgrade that addresses problems with interoperability between Intel's "Killer" and "SmartByte" networking software with the operating system. This is a required update, and Microsoft advises downloading and installing it as soon as it is available for your device. You may encounter that Windows 11 updates are underway stuck or Windows 11 updates failed to install with various issues while installing the update.
Why Windows 11 update stuck?
There are so many reasons that might cause this problem, but some are typical:
▶ Slow internet connection
It is the core cause of the majority of 'updates getting stuck' problems. The same holds when installing the Windows 11 upgrade. In addition to being a cause, an unstable internet connection can give rise to additional causes. The unstable internet connection may create an error in the update's downloading process, or the downloaded files may be damaged, causing the update to become stuck.
▶ Unstable Power Supply
It's not as common as the other factors, but an unstable power supply might cause Windows 11 updates to become stuck on your computer. When the Windows 11 update is installed, the unreliable power supply can interrupt the installation process, so the update is stuck.
▶ Lack of drive space
Windows updates, particularly version upgrades such as Windows 11, require a lot of space to install. Windows 11 ISO is over 4.5GB in size. It will first be downloaded to the system drive and then decompressed before the update procedure can begin.Insufficient storage space on the system drive may be one of the causes of the Windows 11 upgrade being stuck. So, before you begin upgrading, ensure sure you have adequate storage space to complete the procedure.
▶ Corrupted update files
The ISO file is critical in the Windows 11 installation process, and if it is damaged, the installation process would be hampered.
How to fix Windows 11 update stuck problem
After you know the possible reasons that may cause this problem, now, let's solve Windows 11 update stuck at 100% or any certain percentage.
Way 1. Check your PC
First, we need to get rid of the physical faults. Check the Internet connection and your power supply. Make sure all cables work well and no physical damage to them.
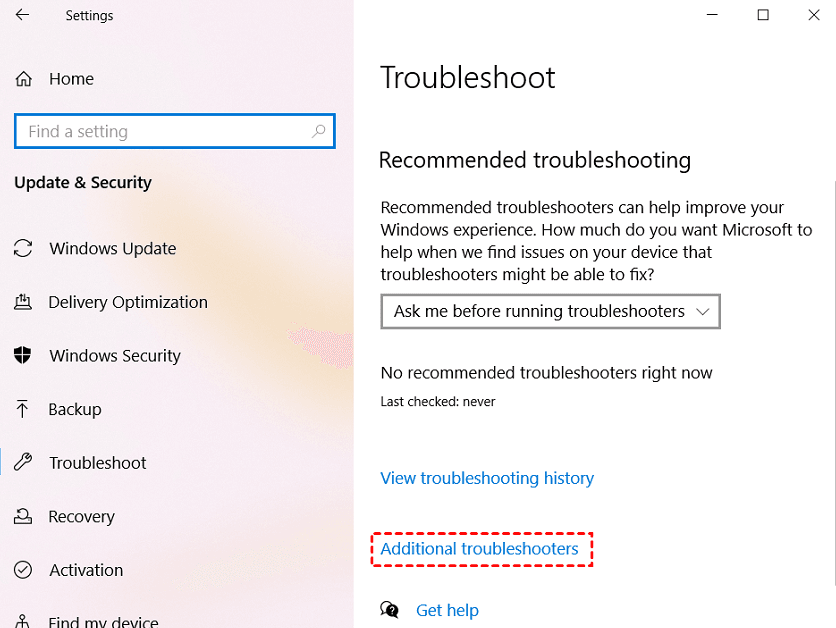
Way 2. Run the Windows Update troubleshooter
There are probable issues with Windows Update, so use the Windows Update troubleshooter before attempting alternative techniques.
Step 1. Go to Start > Settings > Update & Security > Troubleshoot > Additional troubleshooters.
Step 2. In the Additional troubleshooters window, find Windows Update, click on it and then click Run the troubleshooter.
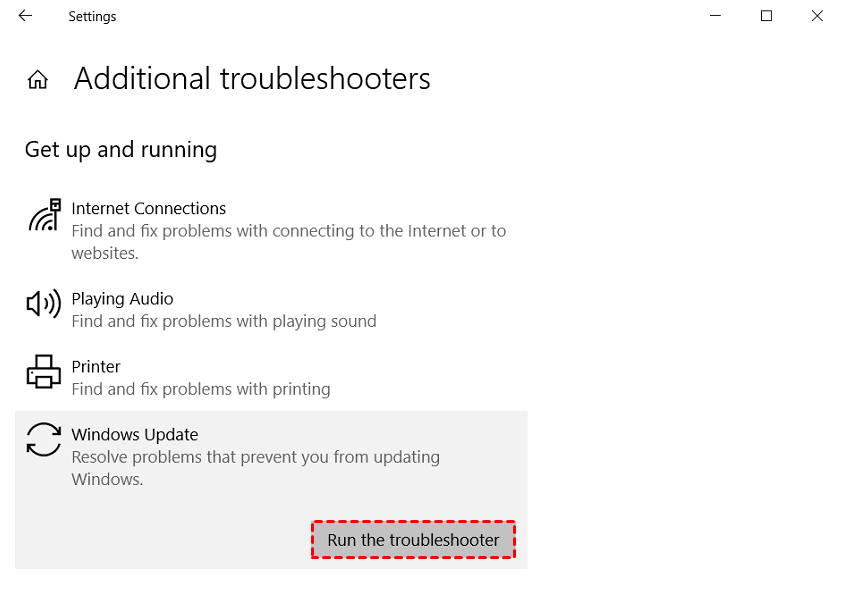
Step 3. Wait for the troubleshooter to look for any issues and fix the issues it finds. Then, restart your PC and the update should download and install now.
Way 3. Extend system drive
Check your C drive, if it doesn't have enough space, you may make more by rearranging partitions, moving certain software, and emptying your download folder.
And if you open Disk Management and find that there's unallocated right behind the C drive, then you can use "Extend Volume" to extend C drive space. However, if the unallocated space isn't adjacently on the right of C drive or there's no unallocated, don't worry, you can use Qiling Disk Master Professional to easily fix this issue.
It's Windows disk/partition management software that allows you to merge unallocated space to another drive even if they are nonadjacent and directly share free space from one drive to another.
Here, we'll take the second function, "Allocate Free Space" as an example.
Step 1. Install and run Qiling Disk Master, and right-click a drive with much free space. Choose "Move / resize".
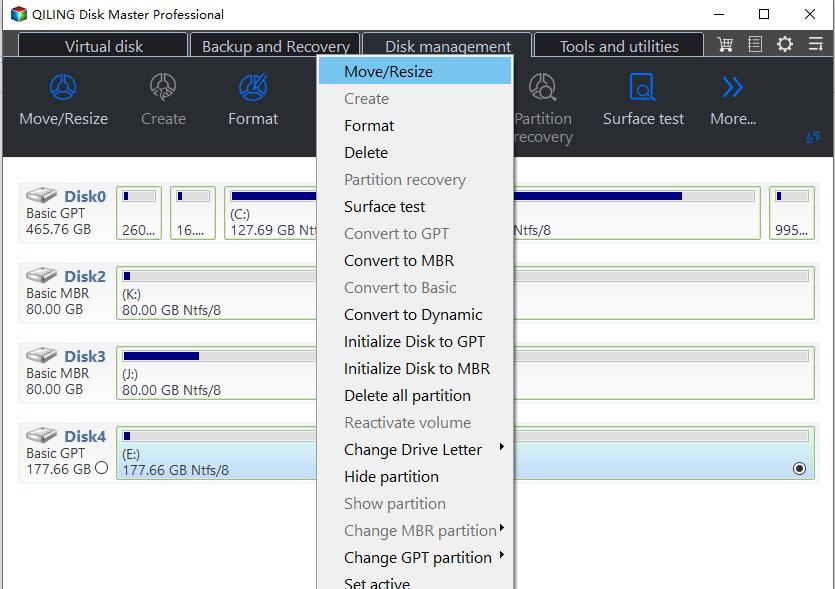
Step 2. In the new window, you can specify the space size and target partition. If it's C drive, you need to select C drive from the given list, and click "OK".
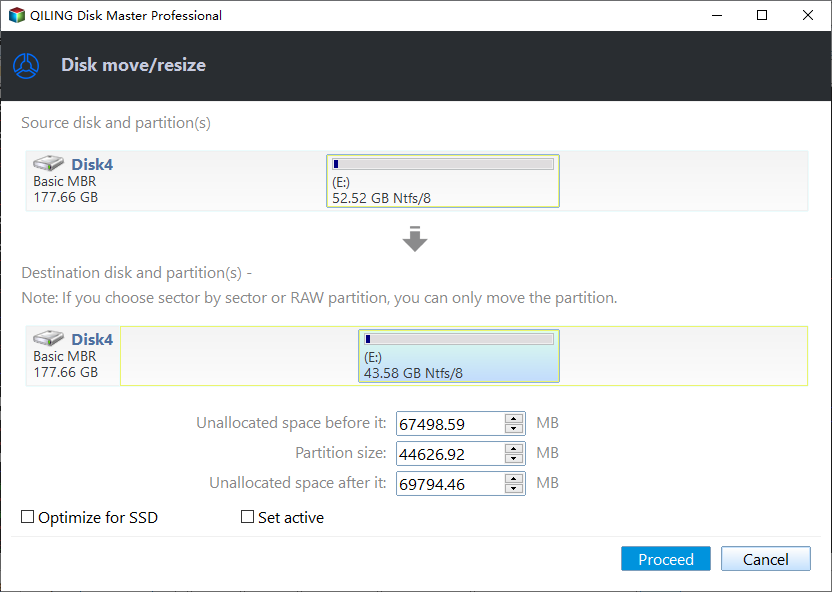
Step 3. Click "Proceed" and "Apply" to execute.
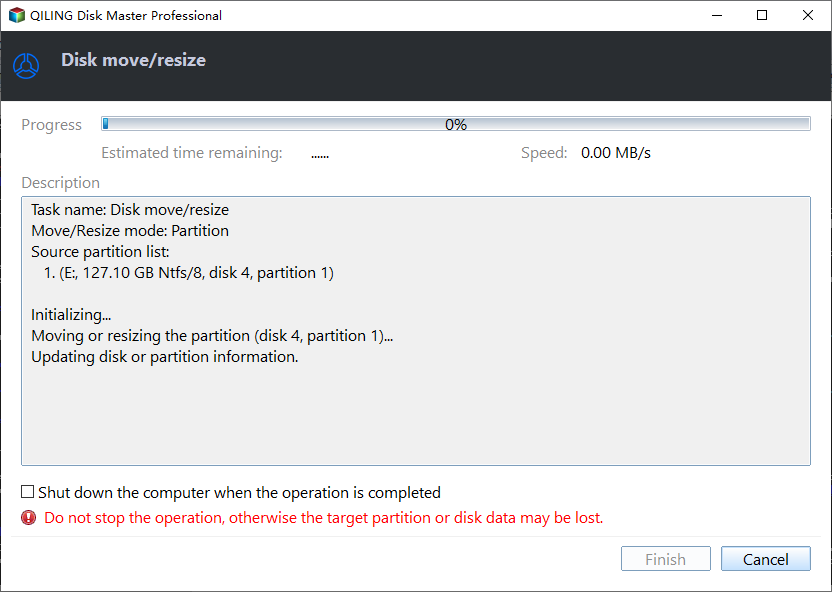
After that, a part of the free space on the D drive will be added to the C drive.
Way 3. Check the SoftwareDistribution folder
If you are unsure whether the update process is still in progress, navigate to C:WindowsSoftwareDistribution. The SoftwareDistribution folder contains all of the temporary files and data needed for the upgrade.
Right-click on a white space in the folder and choose Properties. Then, keep an eye on the folder's size to see if any new files are being added or not.

If they have the same size, you'll need to restart the update.
◤ Section 1. Turn off Windows Update and Background Intelligent Transfer Service
Step 1. Open the Start menu search, type "cmd", and then select the "Run as administrator" option to launch an elevated Command Prompt.
Step 2. Execute the command net stop wuauserv and net stop bits in order.

Then close CMD.
◤ Section 2. Delete the update files in the SoftwareDistribution folder
Step 1. Navigate to C:\Windows\SoftwareDistribution and select all the files and folders there.
Step 2. Right-click on the selected items and select Delete. If you fail to delete them, restart your computer and try again.
◤ Section 3. Turn on the services again
Step 1. Launch Command Prompt in Admin mode.
Step 2. Run the command net start wuauserv and net start bits one by one.
Then exit Command Prompt and try to update again.
Way 4. Uninstall a conexant audio device in Device Manager
Some users reported this way can fix the Windows 11 update stuck issue. Here are the steps.
◤ Section 1. Disable automatic driver downloads
Step 1. Open the Start menu search, type "control", and select Control Panel. In the All Control Panel Items window, select "System".
Step 2. In the next window, select "Advanced" system settings.
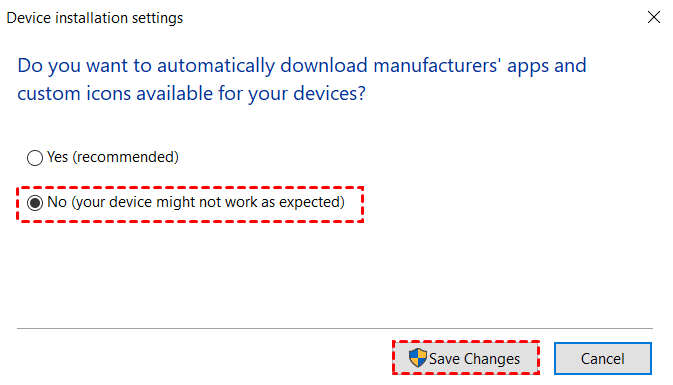
Step 3. Select the "Hardware" tab and click "Device Installation Settings".

Step 4. Select No (your device might not work as expected) and click "Save Changes".
◤ Section 2. Uninstall a conexant audio device in Device Manager
Step 1. Right-click on the Start menu and select Device Manager.
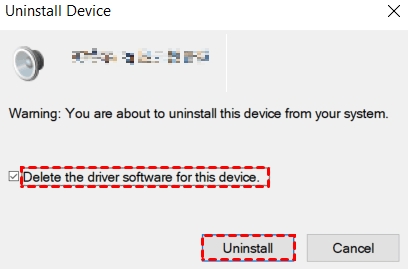
Step 2. Find your audio device under "Sound, video and game controllers". Right-click on the device and select "Uninstall device".
Step 3. In the pop-up window, check the box "Delete the driver software for this device" and click "Uninstall".
Now, reboot your computer. Go to Device Manager to make sure the device drivers aren't reinstalled. Then, try the Windows 11 update again. And after the update, you can enable the driver downloads.
Final lines
In this post, we show you 4 ways to fix Windows 11 update stuck. Hope one of them can help you solve the problem. Qiling Disk Master is an all-around Windows manager, it can also clone disk, migrate OS, convert a disk to GPT/MBR without data loss…etc.
What's more, it has the Server Edition for Windows Server users, and the Unlimited Edition for enterprise users to manage their devices efficiently.
Related Articles
- Solved: C Drive Is Full After Windows 10 Update
C drive is full after Windows 10 update from Windows 7 or Windows 8? Read this article to get realize how to solve C drive full in Windows 10 quickly and effectively. - How to Fix 0xc1900101 during Windows 11 Installation?
If you fail to install Windows 11 due to 0xc1900101 error code, refer to this post as the best solutions and an alternative way for Windows 11 installation will be provided.