Top 3 Ways to Automatic Backup Windows 7 to Network Drive
- Does Windows 7 automatically backup files?
- What do you need to backup in Windows 7?
- 2 common ways to auto backup Windows 7 to network drive
- Method 1: Automated Backup Windows 7 to Network drive via Windows Backup and Restore
- Method 2: Automatic backup Windows 7 to network drive via VHD
- Easier Way to Auto backup Windows 7 to network drive
- Updated: How to Backup Network Drive to Local Disk in Windows 7
- Summary
Does Windows 7 automatically backup files?
Unfortunately, the Windows Backup utility may not allow you to select a network drive as a backup destination. You can try using the built-in File History feature in Windows, which allows you to back up your files to a network location. To do this, go to Settings > Update & Security > Backup, and then select "Add a drive" and choose your network drive. If you're still having trouble, you can also consider using a third-party backup software that supports network drives.
Windows 7 backup and restore allows you to create a system image backup or automatically save personal data to an external hard drive, CD/DVD, USB flash drive, or network drive. However, some users may experience issues where the network drive is not visible for backup, which can be due to the network discovery and file sharing being disabled or the fact that the computer is running a Windows 7 Home version that does not support backing up to a network drive.
To resolve the issue of a network drive not showing in Windows 7, you can enable network discovery and file sharing. If this doesn't resolve the issue, consider upgrading to a more advanced version of Windows, such as Pro, Education, or Ultimate.
For Pro and other advanced versions' users, Windows Backup and Restore can be used, while Home users need to use VHD or network backup software like Qiling Disk Master Professional, which can backup to any network location.
What do you need to backup in Windows 7?
Windows 7 is still widely used globally, making it essential to back up the operating system to an external hard drive or network location. But what should be backed up? To ensure a smooth recovery, consider backing up the entire system, including user accounts, installed programs, and settings. This will help you restore Windows 7 to its current state in case of a system failure or data loss.
If your computer is old, it likely has an operating system, installed programs, and personal data. To restore it, you can reinstall the operating system, which will erase all personal settings, such as background, sounds, and screensavers. You'll also need to reinstall all programs, which can be time-consuming, and unfortunately, your personal data will be lost.
For installed programs on your computer, if they encounter issues, you can simply reinstall them. Some programs may have reactivation problems, which can be inconvenient.
Backing up personal files should be your top priority, as they will be lost or rendered useless if deleted, damaged, or infected. However, if you're tired of reinstalling Windows and apps, you may also want to consider backing up your system or disk, which will include your programs and other essential data.
2 common ways to auto backup Windows 7 to network drive
Here are two common used ways to backup your Windows 7, including Backup and Restore, VHD. If you want an easier way to auto backup Windows 7, you can go to the next part.
- To automate the backup of Windows 7 to a network drive using Windows Backup and Restore, follow these steps: Create a system image and a full backup of your computer. Configure the backup settings to save the backup to a network drive.
- To automatically back up Windows 7 to a network drive via VHD, you can use the built-in Windows Backup feature. First, create a VHD file on the network drive and set the Windows Backup to back up the system to this VHD file.
Method 1: Automated Backup Windows 7 to Network drive via Windows Backup and Restore
To backup Windows 7 Professional or advanced version to a network drive, you can use Windows Backup and Restore. This will overwrite previous backups, keeping only the latest version. To do this, follow the detailed steps for automatic backup of files or system in Windows 7.
Step 1. To start the backup process, click on the Start menu on the taskbar, then type "Backup and Restore" in the search box and select it from the result list.
Step 2. Click Set up backup or Change settings to summon the next window.
Step 3. To save your backup settings, select "Save on a network" and enter the network location, username, and password. Alternatively, you can save your backup to an external hard drive, USB flash drive, CD/DVD, or internal hard drive.
Step 4. Select Let Windows choose or Let me choose, then click Next.
Step 5. 1st, select the folders you want to backup, then click Next. If you want to backup the system, click "Let me choose" and tick "Include a system image of drives..." in the next step.
Step 6. Review the selected folders and click Save settings and run backup. The default schedule setting is 7:PM every Sunday and the default backup type is incremental, but you can change these settings by clicking Change schedule.
Method 2: Automatic backup Windows 7 to network drive via VHD
Windows 7's home backup to a network drive is a bit tricky, as it doesn't natively support saving backups to a network location. However, it does provide an option to create a VHD (Virtual Hard Drive) that can effectively achieve this goal.
Step 1. Click Start menu on the taskbar, then select Computer.
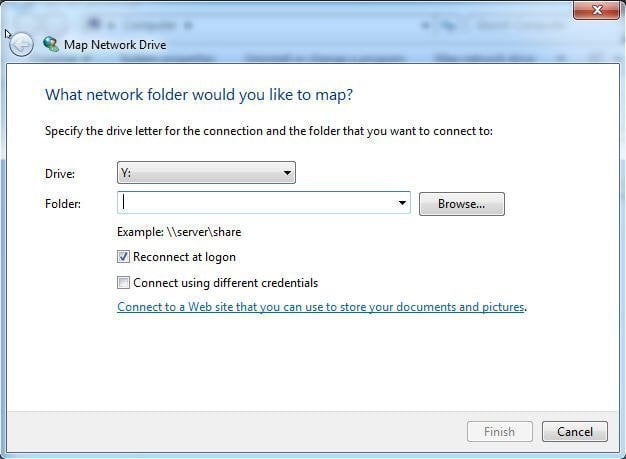
Step 2. Click Tools and Map network drive.
Step 3. Specify a drive letter for your network drive.
Step 4. To complete the process, specify the path of the shared folder on the network drive by either clicking "Browse" to find it, or directly typing the IP address of the network drive and selecting the shared folder. Then, click "Finish".
Step 5. To schedule a backup of Windows 7, use a third-party backup software that supports using a mapped network drive as the destination path. Qiling Disk Master is a reliable option that allows automatic backup to VHD.
Notes:
In all versions of Backup and Restore, you are not allowed to use VHD as a destination path.
If the mapped network drive is not showing up, you can try modifying the User Account Control (UAC) settings in the Registry Editor, checking and adjusting network proxy settings, or turning on the Windows SMB feature.
Easier Way to Auto backup Windows 7 to network drive
This software is easier and more flexible compared to others, allowing backup to various destinations such as network drives, VHD, external hard drives, NAS, and cloud drives like Dropbox, in addition to backing up external devices like CDs/DVDs, USB drives, and more, with the ability to create multiple backup types, including file, system, disk, and partition backups, all within one software.
For automatic backup, you can set up daily, weekly, or monthly backups, and it also supports differential backup, which is more comprehensive than incremental backup. Incremental backup, however, requires all previous images to be complete, making it less ideal. Additionally, you can enable email notification to confirm if your full backup is completed successfully.
To use Qiling Disk Master Professional, you'll need to download the software and have the network drive path, username, and password ready. Once you have this information, you can proceed with the software.
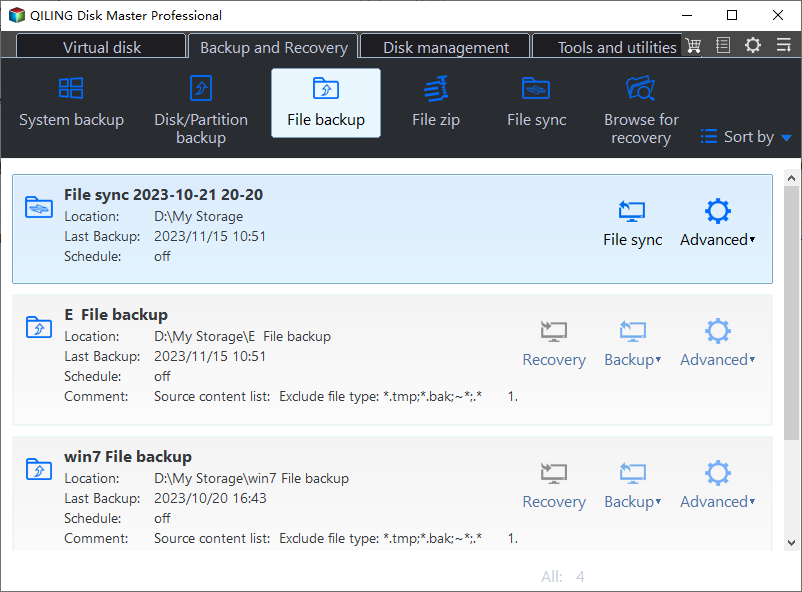
Step 1. Launch Qiling Disk Master and enter the main page. From there, click Backup at the left panel and then select File Backup.
Step 2. Click Files or Folders and select the files or folders you would like to backup.
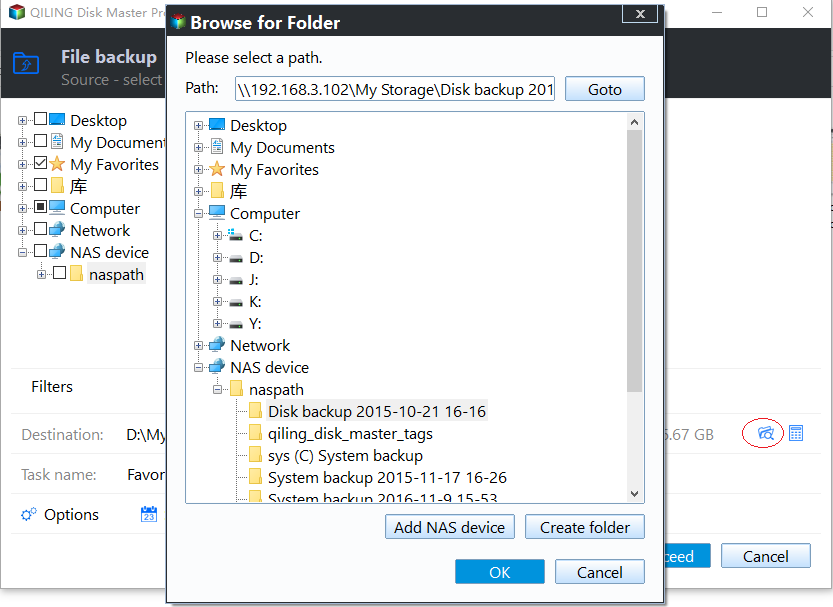
Step 3. To add a network drive, click the triangle button and select "select a network location", then add the network drive by providing its accurate information.
Tip ✎...
If you have Windows 10, you can directly back up to OneDrive, which comes pre-installed, eliminating the need for an external storage device.
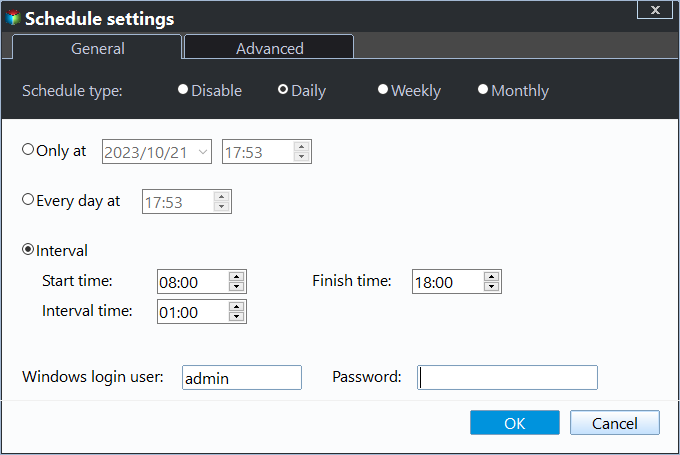
Step 4. To schedule a backup, click the Schedule button and then select Enable Schedule Backup. Choose the desired frequency, such as Daily, Weekly, or Monthly, and select the trigger method, such as Even trigger or USB plug in. Next, set the backup method and navigate to the Backup Scheme section to configure the backup settings.
Tip ✎...
Differential backup can save time and disk space, and is not affected by image file scheduling. It also overcomes the limitations of incremental backup, which can become invalid if one image file is damaged.
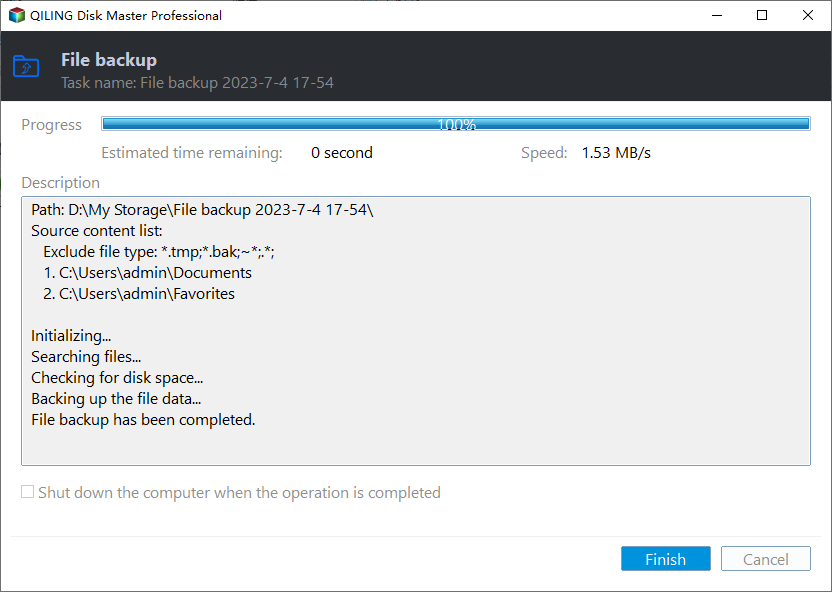
Step 5. After setting up the settings, click Proceed and wait for the result to be checked.
With the increasing availability of storage devices, data loss can still occur due to various reasons such as local disk or partition errors, virus attacks, fires, and even theft of external hard drives or USB devices. To mitigate this risk, it's recommended to follow the 3-2-1 backup strategy, which involves creating three copies of your files, storing them in two different locations, and keeping one off-site backup. This approach ensures that your data remains safe and accessible even in the event of a disaster.
Updated: How to Backup Network Drive to Local Disk in Windows 7
A network drive is a shared storage device that provides access to network resources, similar to a server, NAS, or networked computer. However, if the network computer is turned off, users lose access to the data. To ensure continuous access, some users may want to back up the network drive to a local drive for convenience.
You can also use the 2 methods mentioned above - Backup and Restore and Qiling Disk Master - to achieve this.
✤ Using Qiling Disk Master is straightforward. Simply select the source network path and the target storage, and the steps remain the same.
✤ To use Windows Backup and Restore to back up data from a network location to a local disk, first map the network drive and assign it a drive letter. This allows Windows Backup to detect the network location. Then, create a backup from the mapped network drive to a local disk, following the same steps as Method 1. This method provides a way to back up data from a network location to a local disk using the Windows Backup and Restore utility.
Summary
Automatic backup on Windows 7 to a network drive can be challenging for home users, but alternatives exist. Windows 7 users can use Qiling Disk Master to backup to a VHD, which is compatible with all versions of Windows 7, including Home and Ultimate. This software also offers flexible backup options that aren't affected by image file schedules, providing a reliable solution for users.
With Qiling Disk Master, you can create a system backup, sync folders to a network drive, clone a disk to a larger one, and more, all of which protect your computer and reduce the risk of data loss. Download and try it for yourself.
To protect unlimited computers within your company, you can use Qiling Disk Master Technician, which includes the Qiling Image Deploy tool that allows you to deploy or restore system image files on server-side computers to multiple client-side computers over a network.
Related Articles
- Top 3 Ways to Backup Windows 10 to Network Drive/NAS
You will learn 3 effective methods to backup Windows 10 backup to network drive or NAS easily, even run automatically with the best free auto backup software. - How to Automatic Backup to NAS in Windows 10/8/7
Backing up to NAS is the best way to share data in the same network and protect data security. But how to do automatic backup to NAS in Windows 11/10/8/7? Qiling Disk Master can set it up easily. - How to Sync Folder to Network Drive in Windows 7/8/10
Syncing local folder to network drive automatically is one of the best ways to protect data in the long-term. For easy access, you can choose to make network files available offline. - Best User Profile Migration Tool for Windows 7/8/10
How to migrate user profile to new computer with Windows user profile migration tool in Windows 10, 8, 7? You will find 2 ways to perform profile migration wizard in this article: User State Migration Tool (USMT) and Qiling Disk Master.

