Best Way to Backup Windows 7/8/10/11 to WD My Cloud
About WD My Cloud
WD My Cloud is a personal cloud storage developed by Western Digital Corporation that used to save personal files including photos, videos, music and documents etc. WD My Cloud, claims a cloud of your own, is fairly helpful in people’s daily life. For example, it keeps everything in one place and you can access to this place from any device (laptop, desktop, tablet or smart mobile phone) anytime when you have Internet connected.
Besides, it allows you to share all files to your families and friends, even to public cloud drive like Google Drive or OneDrive. My Cloud is created with capacity of 3TB, 4TB, 6TB and 8TB by its manufacturer, which basically can meet personal user’s all data storage requirements. It is compatible with all popular operating systems like Windows 11/10/8/7 and Mac OS X.
Why backup Windows 7 computer to WD My Cloud
As covered before, WD My Cloud is a kind of personal storage, so it is not uncommon that people store files there. Here are some benefits you can enjoy for backing up Windows 7 to WD My Cloud:
- Just like backing up PC to external hard drive, you’ll save a lot of disk space on local drive and ensure every computer function runs normally.
- Generally, one would like to backup computer, OS or files, constantly to the target storage so that you could get the latest version of the backup. Needless to say, constantly backup requires much more spaces of the storage. You can choose different version of My Cloud based on your demands.
- In addition, you can access to the important files on My Cloud from any device at any time as mentioned before. This unfreezes the limit that you can only get the backups from the device where you backed up to.
Maybe there are many other unlisted benefits that prompt you to backup Windows 7 PC to NAS, yet finding a solution is more important.
How to backup Windows 7 Files to WD My Cloud
The first thought in your mind on this question might be backing it up using WD Smartware Software. WD Smartware will backup your data files from your computer to the My Cloud automatically and constantly. New created, new added and modified files will be backed up, too. Nevertheless, the WD Smartware will not work sometimes, and the support for WD Smartware has ended and is no longer covered under WD‘s software support lifecycle.
Under such circumstance, it is a wise move to turn to third-party WD My Cloud backup software.
Best WD My Cloud Backup Software - Qiling Disk Master
Qiling Disk Master Professional is a reliable WD My Cloud backup software which is designed for Windows OS-based machine in particular, including Windows 11, 10, 8.1, 8, 7 as well as Windows XP and Vista. With Qiling Disk Master Professional, these features provided:
- Backup: Disk Backup, System Backup, Partition Backup, File Backup.
- Clone: As a great WD disk cloning software, it allows you do System Clone, Disk Clone, Partition Clone.
- Restore: Selective file restore, Universal Restore, etc.
- Sync: File Sync, File Sync, Two-Way Sync, and File Sync.
- And more...
Select the one that help you most. Let’s acknowledge the detailed steps of backing Windows 7 OS up in following part.
Steps of backing up Windows 7 to WD My Cloud
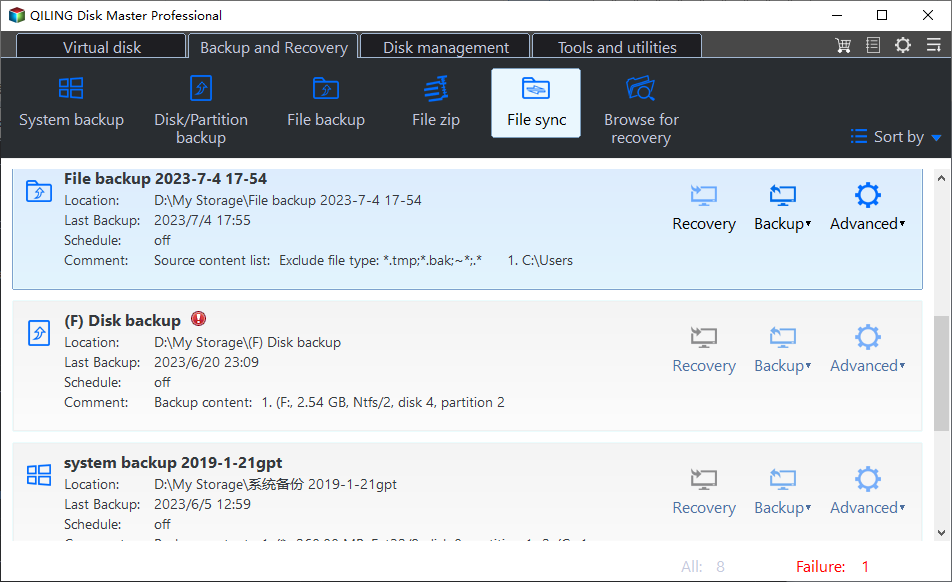
1. Have your WD My Cloud connected to your Windows 7. Download (30-day free trial), install and start Qiling Disk Master.
2. Go to Backup and recovery > File Sync.
3. Click Folder to select the Windows 7 files you want to sync.
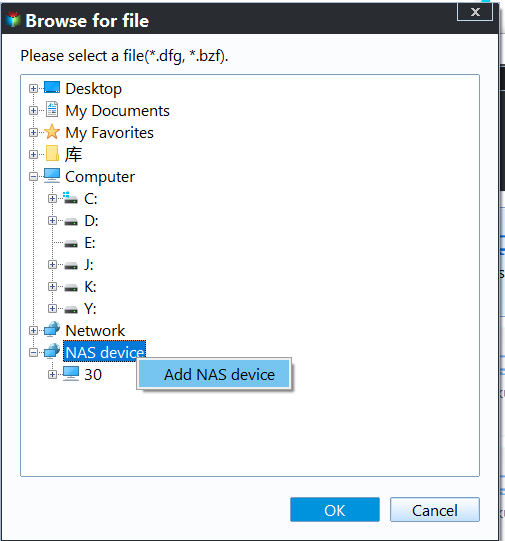
4. Click the box next of destination, then select Share/NAS in the popping out Open window.
5. Click Add Network Location and input IP address of the WD My Cloud and credentials, then click OK.
6. Click Proceed to backup Windows 7 to WD My Cloud easily.
✎Tips:
- You can set scheduled sync tasks in Daily, Weekly, Monthly, Event-trigger or USB plug in in Schedule.
- Above all steps are applied to Windows 8, 8.1 and 10, or previous Windows OS as well.
There are some other sync features, you may interested in. Sync changes or newly added files in real time since the last backup with real time sync if you prefer, etc.
Verdict
Backing up Windows 7 computer to WD My Cloud needs only a few clicks with the help of Qiling Disk Master.
What’s more, you can backup Windows 7 boot disk entirely with the Disk Backup feature. This powerful software also allows you to backup Windows 7 and restore on another computer, which is called Universal Restore. Create Bootable Media in Tools beforehand just in case the system fails to boot one day.
If you would like to protect unlimited PCs and Servers from one central management console within the same LAN, It’s highly recommended to use Qiling Centralized Disk Master to get it done.
Related Articles
- Backup WD My Cloud to Google Drive with the Best Freeware
Do you plan to backup WD My Cloud to Google Drive? Read this article thoroughly to get the best freeware to assist you. - Quick Fixes to WD Backup Not Working in Windows 10/8/7
WD Backup not working? You can refer to this article and find solutions to WD Backup issues. You can also find the best free alternative to WD Backup here. - Best Free Way to Backup WD My Cloud to Amazon Drive
You need to create multiple backups, not only backup WD My Cloud to Amazon Drive, but also to other clouds like OneDrive, Google Drive, Dropbox etc, so your data is always safe even if the Amazon Drive is deprecated. - Download the Best Free WD Elements Backup Software
You will find the best free WD Elements backup software - Qiling Disk Master and learn how to backup WD Elements hard drives automatically with simple steps.


