Fix a Corrupted User Profile in Windows 7, 8, 10 (4 FREE Ways)
- What causes a corrupt user profile in Windows?
- How to Fix a corrupted user profile in windows 7/8/10/11 quickly
- Method 1: Restart your computer to fix a corrupted user profiles
- Method 2: Use System Restore to fix a corrupted user profiles
- Method 3: Recreate user profile to fix corrupted user profiles
- Method 4: Restore registry settings in safe mode to fix corrupted user profiles
- Backup your system to prevent this error happening again
- Conclusion
What causes a corrupt user profile in Windows?
When you type your password and press Enter at the Windows log-on screen, you may receive an error message like "The user profile service failed the logon. User profile cannot be loaded." If you receive this error message, that's to say, the user profile is corrupted or damaged. And this error may happen in all the Windows system, such as, Windows 7, Windows 8.1 or Windows 10.
Then, what causes a corrupt user profiles in Windows 7/8/10? Here are common causes listed below.
- Failed Windows Update or Automatic Updates. Usually, the process includes critical system files upgrade, especially service pack installation, which will update the user profiles. If it fails, the user profiles cannot be loaded properly.
- Damaged hard drive file system due to write errors, power outages or virus attacks.
- Other causes, such as, hardware problem like bad memory or hard drive failure, force shutdown, malware infection, etc.
How to Fix a corrupted user profile in windows 7/8/10/11 quickly
After fully understanding the causes, then we'll start to fix the corrupted user profiles in the following. You have 4 free & effective ways to help you.
Method 1: Restart your computer to fix a corrupted user profiles
Windows 7 user profile cannot be loaded for a number of reasons, the simplest one is that you shut down the computer forcefully or your computer is infected with malware.
Thus, when you receive the error "The user profile service failed the logon. User profile cannot be loaded", the first is to restart your computer and then check if your computer has malware.
If this is not the reason why you receive this error message, you can try the second way.
Method 2: Use System Restore to fix a corrupted user profiles
System Restore can help you roll back Windows installation and essential system files or undo changes after installing Windows Update, device drivers, application, or modifing system settings incorrectly using Registry or other tools etc. Thus, if the Windows update or Automatic Updates is the cause of corrupt user profile, you can try to restore system from a restore point. The steps are below.
Step 1. Go to safe mode with command prompt. Then, type rstrui to open system restore window.
For Windows 7: Restart your computer and press F8 repeatedly until you see the Advanced Boot Options window, then you can choose Safe Mode with Command Prompt option.
For Windows 10: Press Restart while hold the Shift key until you see the Choose an option window. Then, select Troubleshoot > Advanced options > Startup Settings > Restart and choose Enable Safe Mode with Comman Prompt.
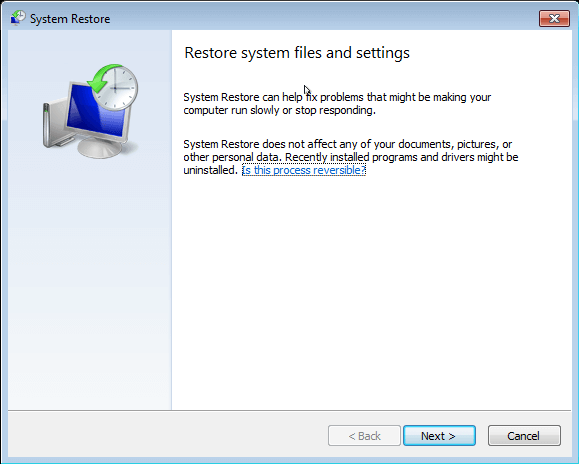
Step 2. Then, you will see restore system files and settings window below and click Next.
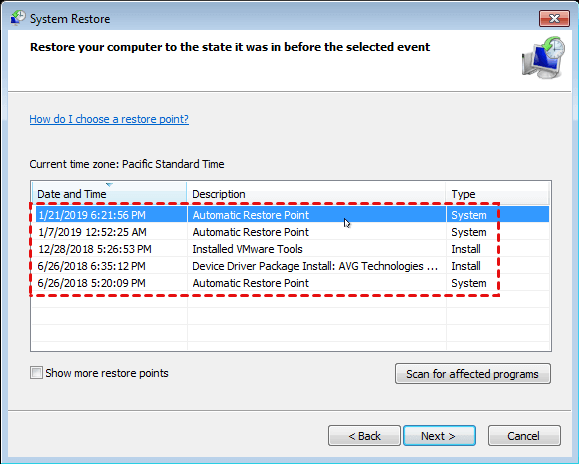
Step 3. Choose the lastest System Restore Point and click Next.
Step 4. Preview and confirm the restore point you are currently chosen, click Finish to recover user profile in Windows 7.
Method 3: Recreate user profile to fix corrupted user profiles
Before recreating user profiles, you still need to check if the profile service is working properly. If it is, you can use the following method to fix this error. Note that the feature name may be a little different, just use the following steps in Windows 7 as a reference.
To check the profiles service status, please start your computer with "safe mode with command prompt". Then, type net user Ivy 0 /add to create a new user, restart your computer and log in as Ivy. If you successfully log in with new user, the profile service is ok.
- Note:✎...
- Ivy refers to the new user name you want to create while 0 is the password of the new user account.
Create a new account when user profile corrupt
Step 1. Boot your computer with administrator account.
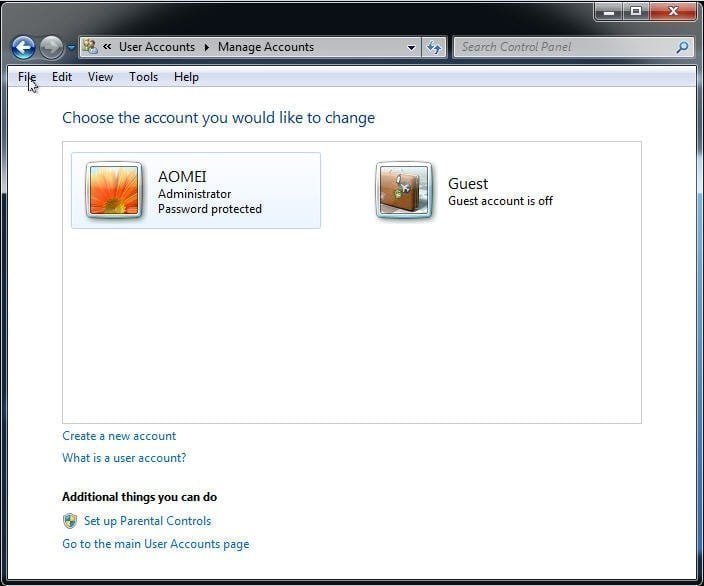
Step 2. Navigate to Control Panel > User Accounts and Family Safety > User Accounts > Manage another account, then click Create a new account at the left bottom.
Step 3. In this window, type a name for your new account and select an account type. Then, click Create Account.
Copy user profile to new user account
Step 1. Access Computer and click Tools > Folder Options > View tab, then check the Show hidden files and folders option > uncheck the Hide protected operating system files option. At last, click Apply and OK to run the pending operation.
Step 2. Go to C: \User\OLD_USERNAME, then right-click all files except for Ntuser.data, Ntuser.data.log, Ntuser.ini and select Copy.
- Note:✎...
- The "C:" parameter refers to the system drive while OLD_USERNAME refers to the username that has corrupted user profile.
Step 3. Go to C: \User\New_USERNAME (the username you created just now)and paste all files in this folder.
Step 4. Restart your computer with the new username.
Method 4: Restore registry settings in safe mode to fix corrupted user profiles
Similar to recreating user profile, you need to check the status of profile service first. Then, try steps below to find the corrupted Profile Subkey in Windows registry and fix a corrupted user profile. Note this method works for Windows 7/8/10.
Find the corrupted user profile in Registry
Step 1. Start your computer in safe mode.
Step 2. Enter into the Registry window. You can press Win + R to summon the Run window, then type regedit.exe and click OK.
Step 3. Navigate to the following key from the left panel.
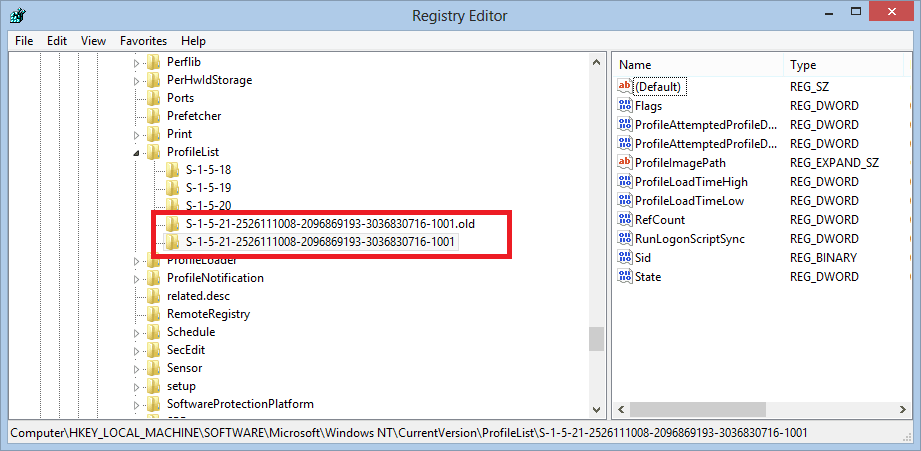
HKEY_LOCAL_MACHINE\SOFTWARE\Microsoft\Windows NT\CurrentVersion\ProfileList
Step 4. Check the subkeys named S-1-5 followed by a long number and see if there are subkeys with the same name. The only difference is that one of them has the .bak extension at the end.
If that's your case, you can fix it using .bak subkey. If that's not your case, you can delete the corrupted user profile from the registry.
Fix the corrupted profiles using .bak subkey
Step 1. Check the ProfileImagePath value of subkey S-1-5 with .bak extension, it should be "C: \Users\username".
Step 2. Go to the "C:\Users" folder in Windows Explorer and be sure the corrupted username is the same as you see in the ProfileImagePath value.
Step 3. Rename the subkey with .bak to .ba extention. Right-click the subkey with .bak extension and select Rename, then chang it to .ba at the end.
Step 4. Rename the subkey without .bak to .bak extention.
Step 5. Remove the subkey with .ba extention to have no extention.
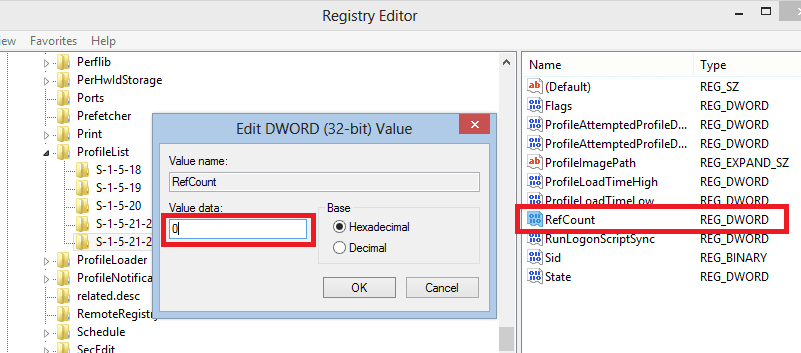
Step 6. Go to the subkey without .bak extention and change the value data of RefCount and State key to "0".
Step 7. Close the registry and restart your computer to log in with the corrupt user account.
Delete the corrupted user profile from registry
Step 1. Click each subkey named S-1-5 followed by a long number and check ProfleImagePath to find the profile subkey that has corrupted user profile.
Step 2. At the left panel, right-click the subkey with corrupt user profile and select the Delete option.
Step 3. Close registry editor.
Step 4. Restart your computer and login to the account with corrupted user profile. (now, the profile should be clean)
Step 5. Log off and log on with Admin account.
Step 6. Navigate to the subkey below again and see the ProfileImagePath key. It should be named as "CorruptedProfileName. YourComputerName".
HKEY_LOCAL_MACHINE\SOFTWARE\Microsoft\Windows NT\CurrentVersion\ProfileList
Step 7. Double-click the ProfileImagePath key and remove ".ComputerName" in the Value data.
Step 8. Close registry editor.
Step 9. Go to Computer > C: \Users folder. Then, enable hidden files and folders using Folder Options.
Step 10. Copy the following files from the folder with "CorruptedProfileName.YourComputerName" to a folder with corrupted user profile. After that, restart your computer and log on to the user account with corrupted files.
- Ntuser.data
- Ntuser.data.log
- Ntuser.ini
Backup your system to prevent this error happening again
Now you may already fix a corrupted user profile in Windows 7/8/10, and can use your computer happily again. But as soon as you think about the problem and its various causes including failed Windows update, damaged file system, hard disk failure, etc, you may worry about the potential and further problems such as data loss, system crash, etc.
To completely resolve this issue, it's suggested to make a system backup. Then, even if your computer runs into a serious problem, you can restore system image to new hard drive to get it back quickly. And, disk backup and restore can achieve the same results. All you need is to select a trust and reliable backup software, Qiling Disk Master Standard is a great choice. It has the following advantages:
- Schedule Backup: You can choose to backup system from daily to monthly and wake up your computer to run scheduled task automatically. More precisely, you can set backup date, backup time, even intervals.
- Incremental Backup: You can enable this feature to backup only changed files instead of making an exact copy of original files, which requires less backup time and disk space. And it greatly reduces the backup disk full issue.
- Normal or high compression level: This is another useful way to help you save much disk space by compressing the image file to smaller. The high compression level requires more backup time and less disk space.
Here I'll take system backup as an example to show you the steps:
Step 1. Download Qiling Disk Master Standard and open it. Then, click Backup and System Backup in order.
Step 2. Select a destination path to save the backup image since the system-related partitions are chosen by default. You can backup computer to USB drive, external hard drive, network location, etc.
- ★Helpful tips:
- You can set Normal or High compression levels in the Options, Daily/Weekly/Monthly backup in the Schedule Backup, Incremental Backup in the Backup Scheme.
- Except for Incremental Backup, you still can backup only changed files using Differential Backup (advanced version). It's based on last full backup, and requires more backup time and disk space. But it's safer.
- If you still worry about the backup disk full issue due to accumulated backups, you can choose to delete old backup images regularly with Backup Scheme(supported by professional version).
Step 3. Then, click Proceed to execute the backup task.
With backup image in hand, you can easily restore system image to new hard drive or SSD. To avoid computer unbootable, it's suggested to create bootable USB or recovery environment in Windows 7, 8, 10, 11. Both of them can help you boot computer from and perform system restore.
Conclusion
To fix a corrupted user profile (windows 7) or other operating systems, you have 4 methods. You can try them one by one until this problem is fixed. After that, it's suggested to backup system or disk with a free backup software like Qiling Disk Master, preferably a schedule automatic backup.
It will make an exact copy of all your files, including the operating system, program, user profile, personal data, etc. Then, you can restore system or disk image to save your computer from any disaster. More surprising, this image can be used on different computer and to perform dissimilar hardware restore while ensure boot.
In addition, this software has different version, you can choose the one per your needs. Which one should you have? Please check the details in the edition comparison page.
Related Articles
- 2 Ways to Recover Deleted User Profile in Windows 7
If your Windows 7 computer stuck on Welcome screen out of some reasons, you can refer to this article and find effective solutions. - How to Backup User Profiles in Windows 7 and Restore it
If your Windows 7 computer stuck on Welcome screen out of some reasons, you can refer to this article and find effective solutions. - Quick Fixed: User Profile Service Failed the Logon Windows 10
If your Windows 7 computer stuck on Welcome screen out of some reasons, you can refer to this article and find effective solutions. - Preparations for Windows Server 2016 in-Place Upgrade
This article focuses on how to prepare for Windows Server 2016 upgrade and upgrade Windows Server 2012 to 2016 step by step. No data loss.
