How Does Windows 7 Backup and Restore Work? (2 Cases)
Quick Navigation:
- About inbuilt Windows 7 backup tool
- How to use Windows 7 backup in two cases
- Alternative to Windows 7 Backup and Restore when it fails
- Wrapping things up
About inbuilt Windows 7 backup tool
In Windows 7, the Backup and Restore tool allows users to create backups and restore from previous backups, enabling them to safeguard their data and settings.
- Set up a backup system to safeguard your Windows 7 operating system, settings, and data by either letting Windows 7 automatically select what to backup or manually choosing specific folders and disk drives to include in the backup.
- Create a system image that captures the operating system, system settings, programs, and files on your computer, allowing you to restore your system to its current state in case of a problem or upgrade.
- To restore files from a backup or recover your computer from a system image, follow these steps: you can restore files from a backup you've created, or recover your computer from a system image. This process can help you get back to your normal activities quickly, and minimize the disruption caused by a system failure or data loss.
Windows 7 backup works by creating a copy of the system, including all files, settings, and applications, at regular intervals or on demand. This copy, called a backup, is stored on an external hard drive, network location, or DVD. The backup process involves creating a Windows Backup file, which contains a snapshot of the system at a specific point in time.
How to use Windows 7 backup in two cases
To create a custom backup and a system image in Windows 7, you can use the Backup and Restore feature separately. For a custom backup, you can select specific files and folders to back up, while for a system image, you'll create a full backup of your entire system, including the operating system, programs, and data.
Case 1: Create a custom backup
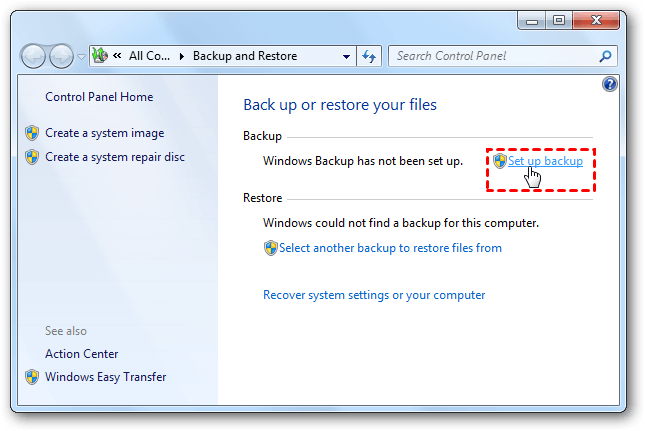
1. Go to the Start Menu, type "backup" in the search box, and choose Backup and Restore.
2. In the Backup and Restore window, click on Set up backup.
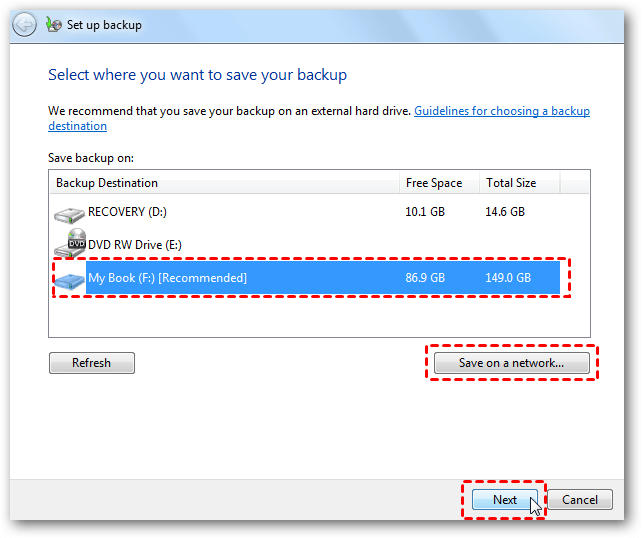
3. Save your backup to a chosen location and click Next. You can select from available drives or network locations.
4. Select Let me choose to create a custom backup and click Next. This will allow you to specify the types of files and folders you want to include in the backup.
5. Select the desired items to be backed up and click Next.
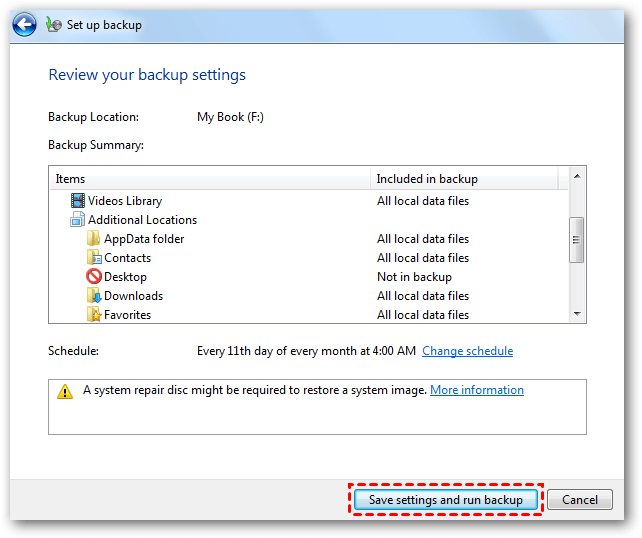
6. Review your backup settings and click on Save settings and run backup.
✍ Tips:
▶ Your backup is created on a default automatic schedule of every Sunday at 7:00 PM, but you can change this by clicking on the "Change schedule" option.
▶ Windows backup automatically keeps track of new or modified files and folders, adding them to your backup, which performs incremental backup by default.
Case 2: Create a system image
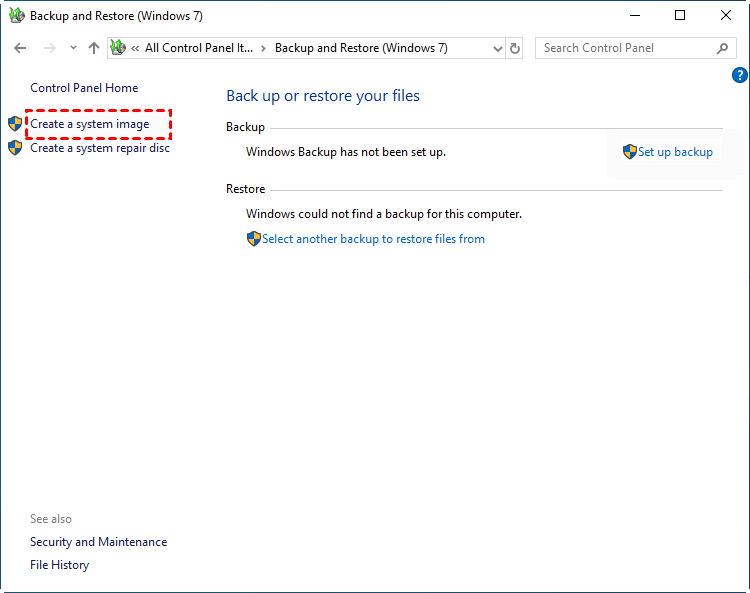
1. Go to Backup and Restore as in Case 1.
2. In the Backup and Restore window, click on Create a system image.
3. Choose the location to save your system image, and then click Next. The available locations are hard disk, DVD or network.
✍ Tips:
▶ It's not recommended to save the system image to the same physical disk as your system drive, as you may lose the image file if the disk fails.
▶ To use a hard disk as a backup location, it needs to be formatted to NTFS.
4. The required drives for Windows to run are selected by default. You can add other drives to be backed up and click Next.
5. Confirm the settings, and then click Proceed.
Windows 7 backup works by using the Backup and Restore feature, which allows users to create system image backups and file backups. However, some users may encounter issues with the Backup and Restore feature not working properly, resulting in a blank page or the button not opening at all. In such cases, an alternative to the inbuilt Windows 7 backup tool is needed.
Alternative to Windows 7 Backup and Restore when it fails
Qiling Disk Master Standard is the best free backup software for Windows, serving as a reliable alternative to Windows 7 Backup and Restore. It supports Windows 11/10/8.1/8/7/Vista/XP.
- There are four types of backup offered in Qiling Disk Master: System/Disk/Partition/File Backup, catering to various needs.
- Various backup locations are supported, including local disks, USB flash drives, memory cards, and NAS devices.
- The Schedule Backup feature allows you to set backups to run automatically at a specified time, ensuring that your data is always up to date and protected. This feature can be set to run at a specific time and frequency, such as daily, weekly, or monthly, providing a convenient and hands-off way to maintain backups.
To install a freeware, download it and then click on the installation file to start the installation process. Once installed, the software's modernized and user-friendly interface can be accessed. Performing backups and restoring from them can be done with just a few clicks.
Wrapping things up
Windows 7 backup works by using the built-in Backup and Restore feature, but users can also turn to a free alternative like Qiling Disk Master, which supports all Windows PC operating systems and offers full backup solutions, including automatic deletion of old backup images in a scheduled backup.
Related Articles
- 2 Quick Ways to Do Schedule Automatic Backup in Windows 7
Running a scheduled backup in Windows 7 can help you automatically protect Windows 7 data and files daily, weekly, or monthly. - Windows 7 Backup and Restore - A Brief Review
In this article, you will see the step-by-step guide to perform Windows 7 backup and restore with Windows built-in tool or its alternative. - Top Three Ways to Automatic Backup Windows 7 to Network Drive
This article will show you 3 ways to automatic backup Windows 7 to network drive, the last one is much easier. Go head and check it. - Top 2 Ways to Stop Windows Backup Service in Server 2012
You will learn how to stop Windows backup service in server 2012 and protect your system without running backup at startup.


