PXE Boot Windows 7 - Easy Guide to Boot Computers via Network
About PXE boot Windows 7 over network
PXE (short for Pre-Execution Environment) is a standard client-server environment that boots client computers remotely by an administrator via network. With this technology, you can boot multiple computers within the LAN even without hard disk, CD-ROM or USB drive.
What are benefits of PXE boot Windows 7?
When booting Windows 7 via PXE, the client computers will boot from a centralized image file held on the designated server machine. Therefore you can enjoy following conveniences:
- You don't need an installation disk or USB. It works even when your machine has no CD drive or USB port.
- You can easily boot and maintain multiple computers within the LAN, instead of doing this machine by machine.
- You can remotely solve problems of client computers, and centrally manage installation, updating, etc.
What are the prerequisites to PXE boot Windows 7?
Despite all the benefits, each computer you want to install Windows 7 via network should satisfy certain conditions.
- It should has a PXE-enabled NIC (network interface cart) that support Wake-on-LAN mode.
- It should be connection to the network through wired Ethernet.
- The client-side and server-side must exist in the same LAN and network segment.
If all the requirements are met, you can follow this guide to network boot Windows 7.
How to PXE boot Windows 7?
In general, installing Windows 7 via PXE boot requires you to setup a DHCP server for IP address assignment and a PXE server to transfer the boot file.
Process: the client-side sends out a DHCP broadcast to apply for PXE boot > the DHCP server replies with an IP address > the client uses the address and contacts the PXE boot server to request the path to Network Boot Program (NBP) > the PXE boot server provides the NBP path > the client downloads the image file and boot from it.
If you want to complete the process manually, you can refer to this answer. But as you can see, it's not easy nor straightforward for people who's not computer savvy. Any improper operation could lead to boot failure or even more serious consequences.
Thus you may wonder, is there an easier way to set up PXE boot in Windows 7/8/10?
There are actually some third-party software could simplify the operation with intuitive wizard. You just need to pick an effective one with high compatibility and success rate. In this case, the PXE Boot Tool integrated in Qiling Disk Master Workstation may be one of the best choices.
Compared with other PXE boot tools, Qiling PXE Boot Tool supports self-created bootable micro-system without the need to deploy any other plug-ins or programs. Thus, Linux bootable ISO or Windows PE bootable ISO can be loaded by this PXE Boot Tool, and enables you to maintain client computers within LAN through network.
With it, the operation of PXE Boot Windows 7 is simply split into two parts – create or select an image file on the master computer and start the service; set the BIOS boot mode of client computers as Network boot.
Steps to set up PXE Boot in Windows 7/8/10
To use the PXE Boot Tool, you need to download and install Qiling Disk Master Workstation on the master computer.
As you can see, Qiling Disk Master is a complete backup & restore software with several functional modules. PXE Boot Tool is one of its built-in utilities, simple yet powerful.
Steps:
1. Launch this software, click Tools on the left panel and choose Qiling PXE Boot Tool under Backup Tools.
2. Choose or create a Windows 7 pxe boot image, then click Start Service.
● Qiling PXE Boot Tool enables you to create a Windows PE system image directly by selecting Boot from Qiling Windows PE System, or create a system image for Linux based computers by selecting Boot from Qiling Linux System.
● Alternatively, you can choose Boot from custom image file to load the bootable ISO file created by Create Bootable Media (in Tools tab) or a Windows PE boot image created by Qiling PE Builder.
● If the current system doesn't have the required environment to create a bootable image file, the program will prompt you to install Windows AIK or ADK.
3. Now you've set up the PXE server in Windows 7. When the service has started, you can turn on the client computers within LAN and enter BIOS settings.
The key to enter BIOS may be F2, F10, Esc, etc. You could search the Internet for specific approach.
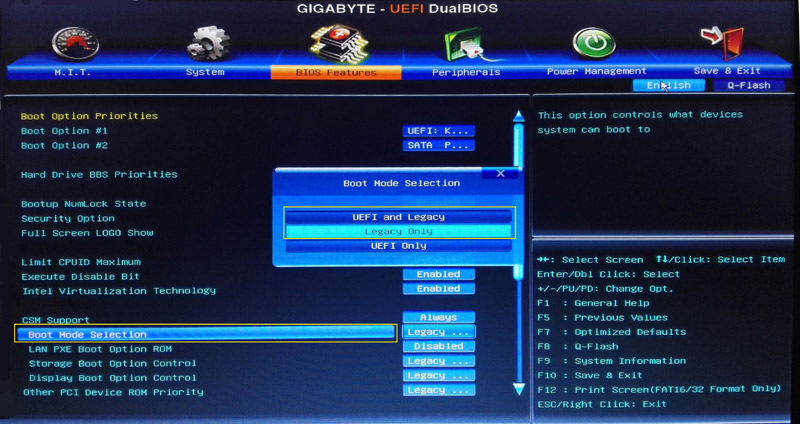
4. Select Boot mode according to your situation.
● UEFI is currently the mainstream boot mode with higher performance security. But if you're booting from a network that only supports BIOS, you'll need to choose Legacy mode.
● Qiling PXE Boot Tool supports booting UEFI machines, but currently only WIM file can be used for UEFI. If the file is an ISO file, you better change the boot mode to Legacy Boot Mode.
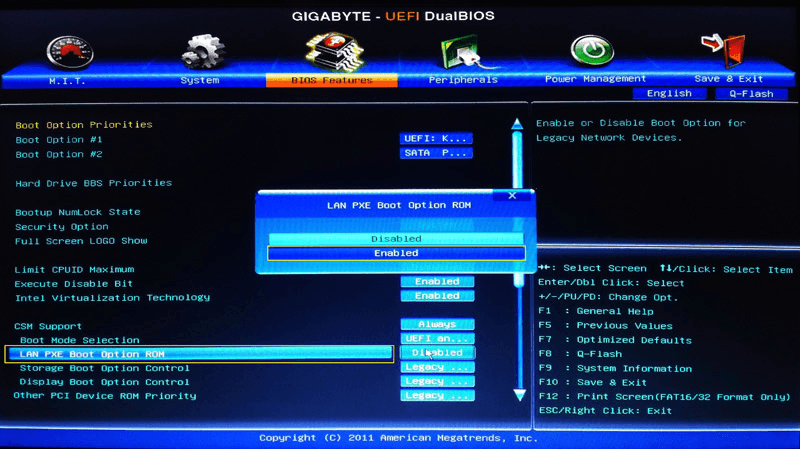
Enable PXE boot option.
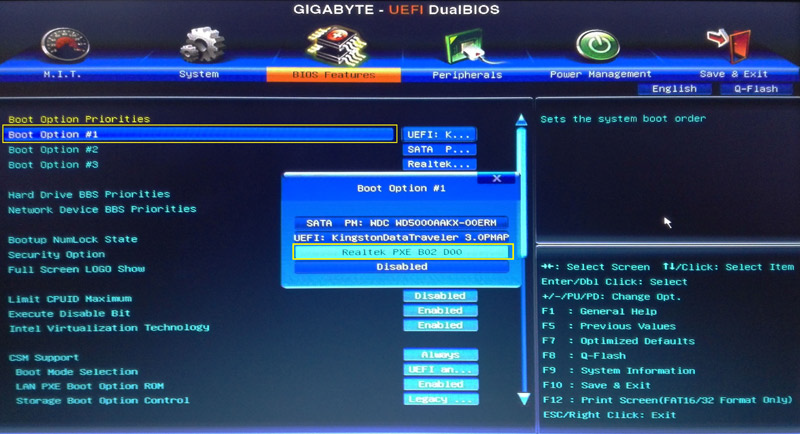
Then set the PXE option as the first place in Boot Priorities.
5. Wait for the PXE boot to complete. The time it takes depends on your network speed and the image file size.
If the network speed is impacted badly because there are too many computers using PXE boot, you can try dividing clients into smaller groups.
Conclusion
If you find the way to PXE boot Windows 7 is complicated and confusing, Qiling PXE Boot Tool can greatly simplify the process. You just need to set up a boot file and then enable client computers within LAN to use the PXE service. No more complicated configurations.
As an all-around backup & restore software, Qiling Disk Master can not only help you to PXE boot Windows 7/8/10, but also work well in daily data protection and disaster recovery. For instance, you can use it for system image backup and restore, hard drive cloning, or continuous data protection.
Related Articles
- How to Setup PXE Boot Server in Windows Easily and Safely?
To boot multiple computers within LAN, you can setup PXE network boot server in Windows. But it requires a high level of computer knowledge. So why not try an easier way? - Solved: SCCM PXE Boot Not Working
This tutorial focus on how to solve the problem of SCCM PXE boot not working. To boot client computers easily, you can turn to Qiling Disk Master Professional. - Create Windows PE or Linux Bootable Media with Qiling Disk Master
When the system fails, Qiling Disk Master can create two types of bootable discs: Windows PE (WinPE); Linux kernel based bootable disc so as to restore data or system. - Image Deployment: Deploy OS Image to Multiple Computers over Network
Learn how to deploy a system or disk image to multiple computers on the same network with the best free OS image deployment software - Qiling Image Deploy.


