How to Schedule Daily Backup in Windows 7/8/10/11 | 2 Ways
Is it necessary to schedule daily backup in Windows 7
To avoid data loss and system failures, it's recommended to set up an automatic daily backup task in Windows 7, ensuring that your files and system are protected and can be easily recovered in case of any issues.
In Windows 7, setting up a scheduled backup is the best way to ensure the newest data is safe, as manual configuration can be inefficient and unreliable.
If you don't use computers frequently, a weekly or monthly backup may be enough. However, if you frequently use your computer, have important files, or meet specific conditions, it's recommended to perform daily backups in Windows 7.
- Using a computer frequently for daily work;
- Working on an important project;
- The computer user is making significant changes or updates to the computer on a daily basis, such as installing new software, updating operating systems, or modifying system settings.
Setting up a daily backup schedule on Windows is a straightforward process. Simply set up a schedule and complete a full backup once, and you're done. I'll guide you through the steps.
How to create Windows 7 daily backup for free
To auto backup Windows 7 files daily, you can try two free methods. Method 2 is more recommended for its fast speed and high compatibility.
- To set up a schedule to backup files daily in Windows 7, open the Backup and Restore tool by typing "backup" in the Start menu search bar. Click on "Backup" and then click on "Set up backup." Choose the location where you want to save your backups, such as an external hard drive or a network drive.
- To daily backup files or OS in Windows 7, you can use the built-in feature called "Backup and Restore". This method is easier and quicker than the previous one. You can access it by going to Control Panel > System and Security > Backup and Restore (Windows 7).
Method 1. Set up a schedule to backup files daily in Windows 7
Windows 7 and 10 have a built-in Backup and Restore tool that allows users to set up a backup task for selected libraries and folders with a schedule, including daily, weekly, and monthly options.
The software can meet the basic needs of Windows 7 automatic backup, but it also has some limitations, such as
- You can specify the source folders or partitions, but cannot accurately backup the operation system.
- There's an option to create a system image for Windows 7 system image recovery, but it can't be scheduled.
- The backup process is taking a long time and affecting the speed of other operations.
- You may not be able to set up a backup due to issues like Volume Shadow Copy Service error 0x80042302, which can prevent the backup process from completing.
If you're experiencing any of the following situations, you may want to consider an alternative solution: having to repeat a task or process, dealing with a complex or time-consuming task, or needing to make changes to an existing process. In these cases, Method 2 may be a better option for you.
If you are okay with it, here are the steps to do daily backup in Windows 7 with the built-in Backup and Restore.
How to daily backup Window 7 with Backup and Restore:
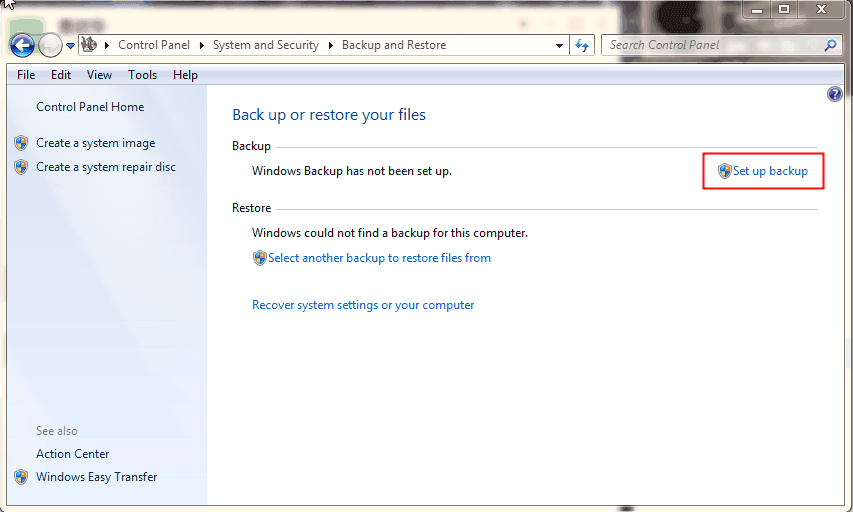
1. To access the Backup and Restore feature in Windows, click on the Start button, then select Control Panel, followed by System and Maintenance. Alternatively, you can search for "Backup and Restore" in the Start menu.
2. On the main page of Backup and Restore, click "Set up backup" if you haven't created any backups yet.
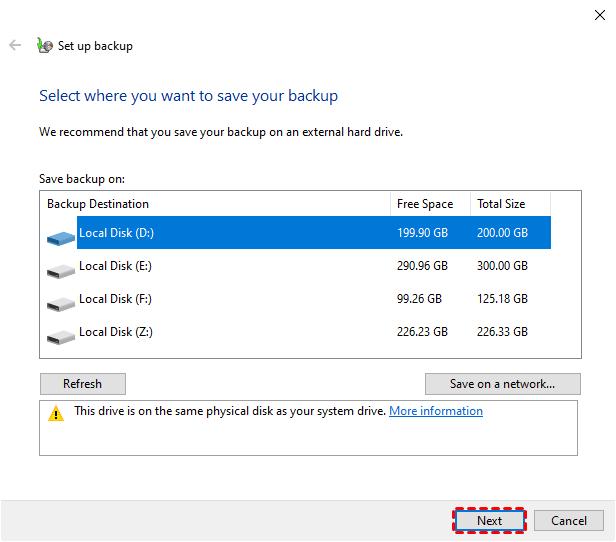
3. Choose where to save your backup. An external hard drive is more recommended than local disk, or you can click "Save on a network..." to specify a network location, then click "Next".
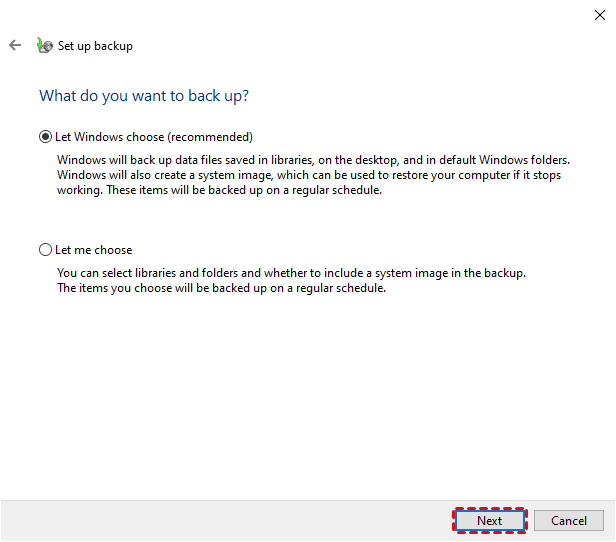
4. Choose what to backup. You can select "Let Windows choose" to backup libraries, desktop and default Windows folders, or choose "Let me choose" to customize the folders or partitions you want to backup. Click "Next" to proceed.
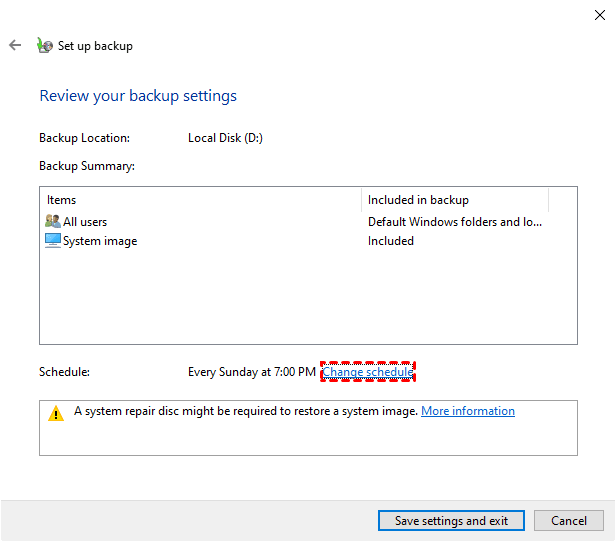
5. Review the backup settings, then click on "Change schedule" to create an automatic backup task.
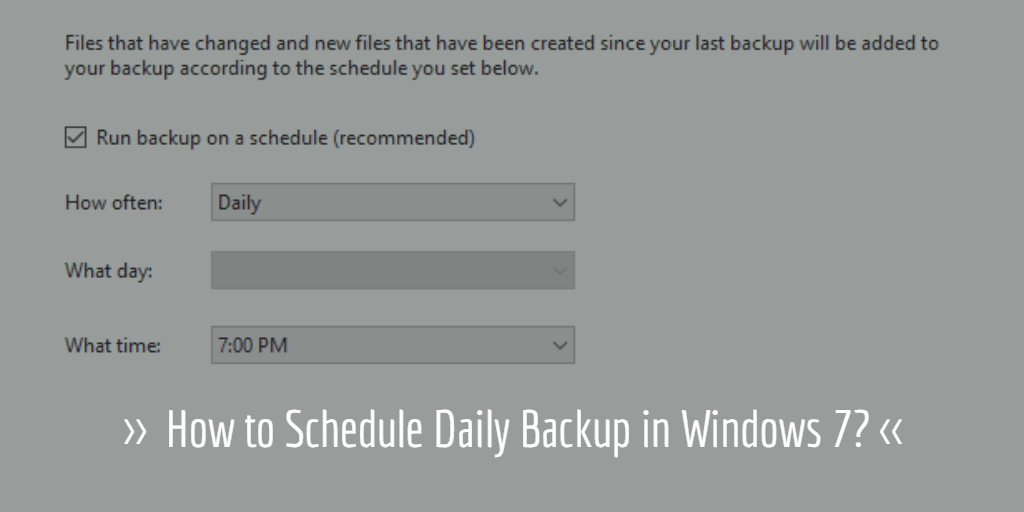
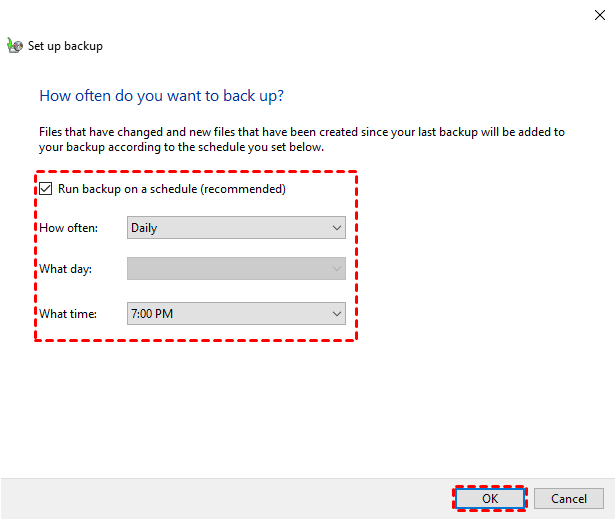
6. To create a daily backup task in Windows 7, select the desired backup frequency, choose a specific time to proceed automatically, and click OK to confirm your settings.
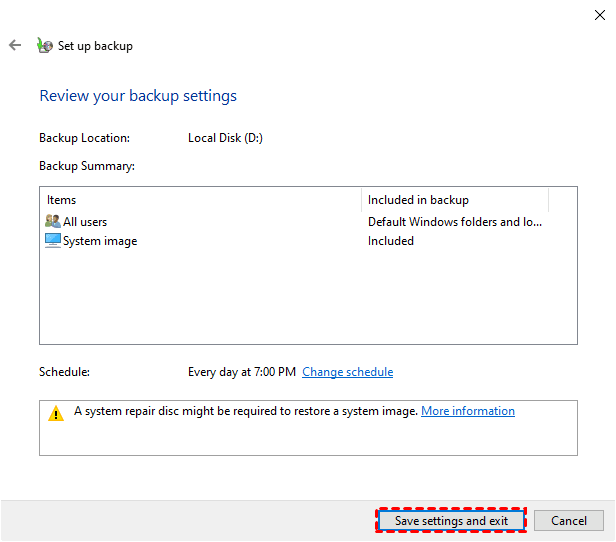
7. Review all your settings, including the schedule, click Save settings and exit to proceed.
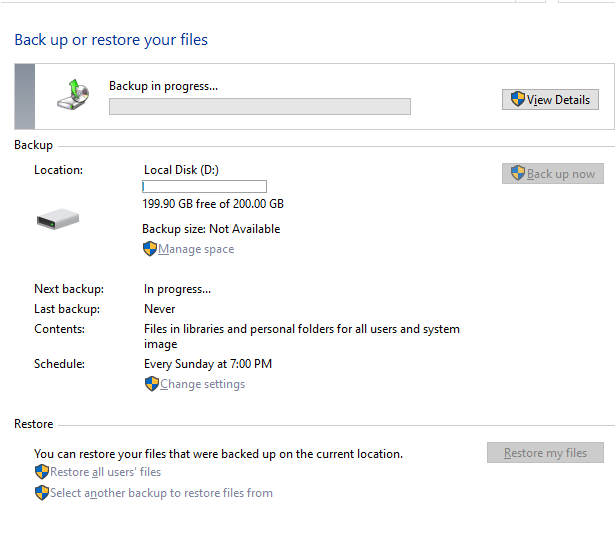
8. Wait patiently till the progress has been completed. You can then modify the scheduled backup by clicking Change settings. You can modify the scheduled backup by clicking Change settings after the progress has been completed.
Method 2. Easier and quicker way to backup files or OS daily in Windows 7
This approach is more flexible and faster than Method 1, allowing for more detailed configuration of the Windows 7 daily backup. It enables backing up selected files, partitions, the operating system, or the entire disk, and provides a range of schedule options to suit specific needs.
This method requires a scheduled backup software, Qiling Disk Master Standard, which provides complete data protection and disaster recovery solution for Windows operating systems. It runs quietly in the background without interrupting other operations, and the backup speed is good, with the scheduled backup running smoothly.
How to set daily backup in Windows 7 with Qiling Disk Master:
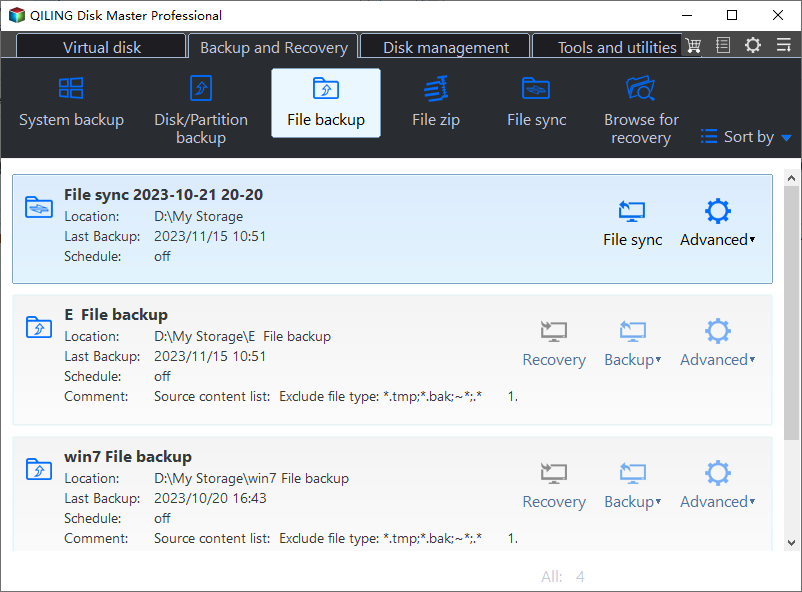
1. Download, install and launch the software, then select the Backup option and choose the backup mode you want, such as File Backup.
✎Tips:
- You can also use the Cloud Backup feature to backup files, which allows you to backup files to Qiling Cloud without installing a desktop app, and offers 1TB of free cloud storage for 15 days after registering a Qiling account.
- If you want to auto backup your Windows 7 OS daily, choose System Backup instead.
2. To specify the source data for your backup, click on either the "Folder" or "Files" option. This will allow you to select the specific files or folders you want to include in your backup.
3. To better protect your important data, you can backup files to a cloud drive, external hard drive, USB, NAS, etc.
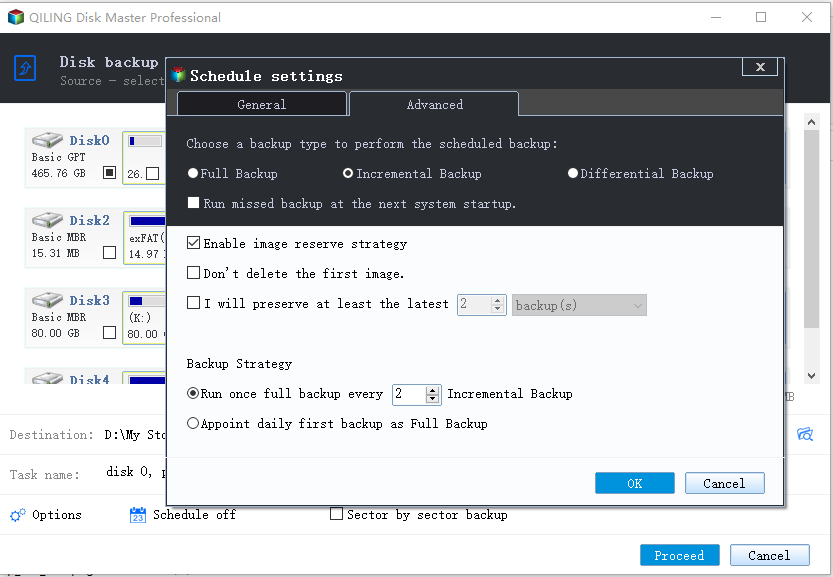
4. Click Schedule Backup and select Daily from the dropdown menu, or customize the time for daily backups, or choose Intervals for multiple daily backups.
In the Backup Scheme tab, you can also select the scheduled backup mode, which is incremental by default.
Upgrading to Windows 7 Professional allows for automatic deletion of older backups, freeing up computer capacity, and is an optional solution to consider.
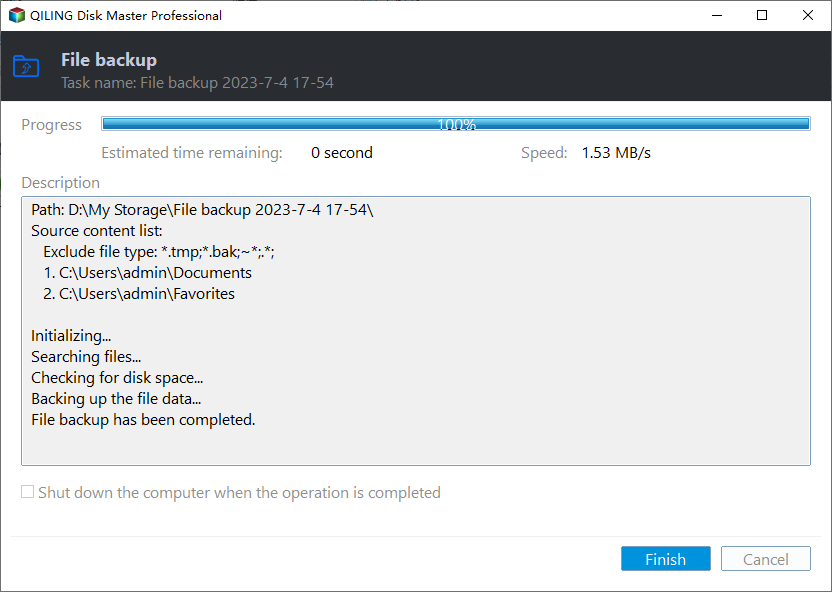
5. Click the Start Backup button and then click Finish when the backup is complete.
✎Other helpful features:
● Compress or split backup images: you can manage more settings in backup Options.
● Scheduled backup triggered by events In addition to time-based scheduling, you can also schedule automatic backups when a USB drive is plugged in, or when a specific event triggers, such as automatically backing up at system shutdown.
● Include or exclude files with certain extension To back up all files in a folder with a specific extension, or those with extensions other than this, the Filter settings can be a significant aid. This feature allows you to specify the file types you want to include or exclude from the backup process, making it easier to target specific files based on their extension.
Summary
In Windows 7 and 10, you can schedule automatic backups, but the built-in feature lacks flexibility and can be time-consuming, potentially slowing down your computer during the process.
To make up for the limitations of the built-in backup feature, you can use a free alternative called Qiling Disk Master. It offers complete backup and restore capabilities with various modes and options, allowing you to set up daily backups. In the event of a system failure, you can create a recovery disk or USB to boot into Windows PE and then restore an earlier system image.
Related Articles
- 2 Quick Ways to Do Schedule Automatic Backup in Windows 7
Running a scheduled backup in Windows 7 can help you automatically protect Windows 7 data and files daily, weekly, or monthly. - Easier Way to Automatic Backup Windows 7 to Network Drive
This article will show you 3 ways to automatic backup Windows 7 to network drive, the last one is much easier. Go head and check it. - Create a Schedule to Backup User Files in Windows 10/8/7
This article will show you how to create a schedule to backup User files in Windows 7/8/10/11 and provides you with 2 helpful ways. - How to Fix Backup and Restore Windows 7 Not Working?
This article provides users with two solutions to Backup and Restore Windows 7 not working and offers an alternative. Go to anchor jump and click on what you want to see.
