How to Use Windows 7 Backup and Restore for Data Protection
Quick Navigation:
- Backup and Restore in Windows 7/8/10
- How to Use Backup and Restore in Windows 7
- Windows 7 Backup and Restore Not Working
- Best Free Windows 7 Backup and Restore Alternative
- Summing Up
Windows 7 Backup and Restore Overview
Backup and Restore is a built-in backup software in Windows 7, which allows you to backup files, system drive (including operating system, system settings, individual folders, libraries, etc.) or other non-system partition(s). It uses VSS (Volume Shadow Copy Service) to backup without interrupting operations and backup only changed files with incremental backup by default. And the schedule settings are every Sunday at 7:00 am.
In other words, it provides you with two different types of backup. The file backup is saved to ZIP files while the system image is full system backup with .vhd file format, no compression. You can choose to backup to local disk, external hard drive, CD/DVD, USB flash drive, network locations. If you are an IT professional, try WBAdmin. It's the command-line interface of Backup and Restore.
Note: Windows 7 Backup and Restore could not backup these files: program files, files stored in FAT file system, files stored in Recycle Bin, Temporary files on drives smaller than 1 GB.
How to Use Backup and Restore in Windows 7
As mentioned earlier, Windows 7 Backup and Restore provides you with two backup types, and I'll introduce you to both of them. At first, you need to open this software with the following methods:
Way 2: Use Search box. Open search box and search backup and restore in it. Then, select the top result in the list.
After opening this software, you can choose to create a file backup or system image. The situation may be a little different for different users.
- If you have never used it before, click Set up backup to create a full file backup.
- If you created before, change backup settings and create one manually. Also, you can delete old backups to manage space for your hard disk.
- lf you want to create a system image separately, click Create a system image at the left panel. Since it will select system partition or all the boot files for system startup, so you only need to select a destination to store backup image.
Windows 7 Backup and Restore Create an Image
To protect your data, we highly recommend that you save the Windows 7 backup image to external hard drive. The size depends on how many data you have and you can check it in Windows Explorer. Here take the first situation as an example.
- In the Backup and Restore window, click Set up backup.

- Select an external hard drive to save the Windows 7 backup. Please connect it in advance if you want to backup files to external hard drive.

- Tick Let me choose option if you want to backup other non- system partition or sepecific files. Then, hit Next.

- Choose the files or drives that you want to backup, click Next. It's suggested to keep system image backup, which can help you restore computer to earlier date.
- Review your backup settings and click Save settings and run backup button. The default schedule settings is every Sunday at 7:00 am, but you can click Change Schedule option and change it to daily or monthly.

★ Tips:
✿ You will be asked to insert CD/DVD and create a system repair disc with it. Thus, you can restore system image without booting into Windows.
✿ If you don't want schedule Windows 7 backup, you could uncheck "Run backup on a schedule(Recommended)" option.
✿ The current system image backup will be overwritten when you create a new one.
Perform Windows 7 File Image Recovery
After the backup is finished, your destination disk will get a folder named WindowsImageBackup containing the .VHD backup file. Now you could do system image recovery in Windows 7 to get your computer back. Please connect the external hard drive contains the Windows 7 system image, then follow the steps to restore:
- Open Windows 7 Backup and Restore, and click Restore my files button.

- Choose Browse for files or Browse for folders to choose files or folders to restore. Then, click Next.

- Select the destination to restore: In the original location, or In the following location (you need to specify the restore path). Then, click Restore to restore the files you want.

★ Tips:
✿ If you don’t want to overwrite the original files/folders, select other location to restore. Otherwise, choose In the original location.
✿ If you just want to restore all your data files, click Restore all users’ files.
✿ Besides file restore, you are still able to restore system image to new hard drive in the recovery environment. Note it requires the destination disk larger than disk contaning image. Otherwise, you will receive the system image restore failed error.
Besides, you could restore windows 7 backup to Windows 10. The overall steps are below:
- Open Backup and Restore (Windows 7) in Windows 10 computer.
- Tap the Select another backup to restore files from.

- Choose the Windows 7 image backup file to restore. Furthermore, you can click Browse network location… to choose the Windows 7 backup saved on the network.
Windows 7 Backup and Restore Not Working
Windows 7 Backup and Restore is helpful for you to backup files or systems, but some users report it's not working. For example, Backup and Restore blank or not open, etc. This may be because it's hijacked by security software and malware or you use certain third-party software. You just need to enable the essential backup service or restore computer to an earlier date. For detailed steps, please check the Backup and Restore Windows 7 not working page.
Besides, some users say that they cannot find a system image on this computer during the restore process. It may be caused by many reasons, such as, the change of folder name for system image, you migrate this folder to another location or backup Windows 7 to USB drive, etc. For solutions and detailed steps, check the Windows cannot find a system image on this computer page.

You may want the Windows 7 Backup and Restore alternative if you are in these situations. And I'll introduce you an all-in-one backup software to protect your data and ensure you always have a copy of them.
Best Free Windows 7 Backup and Restore Alternative
Qiling Disk Master Standard is one of the best free Windows 7 backup and restore software, which helps you backup and restore in Windows 7 easily. All backup solutions (file/system/partition/disk backup) are supported and it is available for Windows XP, Vista, 8, 8.1, 10, 11 as well. And either way, you can enjoy the following advantages:
- Perform all the backup solutions automatically: It supports daily, weekly, monthly schedule backup and you can wake the computer to run scheduled task when you are not convenient or the task is set to off-peak hour.
- Backup only changed files: By default, this software uses incremental backup as backup method, which backup only changed files. Compared with full backup, it saves much backup time and disk space.
- Other useful backup options: Besides, it is able to compress image, automatic splitting image, backup only used sectors of file system, etc. They further reduce the size of backup image. And you can create bootable USB or CD/DVD to boot your computer in case of system failure.
Now please download Qiling Disk Master Standard, and we will guide you through the detailed steps to create Windows 7 system image, including Windows 7 OS, installed programs, settings, drivers, etc.
(PS: This version of Qiling Disk Master only supports Windows XP, Vista, 7, 8, 8.1, 10, 11. For server users, try Qiling Disk Master Server.)
Create a System Image Backup in Windows 7
1. Run Qiling Disk Master Standard after the installation, click Backup -> System Backup.

2. Select a destination path to save the Windows 7 system image file. You can backup Windows 7 to USB, external drive, NAS or network location, etc.

3. Tap Proceed button to create a system image for Windows 7.
Also, you can enjoy advanced features, such as, USB plug in, differential backup, automatic backup cleanup (complete way to resolve backup disk full), etc. Please upgrade to the professional version.

After the backup finished, you will get a Windows 7 system image, suffix with .fvd, on your destination path. You could restore system image or individual files from it. And you can even restore system to dissimilar hardware if you use system image on a different computer.
To avoid computer failure due to system crash or other reasons, you need to create bootable media with USB or CD/DVD. It helps you boot computer if it's unbootable. If you don't have any storage device, try recovery environment in Qiling Disk Master.

Windows 7 System Image Restore
For system restore, usually, there are two situations, your computer is bootable or not.
>> If you are in previous situation, you can directly open this software and restore system image.
>> If your computer is unbootable, you need to insert the bootable USB or CD and boot from it, load Qiling Disk Master in the recovery environment and then perform system image restore. If you create a recovery environment in Windows 7, just restart your computer and select Enter into Qiling Disk Master option.

Here take the previous situation as an exaple. Please follow the steps below to perform system image recovery in Windows 7.
1. Open this software, click Restore > Select Task to choose Windows 7 system image.
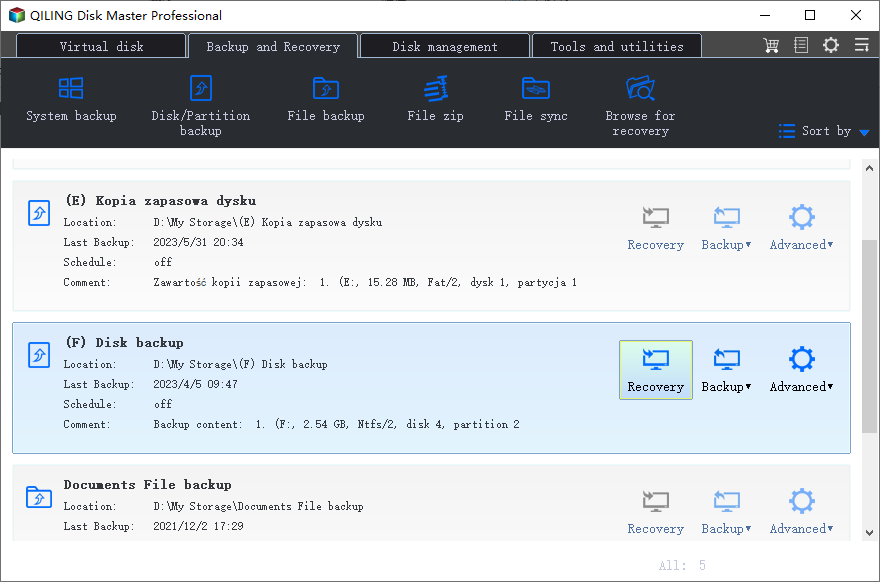
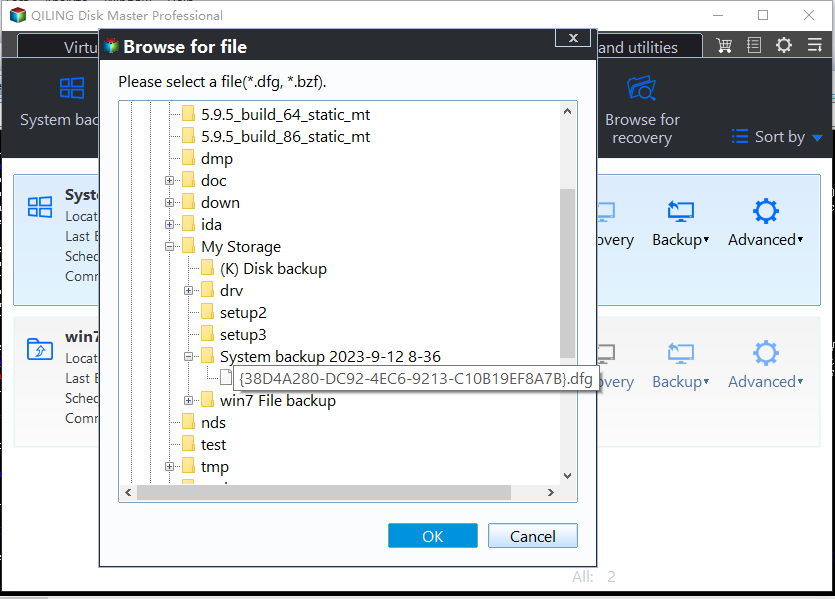
2. Choose a system image in the following window and click Next >>. If you cannot find system image on this computer, go back and choose Select Image File to manually select backup image.
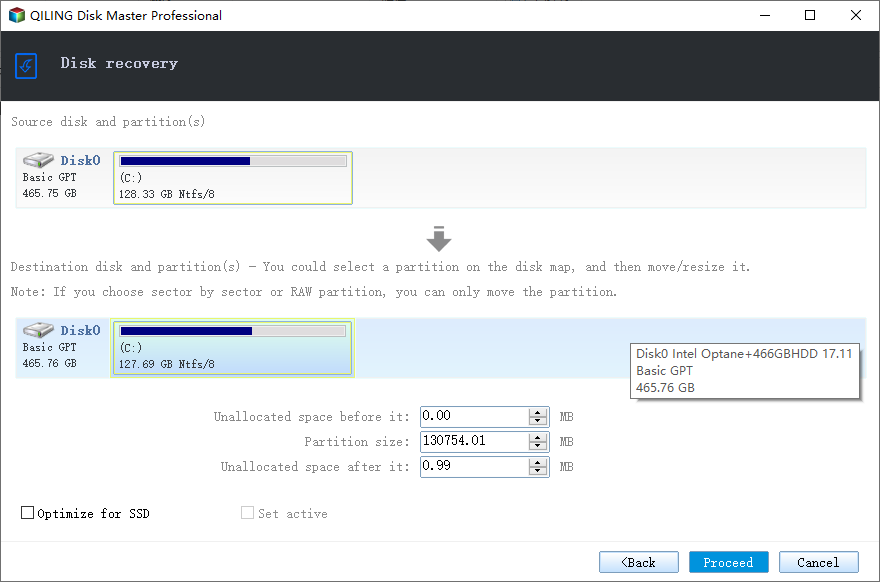
3. Tick Restore this system backup option and Restore system to other location if you want to upgrade hard drive for larger capacity. Then, hit Next >>.

4 (optional). You will be asked to select a restoration path if you tick Restore system to other location. Then, hit Next.
5. Confirm this operation and press Proceed >>.
It’s quite easy to restore Windows 7 system image, right? To perform selective file restore, you could explore Windows 7 system image with Explore Image feature and copy and paste to restore individual files.

Summing Up
Now, you may have already known how to use Windows 7 Backup and Restore, whether you want to backup files or system or recovery. But it's not working sometime. Thus, you may need to use its alternative, Qiling Disk Master Standard is one of the best option.
It contains all the features supported by Windows built-in tools and has more advanced features, such as, backup partition, backup disk, USB plug in, Event trigger, Backup Scheme, etc. Besides, it still allows you to deploy image to multiple computers simultaneously if you want to perform batch operation, such as, install system for 25 computers etc. Try its technician or techplus edition.
Related Articles
- Best Free Alternative to Windows 7 Backup and Restore Tool
- How to Fix Backup and Restore Windows 7 Not Working?
- How to Create a System Image Using Windows 7 Backup and Restore
- How Does Windows 7 Backup Boot Disk Successfully?
Sometimes Windows 7 backup boot disk will fail out of various reasons. This tutorial will instruct you to solve these issues with the best freeware, Qiling Disk Master Standard.