Use Windows 7 Backup Command Line to Securely Back Up
- Benefit from Windows 7 backup command line
- Things you need to know about wbadmin in Windows 7
- Wbadmin commands in Windows 7
- Backup Windows 7 using wbadmin command line
- Tips when using Windows 7 backup and restore command line tools
- Windows 7 command line backup and restore with an easier way
- Summary
Benefit from Windows 7 backup command line
The advantages of Windows 7 command line operation include flexibility, precision, and efficiency. Using the command line allows users to automate tasks, execute complex operations, and access advanced features that may not be available through the graphical interface. This can be particularly useful for power users, system administrators, and developers who require a high degree of control over their system. Additionally, the command line provides a text-based interface that can be easily scripted and automated, making it a popular choice for tasks such as batch processing, data backup, and system maintenance.
◕ Using a command line backup tool is more efficient than GUI tools, saving time and effort from tedious clicking. For advanced users, it's also more convenient, with less interrupting information to navigate.
◕ The command prompt operation supports unattended tasks, including executing a wbadmin backup script.
◕ Command line backup and restore allows users to backup and restore system image or data backups without booting Windows, enabling system state restoration even in system meltdown situations.
In Windows 7, the backup command is typically executed using the wbadmin command line tool. Before diving into its usage, it's helpful to have a basic understanding of the tool itself.
Things you need to know about wbadmin in Windows 7
The inbuilt backup tool, wbadmin, available in Windows Server 2008 (R2)/2012 (R2)/2016 (R2) and all Windows PC operating systems, allows you to back up files, folders, volumes, partitions, system state, etc. to a target location, and supports two types of restore operations: a bare metal restore and individual file and folder, and system state restore.
Wbadmin commands in Windows 7
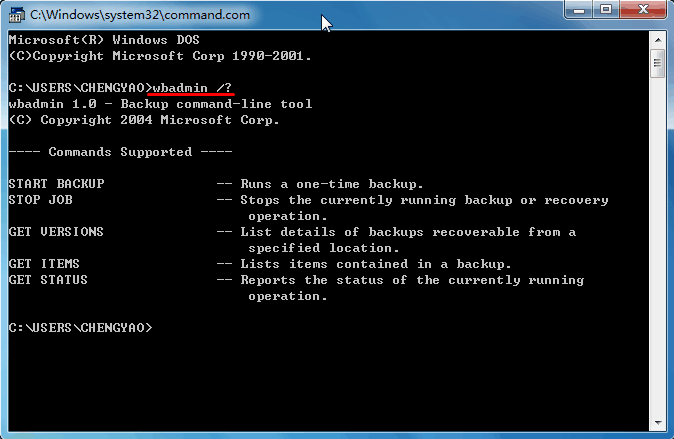
In comparison to backup command lines in other operating systems, the wbadmin command in Windows 7 has limited functionality, supporting only five commands that can be listed with "wbadmin /?".
▶ Proceed – Runs a one-time backup.
▶ STOP JOB – Stops the currently running backup or recovery operation.
▶ GET VERSIONS – List details of backups recoverable from a specified location.
▶ GET ITEMS – Lists items contains in a backup.
▶ GET STUTUS – Reports the status of the currently running operation.
To backup system state in Windows 7 using wbadmin, follow these steps: Open the Command Prompt as an administrator, type `wbadmin get versions`, and press Enter to get the backup versions. Then, type `wbadmin start systemstatebackup -backuptarget:W: -allcritical -vssfull -quiet` and press Enter, replacing `W:` with the drive letter of the external drive where you want to save the backup.
Backup Windows 7 using wbadmin command line
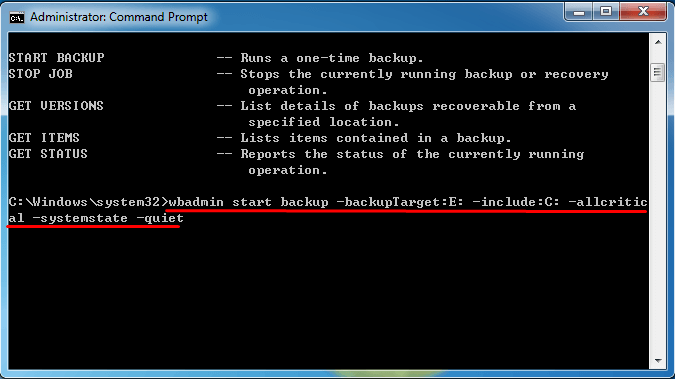
The script will automatically back up the C drive to the E drive, including the system state, without prompting the user. This will create a bare metal backup that can be used to restore the Windows operating system to similar or dissimilar hardware. No user interaction is required.
NoteTo start command prompt without booting Windows 7, boot the machine with the Windows installation drive or system repair disk, press Shift + F10 at the where-to-install page, and run a command to backup.
- To open a command prompt with administrator privileges, type "command prompt" in the search box, right-click on the "Command Prompt" result, and select "Run as administrator".
- cd /d e: (assuming your drive letter is E, change E to your drive letter) cd /d d: (assuming your drive letter is D, change D to your drive letter) cd /d c: (assuming your drive letter is C, change C to your drive letter) cd /d f: (assuming your drive letter is F, change F to your drive letter) cd /d g: (assuming your drive letter is G, change G to your drive letter) cd /d h: (assuming your drive letter is H, change H to your drive letter) cd /d i: (assuming your drive letter is I, change I to your drive letter) cd /d j: (assuming your drive letter is J, change J to your drive letter) cd /d k: (assuming your drive letter is K, change K to your drive letter) cd /d l: (assuming your drive letter is L, change L to your drive letter) cd /d m: (assuming your drive letter is M, change M to your drive letter) cd /d n: (assuming your drive letter is N, change N to your drive letter) cd /d o: (assuming your drive letter is O, change O to your drive letter) cd /d p: (assuming your drive letter is P, change P to your drive letter) cd /d q: (assuming your drive letter is Q, change Q to your drive letter) cd /d r: (assuming your drive letter is R, change R to your drive letter) cd /d s: (assuming your drive letter is S, change S to your drive letter) cd /d t: (assuming your drive letter is T, change T to your drive letter) cd /d u: (assuming your drive letter is U, change U to your drive letter) cd /d v: (assuming your drive letter is V, change V to your drive letter)
▶ wbadmin Proceed -backupTarget:E: -include:C: -allcritical -systemstate –quiet
- Wait for the process completes, and type exit.
Descriptions✍:
❈ -backupTarget: specifies the storage location for this backup.
❈ -include: specifies the items to include in the backup.
❈ -allcritical: The policy specifies that all critical volumes, which contain the operating system's state, must be included in the backups.
❈ -systemstate: The command creates a backup that includes the system state in addition to any other items that you specified with the -include parameter.
❈ -quiet: runs the subcommand with no prompts to the user.
Tips when using Windows 7 backup and restore command line tools
- To schedule a task from the command line, you can use the same command as before. However, if you're using Task Scheduler, you'll need to configure the task to run with administrative privileges, which involves providing an administrative user account and selecting the "Run With Highest Privileges" checkbox on the General tab of the task's Properties dialog box.
- To configure a regularly scheduled backup, you must be a member of the Administrators group. To perform all other tasks with this command, you must be a member of the Backup Operators or the Administrators group, or you must have been delegated the appropriate permissions.
- The target volume for a critical-volume backup must be a local drive that is not included in the backup.
To backup Windows 7 files from command prompt when Windows fails to start, open Notepad, click File > Open, and navigate to the Libraries interface to locate the files you need to back up.
Windows 7 command line backup and restore with an easier way
While wbadmin is a convenient tool for backing up Windows 7, users may encounter issues such as wbadmin not starting, failing to find backups when restoring, or system state backups failing. In such cases, a more powerful command line backup tool can be a reliable alternative.
Qiling Disk Master Professional, DiskMasterUI.exe is a command line backup tool that offers an all-around solution for backing up Windows 7. It provides a utility that allows for easy incremental backups using the command prompt, as well as differential and full backup options. Users can choose to create backups of system files, partition volumes, disks, files, or folders, and save them to external storage, network paths, or other locations. Additionally, the tool supports image compression, splitting, and encryption, as well as sector-by-sector backups. This makes it a versatile and reliable option for users looking to protect their data.
With Qiling Disk Master, you can easily operate command line restore to create bootable media and perform system restore to a machine with similar or dissimilar hardware. This allows for a smooth and efficient restore process, even when dealing with different hardware configurations.
Command line backup Windows 7 step by step
- To get started, install Qiling Disk Master on your computer and note down the installation path, as you'll need it later. If necessary, connect the target storage to your Windows 7 system.
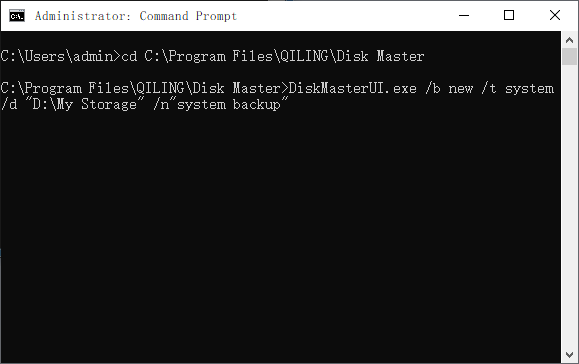
- Open an elevated command prompt, navigate to the installation path of Qiling Disk Master, e.g., cd C:\Program Files (x86)\Qiling Disk Master, and press Enter.
- To perform a system backup on Windows 7, you can use the command line "DiskMasterUI.exe /b new /t system /d "d:\sys" /n "Backup System"" to create a system image backup and assign a task name. This command will start the backup process.
- Wait for the process completes and type exit.
Description✍:
✡ /b new: create a new backup task.
✡ /t system: backup your system.
✡ /d "d:\sys": destination path for saving the backup image.
✡ /n "Backup System": named it Backup System.
Tips:
- Above steps also apply to Windows 10 backup command line.
- The Qiling Disk Master command line operations provide a comprehensive set of tools for managing and manipulating disk images. These operations enable users to create, modify, and analyze disk images, as well as perform various other tasks such as formatting, partitioning, and copying disk images.
Restore Windows 7 from Command Prompt
It is recommended to create a bootable device as covered, and ensure you can access the backup image or know its exact location, in case you need to restore a system image in the future.
- Open an elevated command prompt.
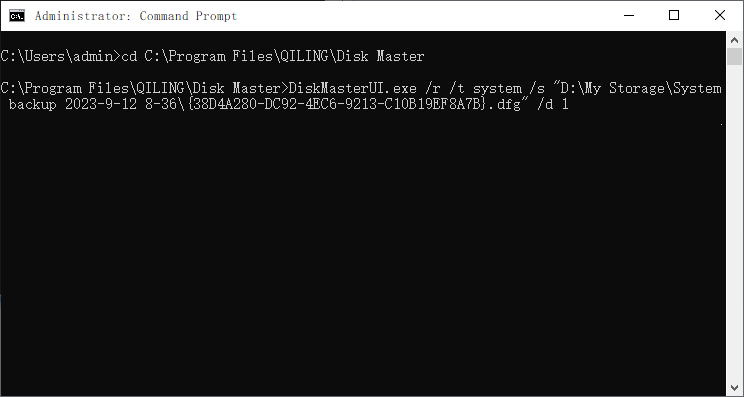
- Navigate to the Qiling Disk Master installation directory by typing `cd` followed by the path to the installation folder, e.g. `cd C:\Program Files (x86)\Qiling Disk Master` and press Enter.
- To restore a system backup to disk 1, type "DiskMasterUI /r /t system /s "J:\system backup\systembackup1.fvd" /d 1" and press Enter. This command will restore the system backup saved in J:\system backup to disk 1.
- Wait for the process completes.
Description✍:
✡ /r: restore the backup image.
✡ /t system: restore system image type.
✡ /s "J:\system backup\systembackup1.fvd": specify the path of the image file.
✡ /d 1: specify the destination location to restore to.
Qiling Disk Master Professional offers a user-friendly interface, making it easy for users of all levels to navigate and use its features. It provides the same backup functionality as for Windows 7, and a 30-day free trial is available. The software automatically selects all system and boot partitions, making the backup process simple and efficient.
Summary
To protect your Windows 7 in an easy way, there are two ways to use backup command line: you can either use the built-in backup feature or use a third-party tool like Qiling Disk Master Professional, which also supports cloning a hard drive with command prompt.
Qiling Disk Master Professional offers more backup and restore commands than the wbadmin tool, with a user-friendly graphical interface that makes operations easy to complete. It also allows you to backup only changed files, providing a convenient and efficient solution. Try this powerful backup and restore software now!
Related Articles
- Windows 7 WBAdmin Command Line and Its GUI Version
- Startup Repair or Boot Repair Windows 7 Using Command Prompt
- How to Run System Restore from Command Prompt Windows 7
- Top 6 Ways to Fix Windows 7 Offline Files Not Working Problem
How to fix Windows 7 offline files not working problem? This guide provides 6 methods to help you fix it.


