Windows 7 End of Life Extended What to Do?
About Windows 7 end of life
Microsoft's mainstream support model, which ended on January 13, 2015, provided regular feature updates, design changes, warranty claims, patching, security updates, and was followed by extended support, which continued to offer security updates and patches until January 14, 2020.
After its initial end of life, extended support was introduced for Windows 7, which provided security updates and bug fixes for the operating system. However, Microsoft ultimately decided to stop providing support for Windows 7 on January 14, 2020, marking the end of its 10-year product lifecycle.
Microsoft has ended support for Windows 7 to focus on new investments with newer technology and improve the user experience. The company has shifted its attention to Windows 11, which was released on October 5, 2021, as the latest operating system.
Windows 7 end of life what does it mean?
On January 14, 2020, Microsoft announced that Windows 7 had reached its end-of-life, meaning it would no longer receive security updates or technical support, putting users at risk of potential security vulnerabilities and malware attacks.
After January 14, 2020, Microsoft will no longer provide technical support for Windows 7, including software updates, security updates, and fixes, making computers running this operating system more vulnerable to security risks.
Microsoft will be disconnecting customer service, related services, and devices such as Internet Backgammon and Internet Checkers, Electronic Program Guide for Windows Media Center, and Internet Explorer.
What are the risks of Windows 7 end of life?
After Windows 7 ends its life, your computer will become more vulnerable to attacks, making it easier for hackers and other criminals to exploit its vulnerabilities, potentially leading to the loss of your data forever or even financial loss to pay hackers or other criminals, as seen in the infamous WannaCry and NotPetya attacks.
You should take data security seriously by backing up your files with free backup software. While Windows 7 comes with Backup and Restore, it's not the most secure option, so it's recommended to use third-party software to back up files to an external hard drive or other offline locations.
Can you still use Windows 7 after 2020?
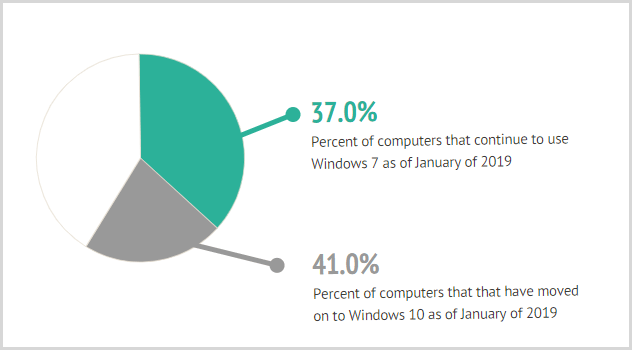
37% of computers still use Windows 7 despite its mainstream support ending, while only 41% have upgraded to Windows 10, and a 2018 survey found that 43% of IT professionals still use Windows 7 and 17% of businesses were unaware of the support end.
Windows 7 has reached its end of life, meaning Microsoft no longer provides technical support for users. Despite this, many users may still be wondering if they can continue to use the operating system.
Yes, You can still use Windows 7, but be aware of potential security risks, and consider upgrading to Windows 10 or 11 for better protection and support.
Windows 7 end of life what should I do?
Users who are still using Windows 7 when it ends of life on January 14, 2020, should consider upgrading to Windows 10 or Windows 11, as using Windows 7 after 2020 will expose their computer to various security risks.
If you're still using Windows 7, I'll show you how to back up your system and upgrade to Windows 10 using installation media in the next article.
Backup your system if you still use Windows 7
Starting January 15, 2020, Windows 7 is no longer secure without Microsoft's technical support, making a reliable backup and restore software essential. A trusted backup software allows you to easily backup the system, disk, partition, or files to an external hard drive for safekeeping.
Here, I highly recommend you free Qiling Disk Master Standard. With it, you can create, delete, format, split, merge, clone, resize, check and repair disks, as well as make bootable disks, all in a user-friendly interface.
- Continuously protect your Windows and files With the help of scheduled settings, such as daily backup, weekly backup, or monthly backup, users can automate the process of saving their data, ensuring that it is regularly updated and protected in case of any unexpected events or system failures. This feature allows users to set a specific frequency for backups, giving them peace of mind knowing that their data is being safeguarded at regular intervals.
- Greatly reduce disk usage by backing up only changed files. The incremental backup method is enabled by default, requiring no manual configuration. Additionally, features like compression and splitting can be utilized to further optimize disk space usage.
- To create a bootable media for your Windows 7 computer, you can use a USB drive or CD/DVD. Insert the USB drive or CD/DVD into your computer and restart it. Then, enter the BIOS settings by pressing the corresponding key (usually F2, F12, or Del) and set the USB drive or CD/DVD as the first boot device.
To backup your system after Windows 7 end of life, follow these steps: First, ensure you have all your important files and data backed up to an external hard drive, cloud storage, or both. Next, create a system image using the built-in Windows Backup and Restore feature or a third-party backup software.
1. To prepare for backup tasks, download and install Qiling Disk Master Standard, then launch it. Ensure the external hard drive is connected to the computer and can be detected.
2. Click "Backup" and then "System Backup" subsequently. To backup files, click "File Backup" instead.
3. To save a backup image of Windows 7, click on the indicated arrow and select a path to save the backup. You can choose to save it to an external hard drive, USB drive, network drive, or NAS, among other options.
Click "Schedule Backup" and enable it, then select daily, weekly, or monthly. By default, this software will enable default incremental backup to create a daily incremental backup that keeps multiple backups while using less space.
✯ To maintain the integrity and security of your backups, we recommend using the features available on higher editions, such as to prevent losing your OS and data on it.
• Event-To minimize the impact on your work efficiency, you can schedule a Windows 7 backup at �ystem shutdown. This way, your computer will automatically create a backup when it's not in use, ensuring that your work is not interrupted.
The USB plug in feature allows for automatic copying of Windows 7 to a USB drive when it's connected, eliminating the need for manual backups.
The software's backup scheme is unique in that it decreases rather than increases, automatically deleting old backups according to a set rule to free up disk space. This independence of backups makes it suggested to use an advanced backup method such as �ifferential backup.system shutdown. This way, your computer will automatically create a backup when it's not in use, ensuring that your work is not interrupted.
The USB plug in feature allows for automatic copying of Windows 7 to a USB drive when it's connected, eliminating the need for manual backups.
The software's backup scheme is unique in that it decreases rather than increases, automatically deleting old backups according to a set rule to free up disk space. This independence of backups makes it suggested to use an advanced backup method such as �ifferential backup.differential backup.
5. After setting up, click "Proceed" to automatically backup your system in Windows 7.
Windows 7 end of life upgrade to Windows 10
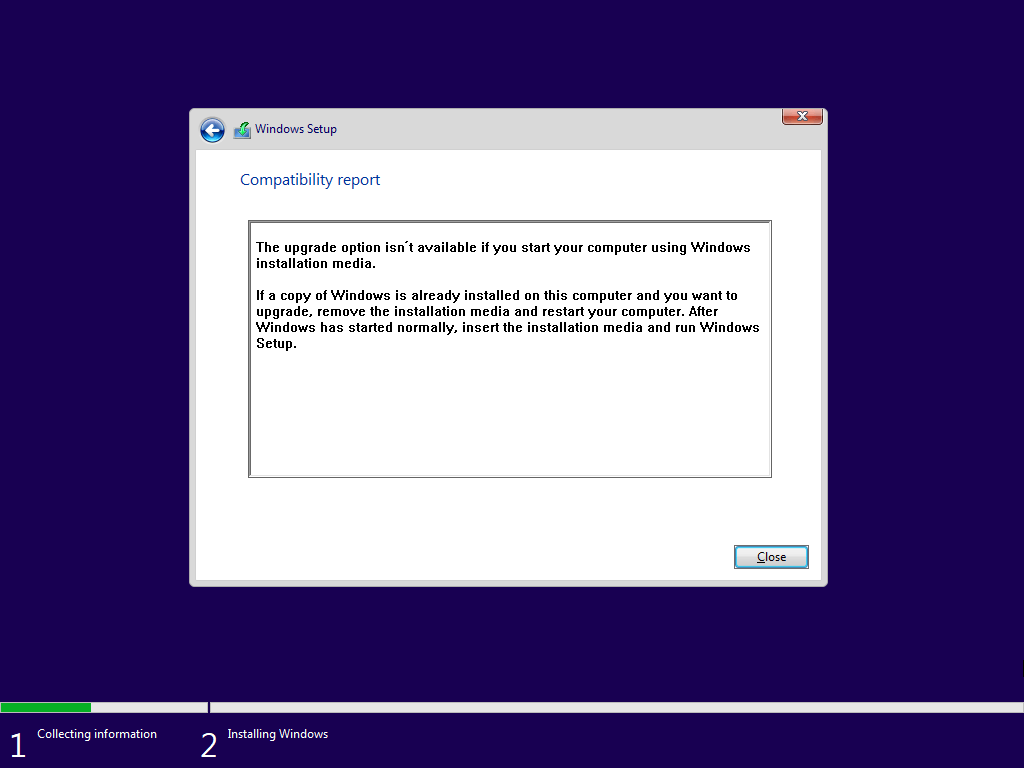
Microsoft has removed the free upgrade option from Windows 7, but users can still upgrade to Windows 10 by reinstalling it using installation media and enjoy its technical support.
You can also choose to directly download and install Windows 11. Here take Windows 10 as an example to show you the detailed steps. And it does not matter, because the steps are very similar, if you want to upgrade to Windows 11, you still can use the following steps as reference.
Preparation:
- To install Windows 10, download the installation media and create a bootable installation media with it.
- To avoid system failure due to human error, you can backup your system in advance, which will allow you to restore it in case of a clean install or reinstall of Windows. This way, you can prevent losing your original operating system and files. a
Perform Windows 7 end of life upgrade to Windows 10:
1. Set boot priority for your installation media. Restart your computer, press the specific key (eg: ESC, F2) on the first screen, go to the boot option and move CD/VD or USB drive to the firs option using "+", hit F10 key to save the changes, and exit. You need to go to the BIOS settings by pressing F2, F12, or Del, depending on the computer, and change the boot order to USB or CD/DVD. Then, insert the Windows installation media and restart your computer.
2. Click Next on the Windows Setup page.
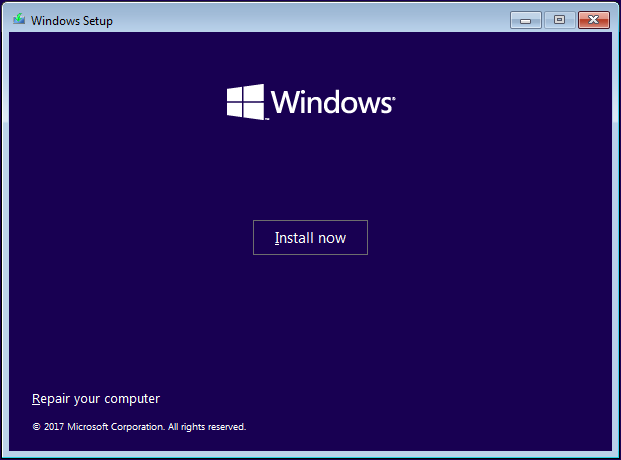
3. Click the "Install Now" button. The setup will start, and a new window will appear once it's complete.
4. Click "I don't have a product key".
5. Select the operating system you want to install and click Next.
6. On the "Applicable notices and license terms" page, tick "I accept the license terms" and click Next.
7. Click on the "Custom" option in the "Which type of installation do you want?" prompt.
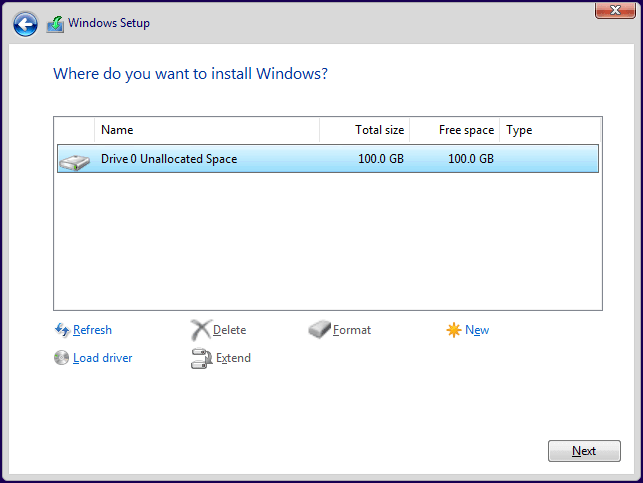
8. Delete the original partitions and create a new operating system with the unallocated space, then set up your references.
Written in the end
Windows 7 has reached its end of life, and the best course of action is to upgrade to Windows 10, which is a much safer option. However, Microsoft has removed the free upgrade option, so users can only reinstall Windows 10 on their existing computer.
Note that this process will erase all installed programs and personal data. If you want to preserve your data, create a file or system backup beforehand. This process also allows you to restore your system if you're not satisfied with the new Windows 10. Additionally, you can schedule backups of your system or data if you're certain you'll be using the new OS.
Related Articles
- Windows Server 2008 (R2) Closes to End of Life| What Can You Do?
Microsoft announces Windows Server 2008 (R2) end of life date once again, your computer are more vulnerable to security risk. What to do to protect your server, get it now! - How to Install Windows 10 from Command Prompt
If you want to upgrade Windows or get rid of system issues, installing Windows 10 from Command Prompt is a good solution. Let's see how to do it, and don't forget to backup your system just in case. - Top 3 Ways for Server Backup to Cloud: Effective, Secure, Simple
Are you looking for the proper ways to finish server backup to cloud? Refer to this article to catch the solutions that suits you most. - Top 3 Best Free Synology Backup Software: Which is Better?
In this post, you can master the top 3 Synology backup software to backup your computer to a Synology NAS. Read on carefully to gain more details by yourself.


