How to Create and Use Windows 7 Repair Disk with ISO
Where can I download Windows 7 ISO?
Are you trying to create a USB stick with a System Repair image to restore a system image? You're not alone! Many users have faced this challenge, and I'm here to help. Let's get started!
You can download windows 7 repair disk ISO from Microsoft as long as you have the product key of your computer. it’s a very authoritative website, which is used by many users in worldwide. You can use it with confidence.
How to create Windows 7 repair disk with ISO
Are you trying to create a USB stick with a System Repair image to restore a system image? You're not alone! Many users have faced this challenge, and I'm here to help.
Step 1. To begin, you'll need to launch the Windows 7 USB DVD download tool. This tool is designed to help you create a bootable USB drive from a Windows 7 ISO image file.
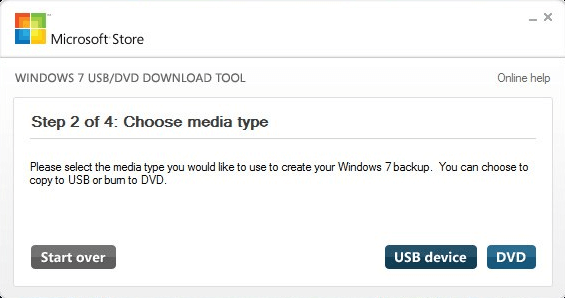
Step 2. Choose USB as your media type.
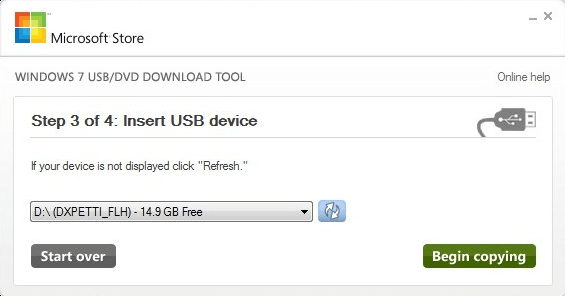
Step 3. To begin the process of creating a bootable USB drive, you'll need to insert the USB flash drive into your computer. Make sure it's inserted correctly and recognized by your computer.
Before proceeding, please note that the Windows 7 USB DVD download tool will format your USB flash drive first, and then create a bootable USB device. This means that any data stored on the USB drive will be erased during the process.
Step 4. After the copying process is complete, you'll need to verify that the USB drive is bootable and contains the correct files. This is an important step to ensure that the USB drive is functioning properly and that the files on the recovery disk are identical to the ISO file.
The Windows 7 recovery disk is a specialized tool designed to repair a specific computer. It contains a set of drivers and software specifically tailored for that computer, making it an essential tool for troubleshooting and recovery purposes.
How to create Toshiba/HP/ASUS/ACER/Lenovo recovery disk ISO
When it comes to using a recovery disk on both 32-bit and 64-bit computers, or across different brands such as HP, Lenovo, Dell, and Samsung, a specialized tool is required. A professional software is needed to ensure compatibility and a smooth repair process.
Details are below:
Step 1. Download Qiling Disk Master Standard, install and launch it.
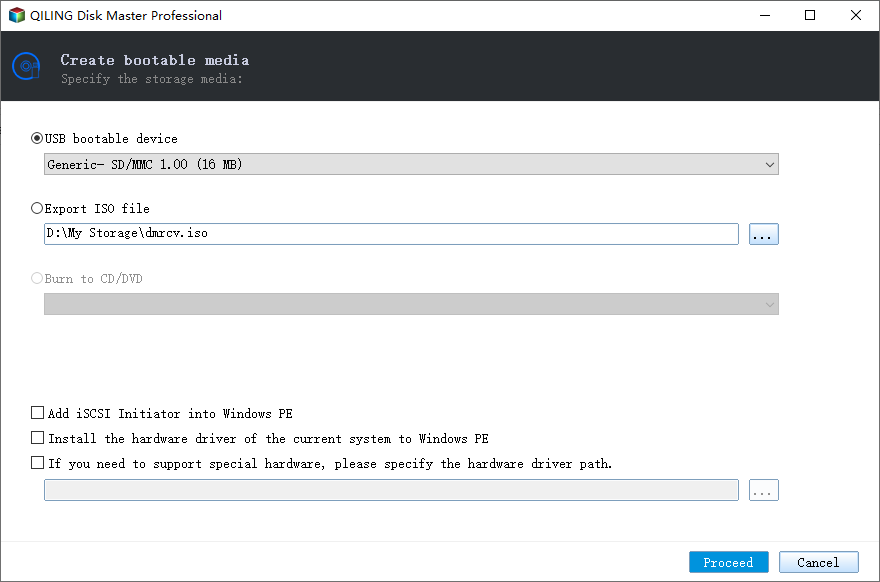
Step 2. Click Tools and Create Bootable Media.
Step 3. When using Qiling Backupper Standard to create a recovery disk, you have the flexibility to choose the type of bootable media that suits your needs. In this example, we'll focus on creating a USB Boot Device. If you prefer to create an ISO file instead, you can simply select the "Explore ISO file" option.
Step 4. Once you have created the bootable media using Qiling Backupper Standard, the final step is to wait patiently until the process is completed. This may take a few minutes, depending on the size of the recovery disk and the speed of your computer.
Beside creating Windows 7 repair disk with ISO, Qiling Disk Master Standard can do more, such as, creating system backup, disk backup, file backup, restoring backup image, cloning hard drive to SSD, migrating OS to SSD, transferring files from one computer to another, etc.
How to use Windows 7 system repair disk ISO
Windows 7 startup repair disk ISO gives you a chance to restore system image from external hard drive or other storage devices when your computer run into issues. Besides, you still can run Startup Repair, System Restore, Command Prompt with Microsoft Windows 7 repair disk ISO.
The Windows 7 startup repair disk ISO is a valuable tool that provides a range of capabilities to help you troubleshoot and resolve issues with your computer. With this ISO, you can restore your system image, run Startup Repair, System Restore, and access a Command Prompt environment.
Step 1. Connect the repair disk to computer via USB port.
Step 2. Start your computer and press the corresponding key to enter BIOS. The key to press are likely to be Dell, F1, F2, F3, ESC, or Delete.
Note: To find the specified key for different brands of computer, you see the following message. It implies the key to access BIOS.
- Press [key] to enter setup
- Setup: [key]
- Enter BIOS by pressing [key]
- Press [key] to enter BIOS setup
- Press [key] to access BIOS
- Press [key] to access system configuration
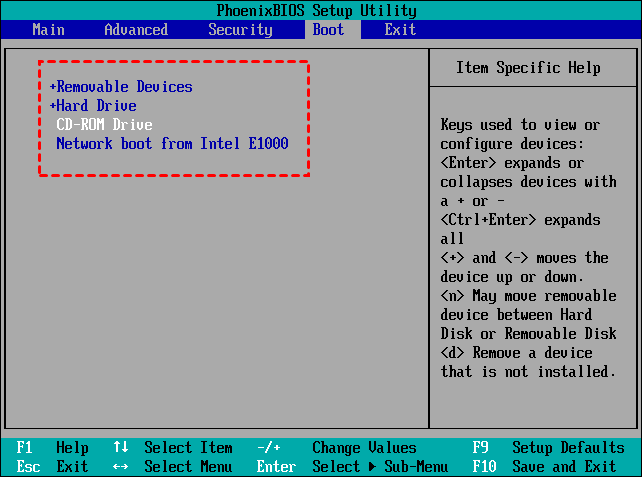
Step 3. Select the Boot option and move the Removable Devices to the first, then press F10 to save the changes and exit.
Step 4. Then, your computer will restart and you may be asked to press any key to boot from the removable devices. Just do as it said.
Step 5. Then, you will go to the initial Setup window or main page of Qiling Disk Master. For the first one, you can click Next and Repair your computer, then go to Choose an option > Troubleshoot > Advanced options and select the recovery tool you like. For the second, just connect the device that contain the backup image to your computer, then restore as the normal mode.
Final words
If you're looking for a free download Windows 7 repair disk ISO, you can visit Microsoft's website and search for "Windows 7 ISO." This will provide you with a legitimate and official ISO file.
If you're experiencing issues with your Windows 7 system, you can utilize the free Qiling Disk Master Standard to create a recovery disk that can be used across various computer brands (both 32-bit and 64-bit). This tool allows you to restore system images when needed, providing a convenient solution for system recovery.
Related Articles
- Top 2 Ways to Create Windows 10 Recovery Disk or USB Drive
- Reinstall Windows 7 without Losing Files or Anything
- How to Create and Use Windows Server 2012 Recovery Disk
- How to Wipe a Hard Drive in Windows 7 Without CD (2 Ways)
This tutorial provides two ways to wipe a hard drive in Windows 7 without CD. Whether you want to reserve Windows 7 or remove everything, you can find the way from this page.


