Tutorial | Windows 7/8/10 System Image Backup and Restore
About Windows 7 System Image Backup and Restore
A system image is a copy of the drives required for Windows to run, including additional drives, which can be restored via System Image Recovery in case of a computer breakdown.
The system image backup function was first introduced in Windows 7 and has since been adopted by Windows 8/8.1, 10, and even the latest Windows 11, where you can still create a system image using Backup and Restore (Windows 7).
The backup tool may not be updated with the operating system, making its features outdated and limited. If you need more advanced system backup capabilities, you may want to consider using a more modern and up-to-date free backup tool.
Quick Navigation:
- System Image Backup and Restore in Windows 7/8/10/11
- Better Way to Backup and Restore Windows System Image for Free
- Frequently Asked Questions about Windows 7 System Image
System Image Backup and Restore in Windows 7/8/10/11
To use System Image Backup in Windows, you can use the built-in system image backup tools. In Windows 7, you can use the Backup and Restore tool, while in Windows 8, Windows 10, you can use the Backup and Restore (Windows 7) tool or the built-in File History feature. The general process involves selecting the drive where the backup will be stored, choosing the type of backup, and scheduling the backup to run automatically.
Windows 7: To back up your computer in Windows, go to Start, then Control Panel, then System and Security, and finally Back up your computer.
Windows 8/8.1: To set up a System Image Backup, go to Start, then click on Control Panel, followed by System and Security. From there, click on File History, and then select System Image Backup.
Windows 10: To access the Backup and Restore feature in Windows 10, go to Start > Settings > Update & Security > Backup, then click on "Go to Backup and Restore (Windows 7)" which will take you to the old backup settings.
Windows 11: To access the Backup and Restore (Windows 7) tool, go to Start, then click on System, followed by Storage, then Advanced storage settings, and finally Backup options. From there, click on Go to Backup and Restore (Windows 7).
To perform a system image backup in Windows, you can search for "backup and restore" in the Start menu or on the task bar directly. The steps are largely similar across Windows 11/10/8/7, and I'll provide an example based on Windows 7. The process involves selecting the backup type, choosing the backup location, and setting the backup options. You can then start the backup process, which may take some time depending on the size of your system and the chosen backup location.
How to create a system image in Windows 7
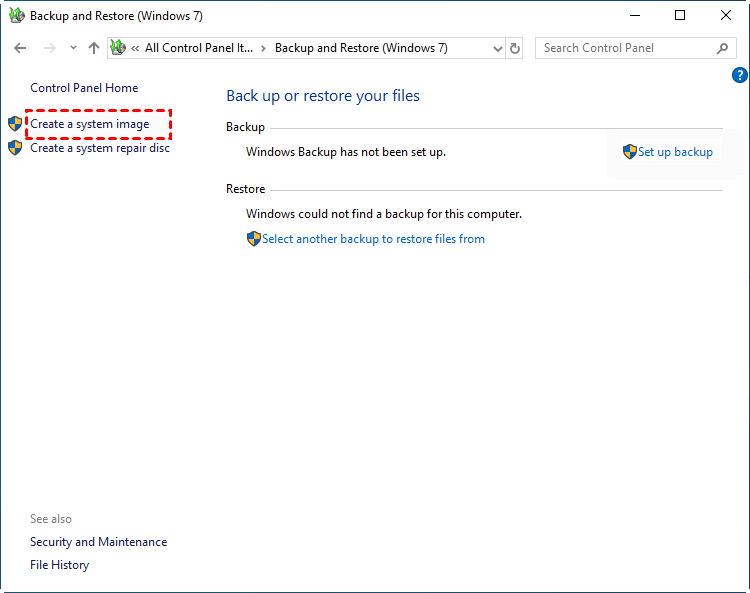
1. To create a system image, click on the "Create a system image" option in the Backup and Restore window, which is located in the top-left corner.
2. Select a location to save the system image and click "Next".
Windows recommends selecting a location other than the local disk, such as an external hard drive or network, for the Windows installation.
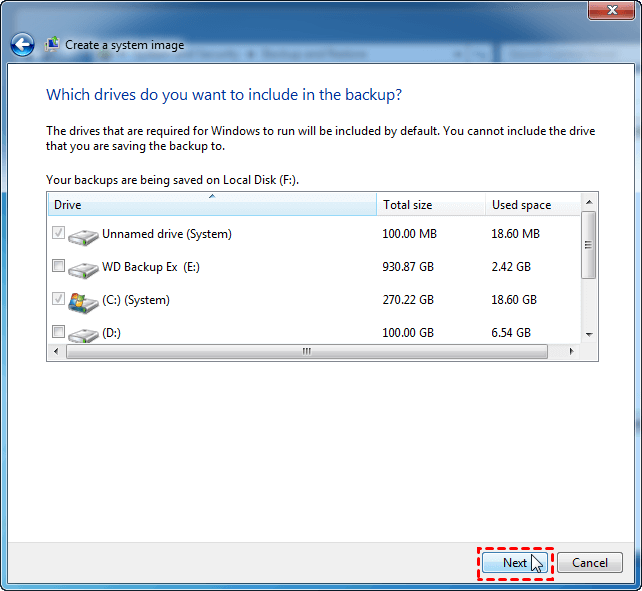
3. Select the drives to backup to the system image, including the system required drives, and any additional drives you want to include, then click Next to proceed.
4. Confirm your backup settings and click Proceed. It may take a while to complete the process, depending on the size of the data to be imaged and the speed of your computer.
Tip: If you're having trouble creating a Windows 7/8/10 system image, refer to the System Image Backup troubleshooting guide for assistance.
How to Perform System Image Recovery in Windows 7/8/10
After creating a system image with built-in Backup and Restore, the next step is to determine when and how to use it. This involves identifying the situations in which restoring the system image would be beneficial, such as when reinstalling Windows or recovering from a system failure.
A system image is used for System Image Recovery, which can be used when your hard drive or computer stops working. To utilize it, you need to access the advanced startup options and select the option to restore system image.
How to get access to System Image Recovery in Windows 7:
Make sure if your computer has preinstalled recovery options. If it does, press F8 during startup and choose Repair your computer in Windows 7 advanced boot options.
If you don't have the option to boot from a USB, you can insert a Windows 7 installation disc, change the boot order if necessary, click Next in the Install Windows window, and then select Repair your computer.
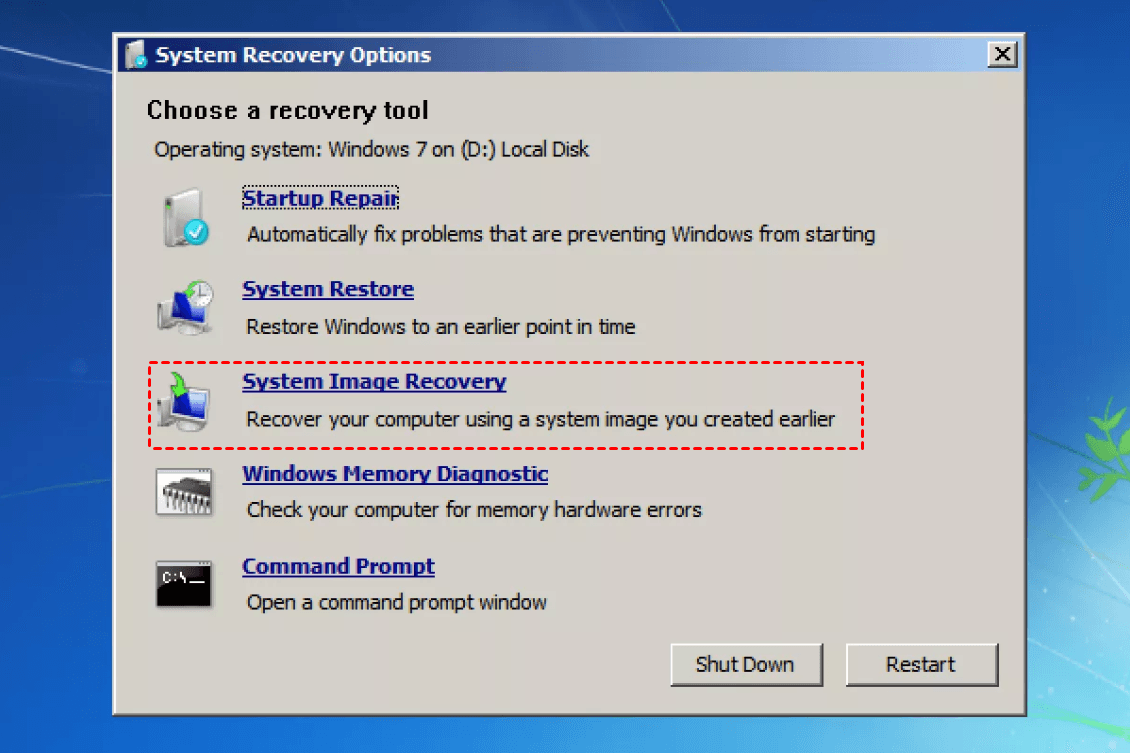
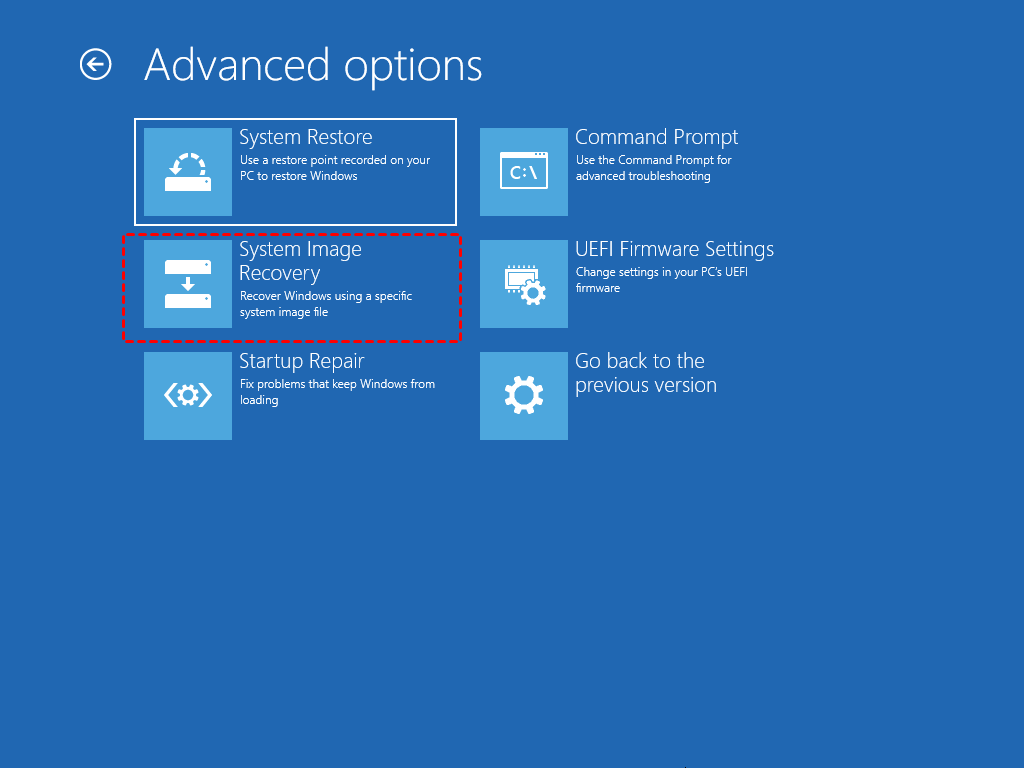
Finally, choose System Image Recovery in System Recovery options.
How to get access to System Image Recovery in Windows 8/8.1/10:
If you can still access Windows, click the Power button in the Start menu, hold the Shift key and hit Restart to enter the Windows Recovery Environment. If you can't access Windows, insert an installation disc, select your language and region, click Next, and then select Repair your computer.
To enter WinRE, you can try turning your PC down and then on, repeating this process until it boots into the Windows Recovery Environment. This can be done by holding the power button to turn down the PC, then turning it back on, and repeating this process two more times. On the third boot, you should enter WinRE.
Then, click Troubleshoot > Advanced > System Image Recovery.
Tips: If you don't have an installation CD, you can create a recovery drive or repair disc to boot into advanced options.
To perform a Windows 7 system image restore, follow these steps. The process is similar in Windows 8 and Windows 10.
How to restore Windows 7 from system image backup:
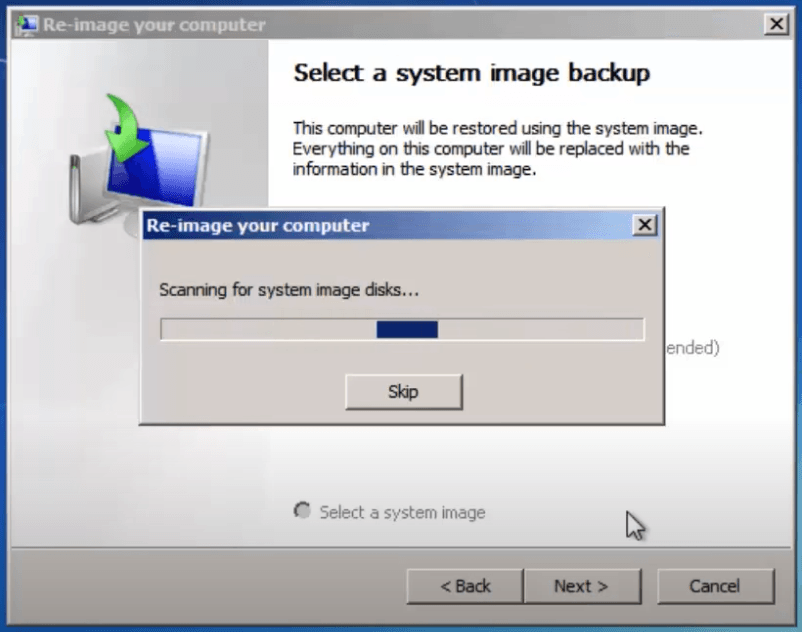
1. To get into the recovery environment and choose System Image Recovery, first get into the recovery environment using methods such as booting from a USB drive or using a Windows installation media. If a system image was backed up to a removable device like an external hard drive or USB, connect it first. Then, choose System Image Recovery from the recovery environment's options.
2. The system image selection process will automatically detect the available system image stores on your device. Alternatively, you can manually select a system image by choosing "Select a system image" to locate it on a CD/DVD or network. Once selected, click "Next" to proceed.
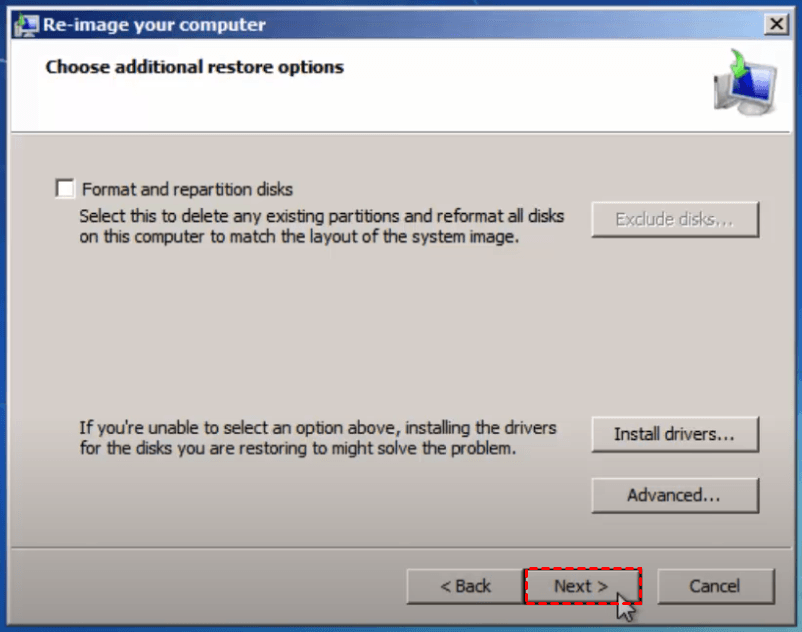
3. Choose additional restore options and click Next.
You can use the "Install drivers..." option to install OS required drivers that haven't been built in Windows, such as NIC drivers for system image retrieval from a network, to avoid the error message "The network location cannot be reached".
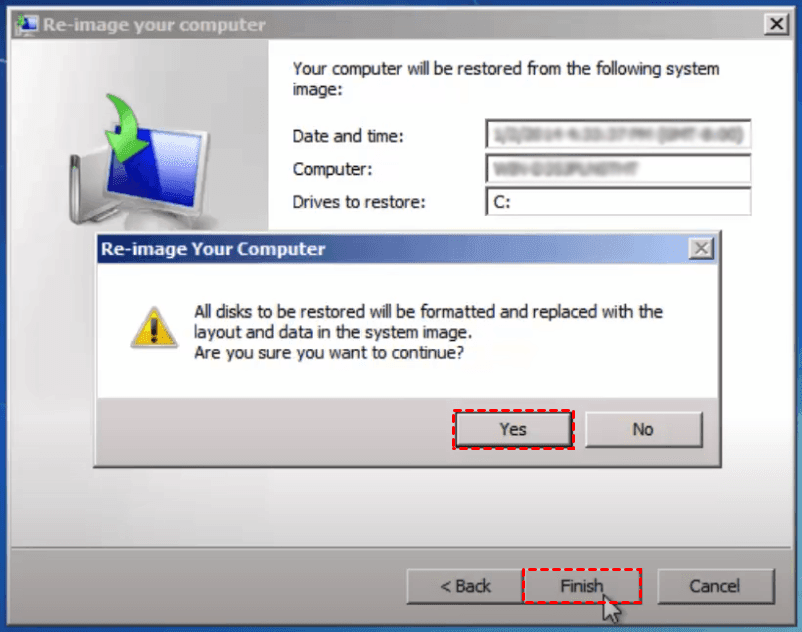
4. Confirm the information. Click Finish and then Yes if there's no problem. It may take hours to restore the system image, please wait patiently.
Better Way to Backup and Restore Windows System Image for Free
To perform a system image backup and recovery with Windows 7/8/10/11 built-in utility, it may not always work due to various reasons, resulting in unexpected error messages.
While Windows 10's built-in backup and restore feature works, it's relatively slow and can result in a huge system image file (over 100 GB in some cases). A faster and more efficient alternative, such as Qiling Disk Master Standard, may be a better option with a high success rate.
◆ Aisigong is a free backup software that supports Windows 11/10/8.1/8/7/Vista/XP, similar to Windows Backup and Restore.
◆ This tool enables the creation of restorable images for not only operating systems, but also files, partitions, or entire disks.
◆ To automate system image backups, you can set up a schedule to run them automatically. This allows for either full or incremental backups, and the compression level can be configured to suit different needs, providing flexibility and convenience in managing system backups.
◆ There's a practical tool that can help you create bootable media and rescue a faulty computer.
The backup and restore process is straightforward and runs at a satisfactory speed. You can download the completely free software to give it a try.
How to create Windows 7 system image backup with Qiling Disk Master:
1. Install and launch the software, then go to the Backup tab and select System Backup.
2. The system will automatically choose the partition, and you can select a destination like a local disk, external hard drive, USB, cloud drive, or NAS.
3. Optionally, you can customize the backup by clicking on Options, Schedule or Scheme. Click Proceed to execute the task and wait for it to complete.
Options: The backup process can be customized to suit specific needs by adjusting various settings, including managing backup mode, compression level, image splitting, and encryption. This allows users to fine-tune their backup strategy to optimize storage space, speed, and security. For instance, they can choose between full, incremental, or differential backups, and select the desired compression level to balance data integrity and storage efficiency.
Schedule Backup: The software allows for automatic backups on a daily, weekly, or monthly basis. Upgrading to the Professional edition unlocks additional options, including event triggers and USB plug-in capabilities.
Backup Scheme: Choose a backup method, or enable automatic backup cleanup (available in the Pro edition) to delete older backups according to the rule you set up.
How to perform Windows 7 system image restore with Qiling Disk Master:
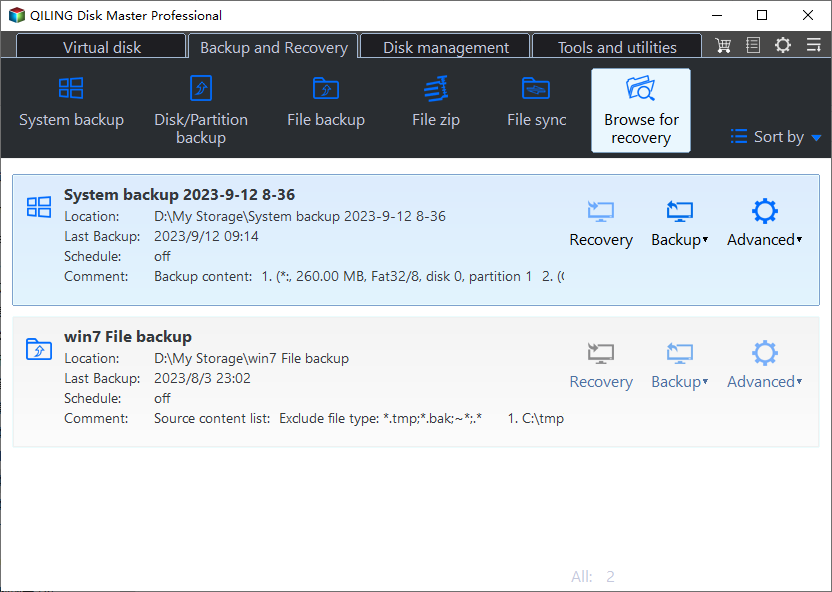
1. In the Restore tab, select either Task or Image File to proceed.
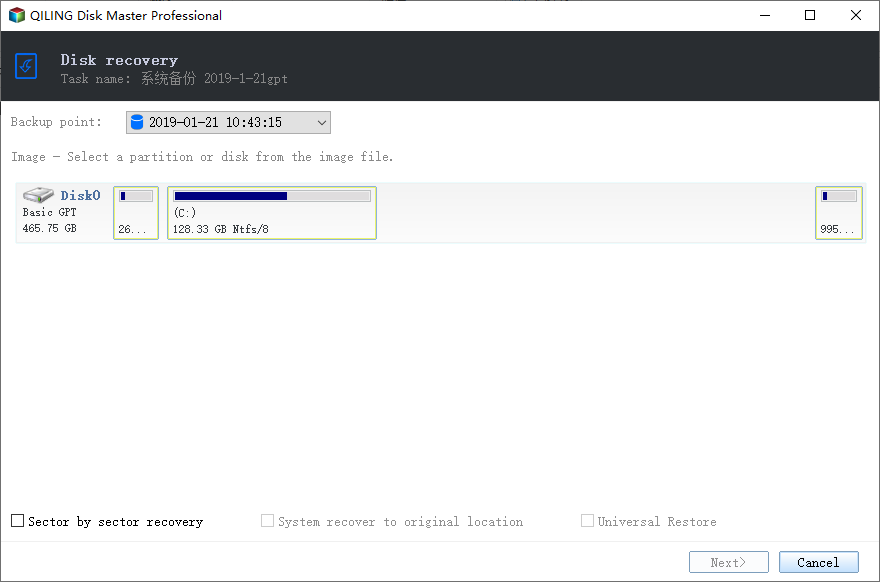
2. Select the task or system image and choose "Restore this system backup," then click "Next."
3. Confirm the operation and click Proceed for system recovery.
Tips:
● If your computer won't boot due to unexpected problems, you can create a bootable media with Qiling Disk Master to boot your computer into WinPE, and then restore it with a previously created system image.
● If what you want to backup is not only the OS but the entire hard drive, you can choose Disk Backup instead.
● To restore a system image to dissimilar hardware, you can upgrade to the Pro edition and enable Universal Restore during the system restore process.
Frequently Asked Questions about Windows 7 System Image
Q: What's the difference between a system image and a restore point?
System image and restore point are two different concepts in Windows. A system image is a complete backup of the operating system, including all installed programs and data, which can be used to restore the system to a previous state.
Q: How's system image different from ordinary backup?
A system image is a backup of the entire operating system, including all settings, files, and programs, which can be used to restore the system to its exact state in case of a failure or disaster. In Windows 7/8/10, this can be done using the built-in "Backup and Restore" feature, which allows you to select the system partition and back it up to an external hard drive or network location. This type of backup is useful for restoring the entire system, but not for backing up individual files or folders.
Q: I already backed up my important files, do I need to create a system image?
If you're experiencing issues with your Windows system, you have the option to restore it to a normal state using a previously created system image. However, keep in mind that Windows is a complex operating system and may be prone to various problems, so this should be considered a last resort if conventional troubleshooting methods fail.
Q: Can I create a system image on an USB flash drive?
The system image backup can be done using either the built-in Windows utility or a third-party tool like Qiling Disk Master. If the built-in utility fails, refer to the troubleshooting guide for backing up the system to a USB drive.
Q: Can I restore Windows 7 system image to another computer?
You can try to reinstall Windows on your new PC, but it might not work since each Windows installation customizes itself to work with a particular PC. If you really want to do it, the Universal Restore feature of Qiling Disk Master may help you better.
Conclusion
Windows 7 system image backup and restore allows you to recover your computer from a serious malfunction, and can be done using built-in tools in Windows 8 and 10. However, if you find the process complicated, Qiling Disk Master is a user-friendly software that can make it easier.
Qiling Disk Master is a comprehensive data protection and disaster recovery solution that goes beyond traditional system image backup and restore. It's not only an alternative to these methods but also a versatile tool that can be used in various scenarios, such as replacing a hard drive, where it can help migrate a Windows system without reinstalling. Additionally, there's a dedicated edition for �erver backup and restore, making it a valuable asset for Windows Server users.server backup and restore, making it a valuable asset for Windows Server users.
Related Articles
- How to Create a System Image Using Windows 7 Backup and Restore?
This tutorial will show you how to create a system image using Windows 7 built-in Backup and Restore utility as well as powerful 3rd party software Qiling Disk Master step by step. - Create Windows 10 System Image Backup with 2 Free Ways
You will learn how to create system image backup for Windows 10 and use it step by step. Choose one among 3 methods below! - Create Image Backup for Windows Server 2012/2016/2019 | 3 Ways
In this post, you will get how to create image backup for Windows Server 2003/2008/2012/2016/2019(R2)/2022 etc with 3 Windows Server backup software. - Restore System Image to Another Computer | Secure Boot
The easiest and safest way to restore system image to another computer is using reliable software that supports creating system image for another computer, even with different hardware, keeping data intact and ensuring secure boot.
