Automatic Backup Server 2008 to NAS or Network Share
Quick navigation:
- Windows Server 2008 (R2) Support Ended
- Why Perform Windows Server 2008 Backup to NAS?
- Unable to Access the Remote Shared Folder
- Workaround to Let Server 2008 Backup to Network Share
- More Flexible Way to Automatic Backup Windows Server 2008 to NAS
- Conclusion
Windows Server 2008 (R2) Support Ended
Like Windows 7 end of support, Windows Server 2008 and 2008 R2 support has been ended on January 14, 2020. After this day, you could not get regular security updates from Microsoft to protect your infrastructure and applications.
To keep your Windows Server 2008 and 2008 R2 safe, please upgrade to Windows Server 2016 or higher. If you did not upgrade Windows Server 2008 and 2008 R2, do the following to protect your server:
- Migrate Windows Server 2008 and 2008 R2 to Azure and get free three years of Extended Security Updates.
- Or buy Extended Security Updates for Windows Server 2008 and 2008 R2 Datacenter, Enterprise, and Standard editions. Other editions could not get the Extended Security Updates.
Considering system and data security, you may want to backup Server 2008 to NAS so that you will have a duplicate copy. If something bad happens, such as system crashes, you can perform Windows Server 2008 (R2) system restore to get everything back.
Why Perform Windows Server 2008 Backup to NAS?
In fact, many users want to backup Windows Server 2008 to NAS automatically, because it has many advantages over external storage devices or cloud drives. Here I'll introduce you to some of them:
- Easy access to your data. Since NAS is a shared network, so you can access your data on it as long as your computer has a network and connect to it.
- Own a big storage. The NAS devices allow you to connect several hard drives simultaneously, so you don't need to worry about disk space issue.
- Cheaper. Compared with other devices, you only need to pay for the NAS device, instead of recurring subscription frees or disk after disk.
- ...
Unable to Access the Remote Shared Folder
Windows Server comes along with a built-in backup software - Windows Server Backup, and with it, you can create a full backup, bare metal backup, system state backup, and more. For destination, it can be a local disk, external disk (HDD or SSD), or tapes.
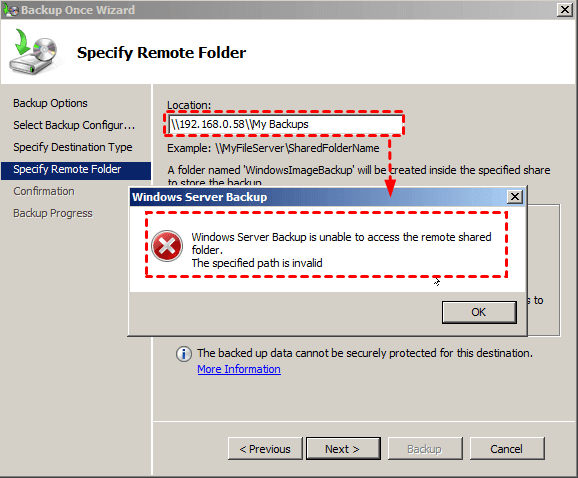
You may find that there is no NAS or network share, that is because Windows Server Backup does not allow you to get Windows Server 2008 backup to NAS or network shared folder. If you do so, you may get the following errors: Windows Server Backup is unable to access the remote shared folder. The specified path is invalid.
And many users complained about they cannot backup to network shared folder, and might encounter these error messages, like:
- error code 0x8078015B: Windows Backup encountered an error when accessing the remote shared folder. Please retry the operation after making sure that the remote shared folder is available and accessible.
- error code 0x81000039: The network path was not found.
Therefore, you cannot take advantage of Windows Server Backup to perform Windows Server 2008 backup to NAS or network shared folder. Is there any better choice to get it done?
The answer is Yes, you could create a VHD file and attach it to a network-shared folder, or try the best server backup software to backup Windows Server 2008 to WD or Synology NAS as you like.
Workaround to Let Server 2008 Backup to Network Share
Although Windows Server Backup is unable to access the network shared folder in Windows Server 2008, you still could create a VHD file and attach it to your NAS, then use it as a local drive for backup destination. And this way help you keep multiple backups with the help of volume shadow copy service.
Part 1: Create and Attach Virtual Hard Disk on Windows Server 2008
1. Go to Control Panel > Administrative Tools >Computer Management > Storage > Disk Management.
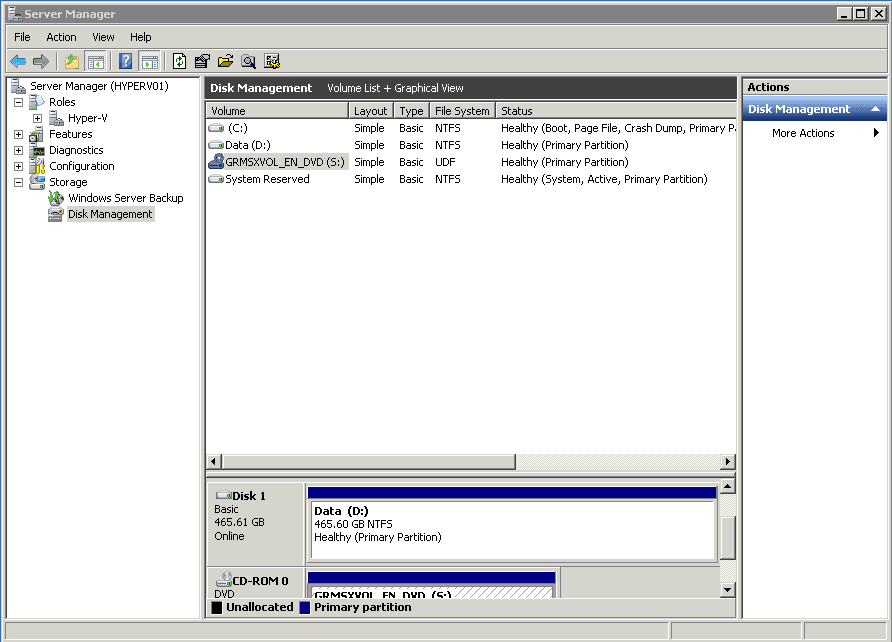
2. Click Action, and select Create VHD.

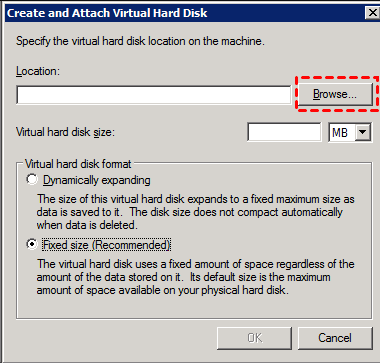
3. Then, click Browse.. > select your NAS path > type a file name for the virtual hard disk location, and click OK to create and attach a VHD disk.
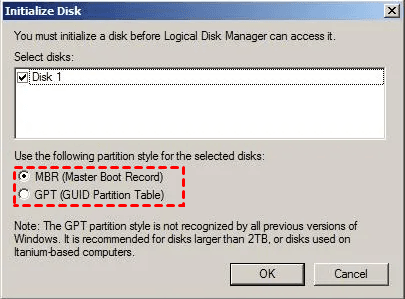
4. Right-click the virtual hard disk and select Initialize Disk. Then, choose MBR or GPT as the disk partition style and click OK to initialize it.
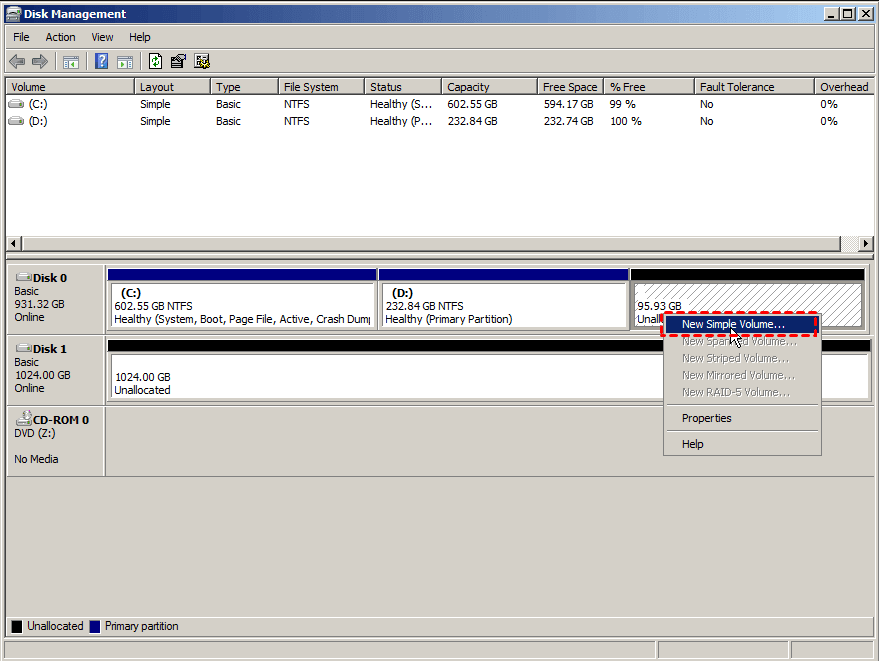
5. Right-click the VHD disk and select New Simple Volume... at this time. Then, specify volume size, drive letter, file system and click Next > Finish to make it visible.
Part 2: Backup Windows Server 2008 to Network Share
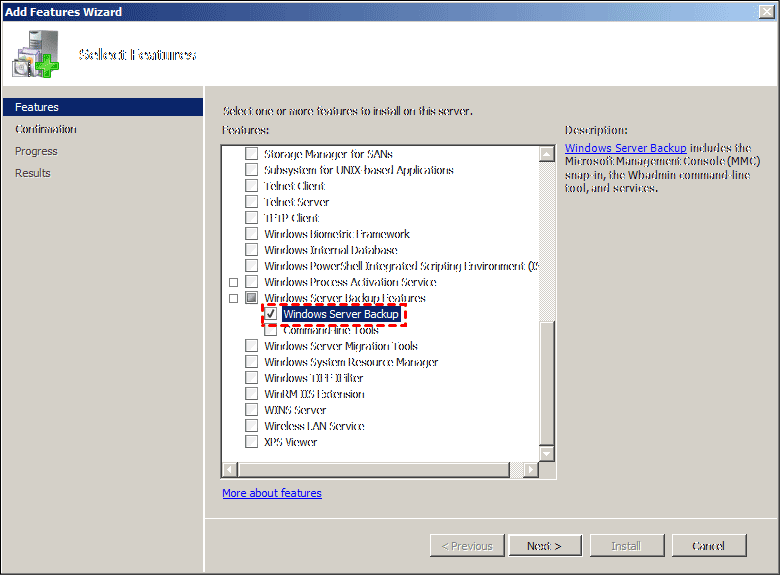
Note the Windows Server Backup is not installed by default. So you need to install it in the Server Manager first. Click Features > Add Features and select Windows Sever Backup Features in the Select Features interface. Afterward, click Install to start the installation of Windows Server Backup.
After installing Windows Server Backup successfully, follow the steps below to create a full system backup in Windows Server 2008.
1. Click Start > Administrative Tools > Windows Server Backup to open it and select Backup Once in the Windows Server Backup window.
2. Choose backup option - Different options and click Next.
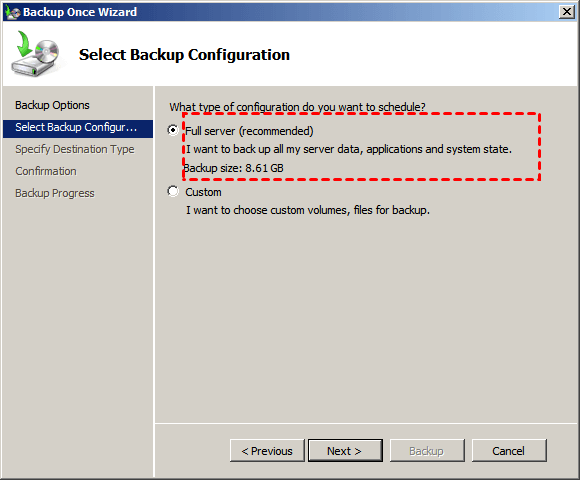
3. Choose Full server to backup all the server data, applications and system state.
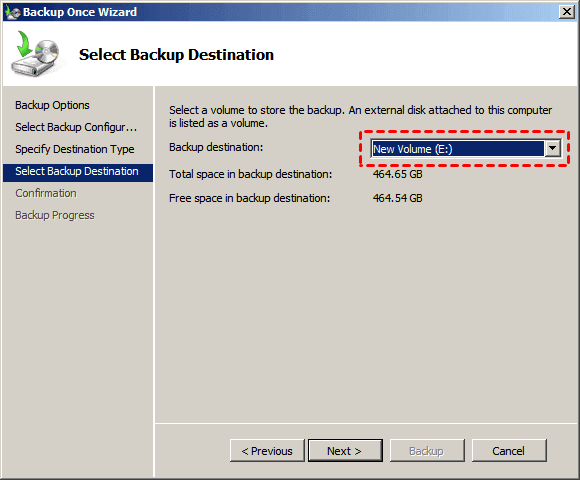
4. Select Local drives > virtual hard disk created previously and click Next.
5. Confirm this backup task and click Backup to create a full system image in Windows Server 2008.
Just wait until the backup process completes. Of course, if you want to create scheduled backup for Windows Server 2008, click Backup Schedule in the first step. Note it only schedules backup once a day or more than once a day.
So if you want to back up at different time intervals, it's suggested to try the best server backup software. And I'll introduce you to it in detail. Please keep reading below.
More Flexible Way to Automatic Backup Windows Server 2008 to NAS
Here you will get the best server backup software - Qiling Disk Master Server, and with it, you can directly backup Windows Server 2008 to NAS or network shared folder, such as WD My Cloud NAS, Synology NAS, etc as well as keep multiple backups without creating and attaching VHD file. And you still can enjoy the following advantages:
- More options to schedule backup Windows Server 2008. It supports daily, weekly, and monthly, and you can set backup time, intervals, or the backup date. Besides, you can also enjoy different event triggers and USB plug in features.
- Backup only changes after the first full backup. Its default backup method is incremental backup and you don't even need to set it up. And you can also enjoy the differential backup.
- Always keep enough space for new backup: In this software, you still can enjoy different automatic backup cleanup methods to delete old backup images automatically It's the most effective way to free up more disk space.
Please download the 30-day free trial to have it a try. It's available for Windows Server 2003, 2008, 2012, 2016, 2019, 2022, SBS 2003, 2008, 2011, including R2 versions and all Windows PCs.
See detailed steps to get Server 2008 backup to NAS or network shared folder. And it is also applicable to Windows Server 2008 R2 backup.
1. Launch the best Windows Server backup software - Qiling Disk Master Server. Select Backup and System Backup.
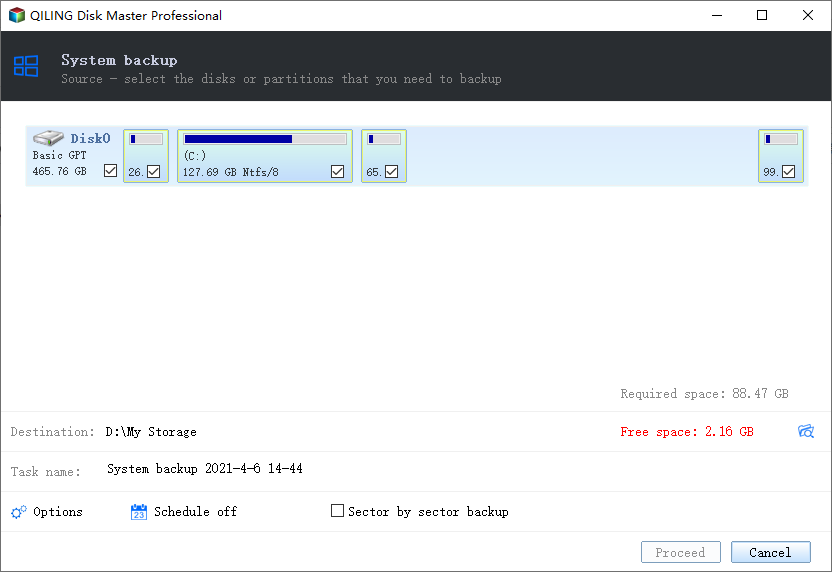
2. By default, this software will automatically choose the operating system and other partitions containing system files required to start server 2008. So you just need to select your NAS as backup destination.
- Click where the arrow points, and select Add Share or NAS Devices.
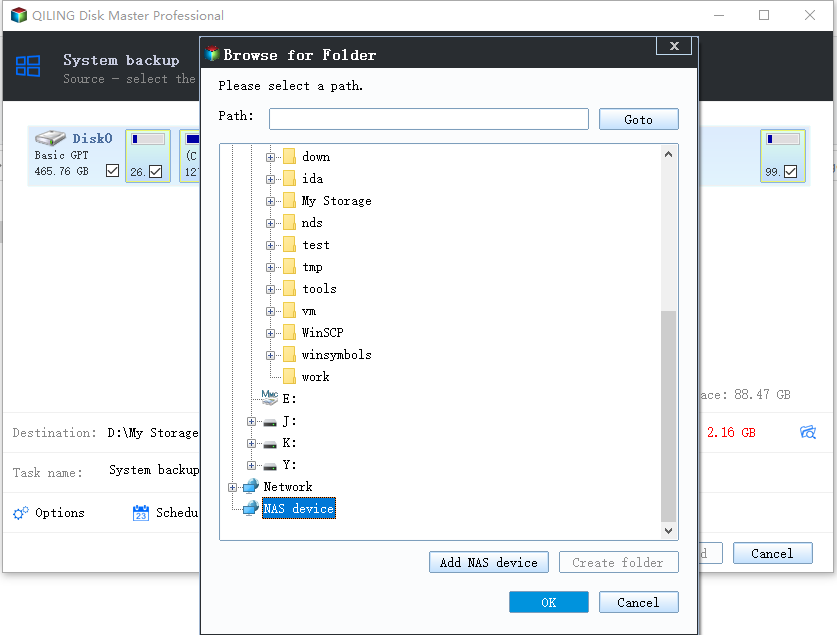
- Type the network location of your NAS (IP address), and select the shared folder you want to store your data. Click OK to confirm it.

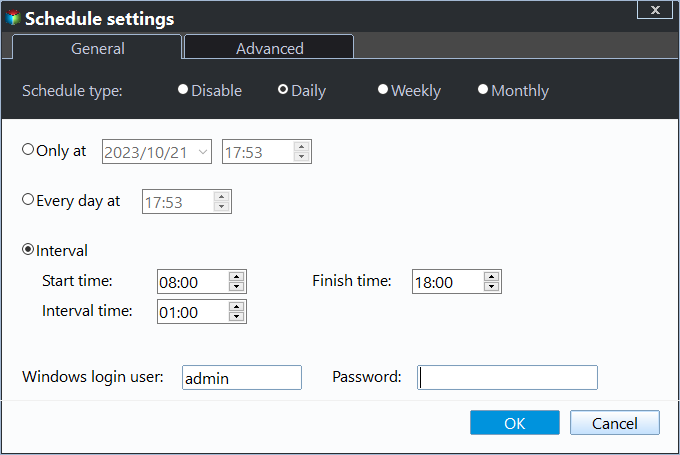
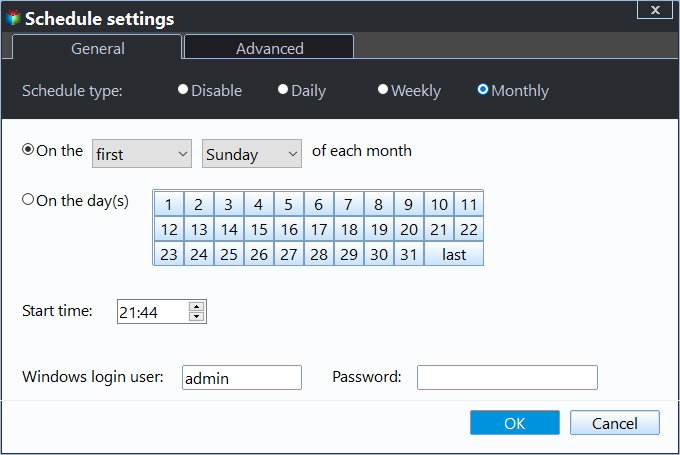
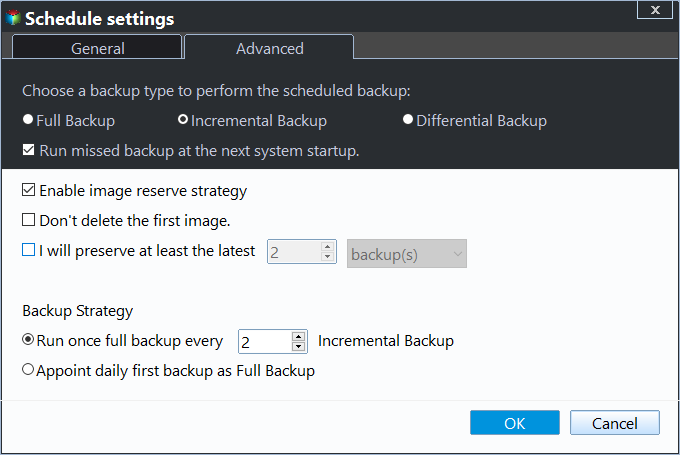
3. Click Schedule Backup, and toggle on Enable Schedule Backup, then you can select from Daily, Weekly, Monthly, Event triggers and USB plug in. Afterward, click Proceed to perform Windows Server 2008 weekly backup.

For details, you can set more flexible as follow:
In Daily mode, you have 3 options:
- Run once only on a specific day and time.
- Run once every day at a specific time.
- Set intervals to run a scheduled backup. Such as, from 00:00 to 23:59, and run it for every 1 hour.
In Weekly mode, you can choose a specific day and time to run backup task.

In Monthly, you can choose to run once on a specific day and time with the following 2 options.
Besides, you can also set Options and Backup Scheme:
- Options: You could comment on this server 2008 backup task, like, split, compress, encrypt (paid) for the task, enable email or SMS notification after the backup task completed, use Volume Shadow Copy Service (VSS), etc.
- Backup Scheme: You could select a backup method from full/incremental/differential backup as well as automatic backup cleanup methods to help save or free up disk usage effectively. Note there are 4 cleanup methods in total and the By space option is only available when you select differential backup as backup method.
After a while, you will get the Windows Server 2008 R2 backup to NAS or network shared folder. You could also backup server 2008 to Synology NAS, QNAP NAS or other NAS devices. It's easy to operate, right? Just download it to have a try!
If you just want to backup specific files, you could try its Sync feature and sync files between Windows Servers.
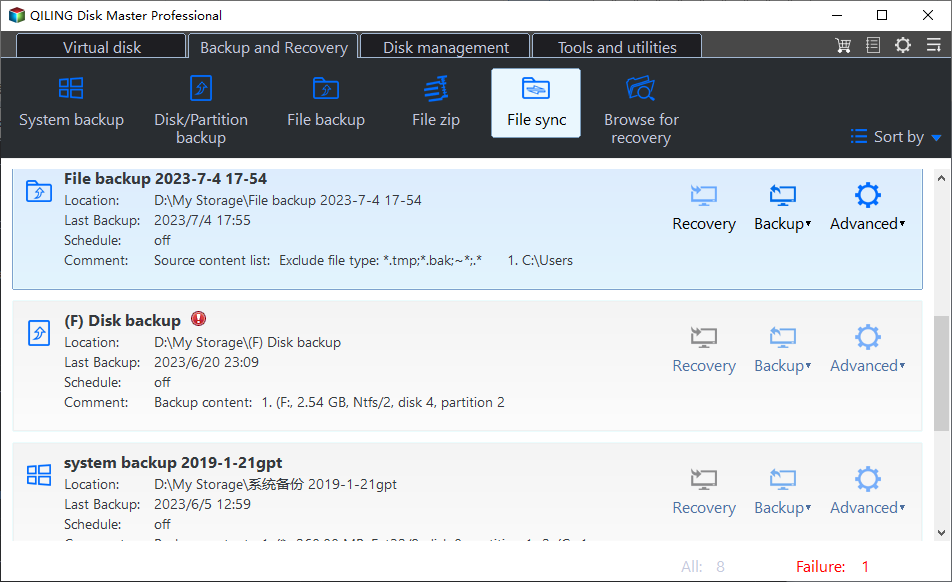
For small and medium companies, to create, manage and monitor backups for multiple computers, please try Qiling Centralized Disk Master to create a centralized backup.
Conclusion
It's not easy to perform Windows Server 2008 backup to NAS if you use the built-in backup utility - Windows Server Backup. It does not support using NAS or network share as backup destination unless you create and attach VHD and create a local backup with it. If you think it's complicated, try the best server backup software - Qiling Disk Master Server.
With it, you can directly backup Windows Server 2008 (R2) to NAS or network shared folder and keep multiple backups as you want. And you can even set the number of backups you want to keep and the rule to backup system and delete old backups automatically. If you would like to manage backups on unlimited Windows PCs and servers, please try Qiling Disk Master Technician Plus.
Related Articles
- How to Perform Windows 2008/2012 File Server Backup with Ease
You will learn how to perform Windows file server backup easily for all server computers, two ways in total. - Windows Server 2008/2012/2016 Backup: Restore from Network Location
If you have trouble performing Windows Server Backup 2012 restore from network location, please read this article patiently to get the way to restore system sucessfully. - Backup Server to QNAP NAS in 4 Steps - Qiling Disk Master
You can backup Windows Server 2012/2016/2019/2022 to QNAP NAS successfully without any issue. Scroll down to get 3 effective methods. - Backup Windows Server 2012 (R2) to Synology NAS
You can learn how to backup Windows Server 2012 to Synology NAS with a professional server backup software if Windows Server Backup failed to backup to Synology.