The Easiest Way to Clone Windows Server 2012 to New Hard Drive
The need to clone Windows Server 2012 to new hard drive
You can clone the existing Windows Server 2012 installation to the new hard drive using software like Acronis True Image, EaseUS Todo Backup, or Macrium Reflect. These tools will help you create a sector-by-sector copy of your current system, preserving all settings, applications, and data. This way, you won't need to reinstall the operating system, saving you time and effort. Make sure to choose a software that supports Windows Server 2012 and can handle the size of your new hard drive. Additionally, ensure the new drive is properly configured and recognized by the system before proceeding with the cloning process.
To improve computer performance, consider upgrading to a new HDD or SSD, which can help with storage space and speed. However, reinstalling the OS and applications can be time-consuming. A better approach might be to consider a cloud-based solution, such as cloud storage or a virtual machine, that can help reduce the need for physical storage and improve performance without the hassle of reinstalling everything.
There is a quick and easy method to transfer an operating system to another storage device without reinstalling it, known as System Clone, which involves making a copy of the original OS and transferring it to the new device using a tool like Qiling Disk Master Server.
Best software to clone Windows Server 2012 to new hard drive
Qiling Disk Master Server is a data protection and disaster recovery tool that also serves as a disk/partition cloning software, specifically designed for Windows Server systems, and is easy to operate even for non-experts, supporting all Windows OS platforms.
You can easily clone Windows Server 2012 to a new hard drive using the System Clone or Disk Clone feature. The System Clone will only clone the system drive, while the Disk Clone will clone the entire drive, including system and data. To perform a Windows Server 2012 system clone, you can use Qiling Disk Master Server.
How to clone Windows Server 2012 to new hard drive
Connect another disk to your computer and ensure it's available for detection. Next, download and install the Qiling Disk Master Server, then launch the application.
Step 1. Select "System Clone" under the "Tools and utilities" tab.
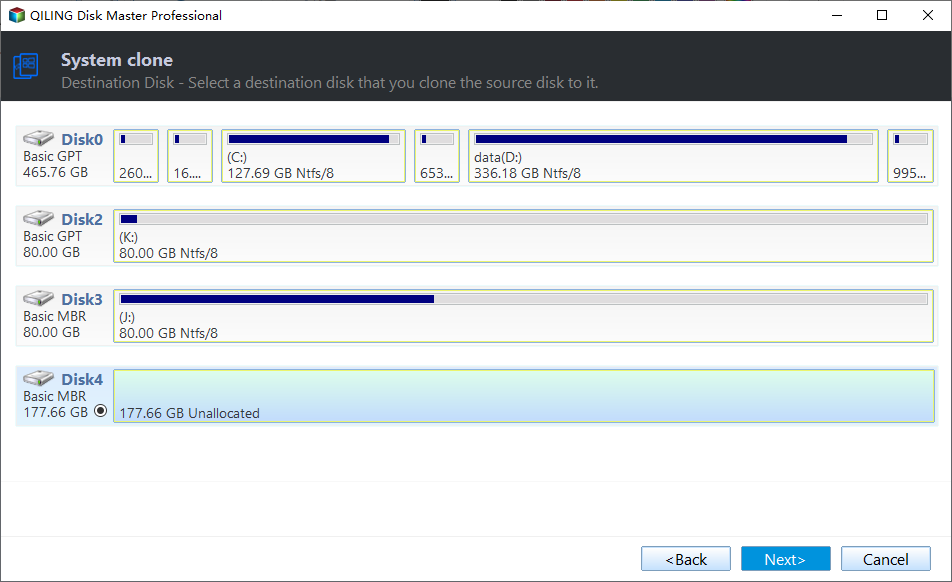
Step 2. The system drive and all boot-related drives are selected by default. To proceed, you must choose a partition as the destination, ideally the first partition or available area on the target disk, to ensure a successful boot process.
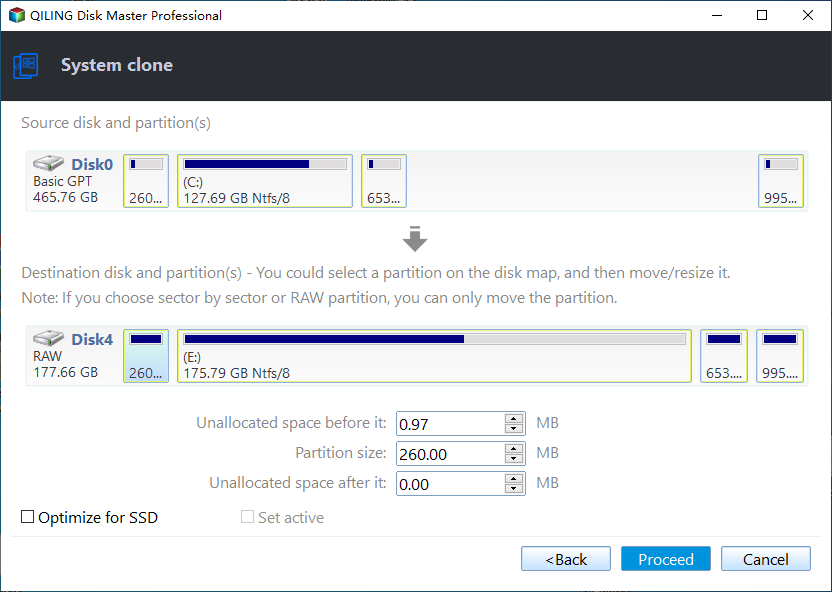
Step 3. Confirm the operation and click "Proceed". Wait for the progress to reach 100%. After system cloning is completed, shut down your computer, disconnect the source disk, and connect the destination disk to make the system bootable from the new hard drive.
Notes:
- If you're cloning from a smaller disk to a larger one, you can edit the partitions on the destination disk by clicking the "Edit Partitions" option. This allows you to make adjustments as needed.
- If you choose "sector by sector clone", it will clone each space of the selected partitions, whether it is used or not, but this option is not supported when cloning a larger disk to a smaller disk.
- If you're cloning a disk to an SSD, enabling SSD Alignment will improve its reading and writing speed.
Conclusion
Qiling Disk Master Server makes it easy to clone a Windows Server 2012 installation to a new hard drive, offering options to clone just the system or the entire hard drive, as well as individual partitions.
Qiling Backuper Server is not only a cloning tool, but also an excellent backup and restore tool, offering various backup options like system, disk, partition, and file backup, as well as full, incremental, and differential backup. It also allows you to create multiple backup schedules according to your needs.
Qiling Backpper Standard is a free version of the software that allows Windows PC users to protect their data safe.
Related Articles
- How to Clone Windows Server 2012 (R2) Hard Drive | 2 Ways
This paper shows how to clone Windows Server 2012 (r2), 2008(r2) or 2003 hard drive with secure boot under the help of the best disk clone software and Windows Server Backup. - How to Clone Server 2016 Hard Drive to SSD or Larger HDD
How to clone hard drive on Windows Server 2016/2012/2008? The powerful server cloning software Qiling Disk Master Server offers you the simplest and safest solution. - Top 2 Ways to Migrate Windows Server 2012 R2 to New Hardware
Here are 3 ways to migrate Windows Server 2012 R2 to new hardware for different situations. You could choose one way to follow according to your situation. - Best ADATA SSD Disk Migration Tool to Clone HDD to ADATA SSD
The best ADATA SSD disk migration tool - Qiling Disk Master will help you safely clone HDD to ADATA SSD without reinstalling.


