How to Create Restore Point in Windows Server 2008 (R2)
- Can I create restore point in Windows Server 2008 (R2)
- What a Windows Server 2008 (R2) restore point should include
- How to create Windows Server 2008 (R2) restore point easily
- Method 1: Create restore point in Windows Server 2008 (R2) via Windows Server Backup
- Method 2: Create Windows Server 2008 (R2) restore point with Wbadmin
- How to create a full system backup to avoid system crashes
- Conclusion
Can I create restore point in Windows Server 2008 (R2)
In Windows Server 2008 (R2) and other newer OS, you can create a restore point, which is a snapshot of your system files, program files, registry settings, and hardware drivers. This allows you to undo changes and restore your system to a previous date, just like in Windows Client OS. However, the process and location of creating a restore point may differ slightly from the Windows Client OS.
Windows Server 2008 (R2) and other server-based computers do not have restore point and system restore features, unlike desktop versions of Windows. However, they do include a system state backup feature, which can be created using Windows Server Backup and Wbadmin, to protect the operating system of the server. This allows for similar functionality to system restore, but specifically tailored for server environments.
What a Windows Server 2008 (R2) restore point should include
In Windows Server 2008 (R2), a System Restore Point refers to a System State backup, which is a copy of all related information of your operating system and configurations. This backup includes system files, boot files, the registry, and other system components, as well as the System Volume Information folder, which contains information about installed applications, system events, and other system-related data.
- Boot files, including system files, and all files protected by Windows File Protection (WFP) are not backed up by Windows Backup. These files are crucial for the operating system to function properly and are therefore not included in the backup process.
- Active Directory (on a domain controller only)
- Sysvol (on a domain controller only)
- Certificate Services (on certification authority only)
- Cluster database (on a cluster node only)
- The registry
- Performance counter configuration information
- Component Services Class registration database
In Windows Server 2008 (R2), creating a system state backup allows you to restore your system to a previous state in case of a disaster. This can be a lifesaver if something goes wrong with your system. To create a system state backup, you'll need to use the Windows Server Backup feature, which is a built-in tool that comes with the operating system.
How to create Windows Server 2008 (R2) restore point easily
To create a Windows Server 2008 (R2) restore point, you can use either Windows Server Backup or the Wbadmin command line utility. For professionals, using the command line is recommended as it offers more flexibility.
Method 1: Create restore point in Windows Server 2008 (R2) via Windows Server Backup
To create a system restore point in Windows 2008 (R2), you can use Windows Server Backup, a built-in backup and restore software in server-based operating systems. This tool allows you to create a system restore point, which can be useful in case of system failures or other issues.
To create a system state backup, follow these simple steps. Firstly, open the Control Panel and click on the "System and Security" section.
Step 1. To access Windows Server Backup, go to Start > Administrative Tools > Windows Server Backup, then click Backup Once... under the Actions tab to create a one-time system state backup, or choose Backup Schedule... to set up regular backups.
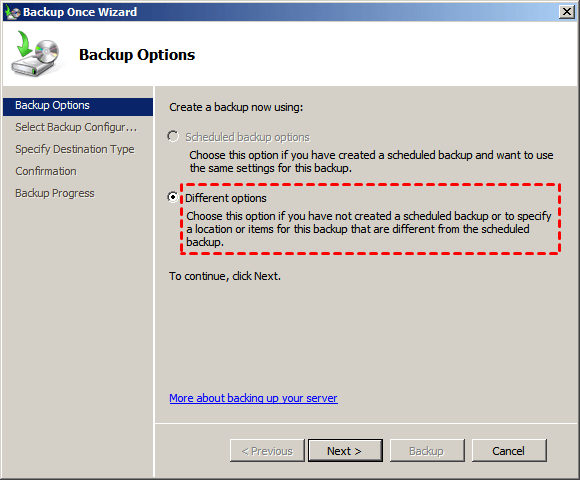
Step 2. Tick Different options and click next.
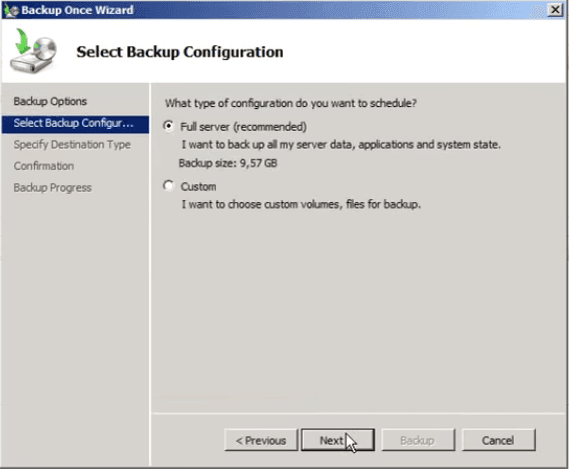
Step 3. To proceed, select the "Full server" option in the window and click "Next". This choice encompasses all server data, applications, and system state, making it a comprehensive option for full system recovery, including system state recovery.
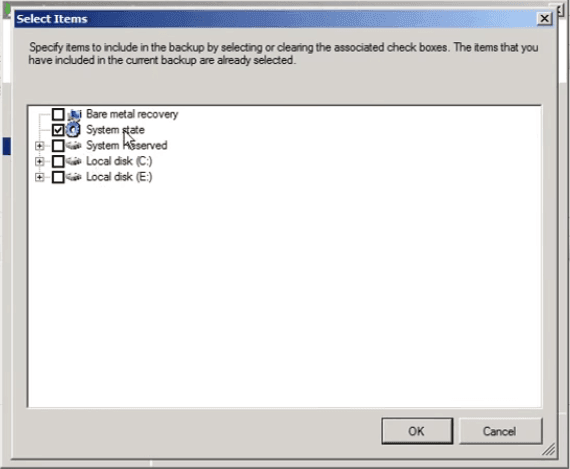
Click on the System State option in the window that pops up after clicking Add Items.
Tip: You can also choose to create a full system image backup as a restore point, which can prevent your computer from suffering any disasters, such as startup failure, by choosing the Full server option.
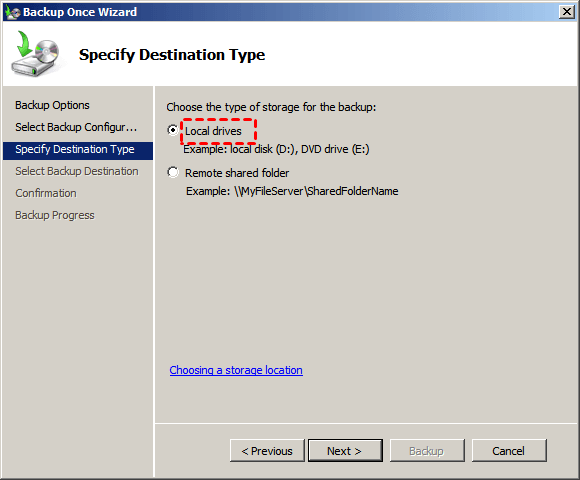
Step 4. Specify your destination path to save your backup. You can choose any local drive recognized by your computer or save to a network share.
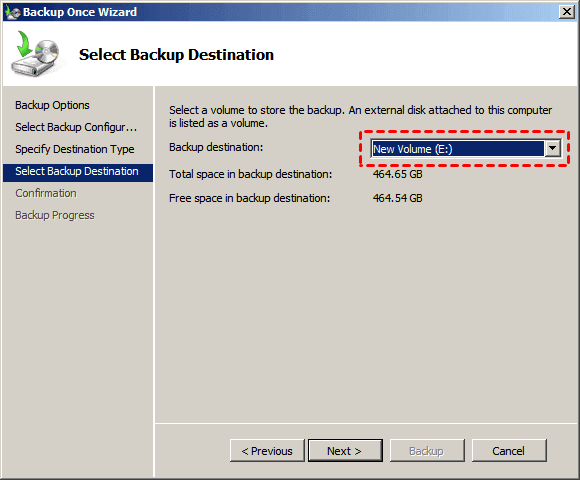
Step 5. In Windows Server 2008 R2, select a backup destination from the drop-down list, then click Next and Backup to create a system restore point.
Method 2: Create Windows Server 2008 (R2) restore point with Wbadmin
To create a Windows Server 2008 (R2) restore point, you can use the Wbadmin command line utility, which is user-friendly for IT technicians, but may be complicated for most users. Alternatively, you can use Windows Server Backup, a more user-friendly option.
Step 1. Click Start Menu and type cmd in the search box, then run command prompt as administrator.
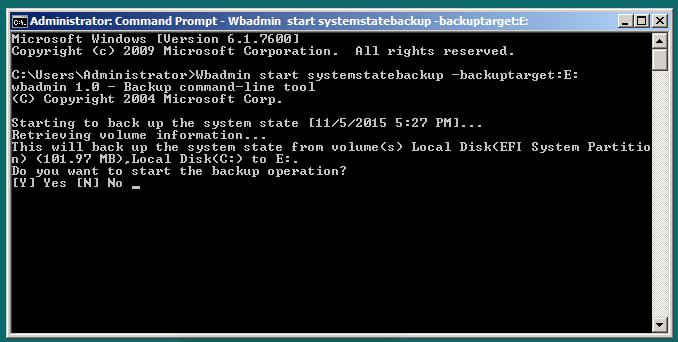
Step 2. Type a command based on the following syntax and press Enter to execute system state backup.
wbadmin start systemstatebackup -backuptarget:X: -quiet
Notes:
The X parameter in the command refers to the drive letter of the partition you want to save your backup to.
• The -To avoid receiving a prompt asking if you want to start the backup operation, add the –quiet parameter to the end of your command. This will prevent the prompt from appearing and automatically proceed with the operation. For example, you can type the command with –quiet at the end, like this: command –quiet. This way, you can skip the confirmation prompt and directly execute the operation.
In Windows Server 2008 (R2), you can create a system state backup using either GUI-based backup software or the command line. However, this type of backup is only effective for small failures and may not be sufficient in the event of a serious problem like boot failure, making a full server backup a more reliable option.
In this case, you only need a full system backup that includes the operating system and boot-related partitions required to start Windows, and you can continue learning about it in the next part.
How to create a full system backup to avoid system crashes
Qiling Disk Master Server is a professional backup software for Windows Server and client operating systems, including Windows 2022, 2019, 2016, 2012, 2008, 2003, and Windows 11, 10, 8, 7. It allows users to create full system backups, disk backups, and other backup types in a simple and straightforward process, providing a convenient way to rescue computers from disasters, even in cases where the system fails to boot.
- You can create a schedule backup in daily, weekly, or monthly intervals, or set it to automatically backup during specific events like system shutdown, or even use the USB plug in feature to backup directly to a USB flash drive.
- You can manage your backup disk professionally with features like compression, splitting, and automatic backup cleanup, ensuring a smooth backup process without worrying about Windows server backup disk full issues.
- To create a bootable Windows Server 2008 USB, you could use a tool like Rufus to copy the installation media onto a USB drive, ensuring you have a backup in case your computer fails.
- You can perform Windows Server backup and restore to a new hard drive, computer, or even with different hardware. The advanced edition also allows you to restore the system to multiple computers at once over a network.
To create a restore point in Server 2008(R2) using Qiling Disk Master Server, you can backup your server to any device that can be detected by your server computer, such as an external hard drive, network drive, or cloud storage. First, connect the device in advance. Then, you can proceed with the backup process. The specific steps and details for creating a restore point and backing up your server will depend on your Qiling Disk Master Server software and the specific device you are using.
Step 1. To backup server computers, download and install the Qiling Disk Master Server software. For backing up multiple servers, consider using the Qiling Disk Master TechPlus edition.
To backup your system, launch the backup software, click Backup, then System Backup, and it will automatically select the system partition and any boot-related partitions required to start Windows.
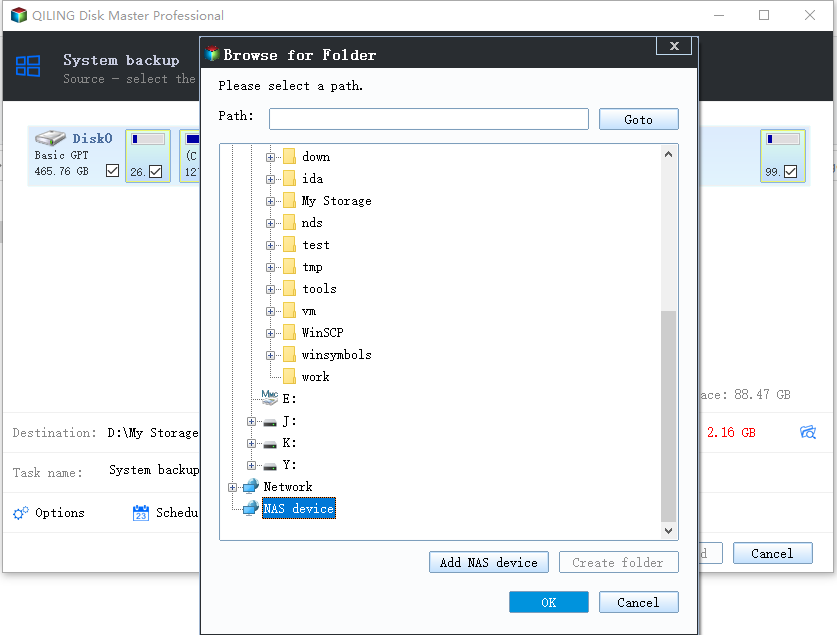
Step 2. After clicking where the arrow points, choose the desired destination path to save the image backup, which can be an external hard drive, USB, network drive, NAS, or any other suitable location.
Step 3. In Windows Server 2008 (R2), go to "Options", "Schedule Backup", and "Backup Scheme" to customize backup settings and manage disk space. Confirm your choices and click "Proceed" to create a full system backup.
About Options:
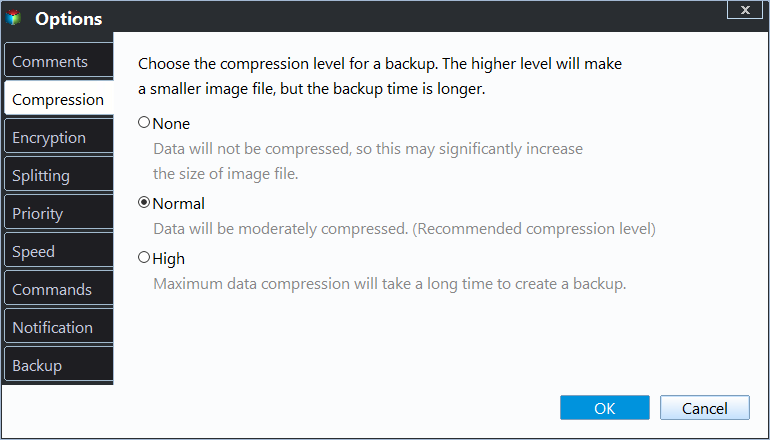
You can comment, enable email notification and encryption for backup, set compression level, and create pre/post-command scripts.
About Backup Schedule:
- Daily/weekly/monthly backup: Set up daily, weekly or monthly backups based on file change frequency, and schedule backups to run during off-peak hours by enabling the "�ake the computer to run scheduled tasks" option.Wake the computer to run scheduled tasks" option.
- Event triggers: To backup system without interfering with any of your operations, using the "System Shutdown" option in Event triggers is recommended.
- USB plug in: To automatically backup data to or from a USB drive when it's plugged in, set up a scheduled backup task that is triggered by the USB drive being plugged in. This will ensure that your data is safely backed up to the USB drive or restored from it whenever it's connected.
About Backup Scheme:
- Incremental or differential backup: Both features save time and disk space by backing up only changes, with incremental backup being the default option.
- Automatic Backup Cleanup: This feature resolves the backup disk full issue by automatically deleting old backups and keeping the latest ones, organized by quality, time, or daily, weekly, and monthly tiers, with the longest retention period for the daily tier.
Tips:
All backup tasks are listed under the Home tab, where you can view and edit them as needed by selecting the task and corresponding options.
You can switch to the Tools tab and select Create Bootable Media, which helps restore Server 2008(R2) to a previous date without booting into Windows, even if your computer refuses to boot.
To protect data safely in multiple computers or within a company, you can create a portable version of Qiling Disk Master and backup system without installing it again, by using �iling Disk Master Technician or TechPlus edition.Qiling Disk Master Technician or TechPlus edition.
Conclusion
In Windows Server 2008 (R2), you can create a restore point using the system state backup feature, which is also available on server 2003, 2012, 2016, 2019, and 2022, as well as their R2 versions. However, this feature is not suitable for quick recovery from a system crash, and a full system backup with Qiling Disk Master Server is recommended for that purpose.
This software allows you to clone Windows Server 2008, 2011, 2012 R2, and 2019 to a new hard drive, serving as a backup and restore solution. It enables you to easily replace a hard drive and boot from the new one without needing to restore an image first.
Related Articles
- Create Windows Server 2012 Restore Point with 2 Alternative Ways
A restore point allows you to restore system to the previous state. This article will show you how to create Windows Server 2012 restore point with two ways. - How to Perform Windows Server 2012 System Restore Using Command Line
If you don't know how to perform Windows Server 2012 system restore command line, please read on and learn 2 practical methods as well as from easy graphics. - How to Create and Use Windows Server 2012 Recovery Disk
If you are looking for a way to create Windows Server 2012 recovery disk in case your computer fails and restore it to previous date, please continue to read this article and learn the operating steps. - How to Create System State Backup for Windows Server 2016
You will learn two easy ways to create a system image for Windows Server 2016, namely using Windows Server Backup and Qiling Disk Master Server. Get the stepwise guide below. - Solved: Can’t Create Restore Point in Windows 10
If you can't create restore point in Windows 10, refer to this article to realize how to fix this problem and find out a better way to protect your computer.

