Create System Image Backup in Windows Server 2016 | 3 Ways
About Windows Server Backup in Windows Server 2016
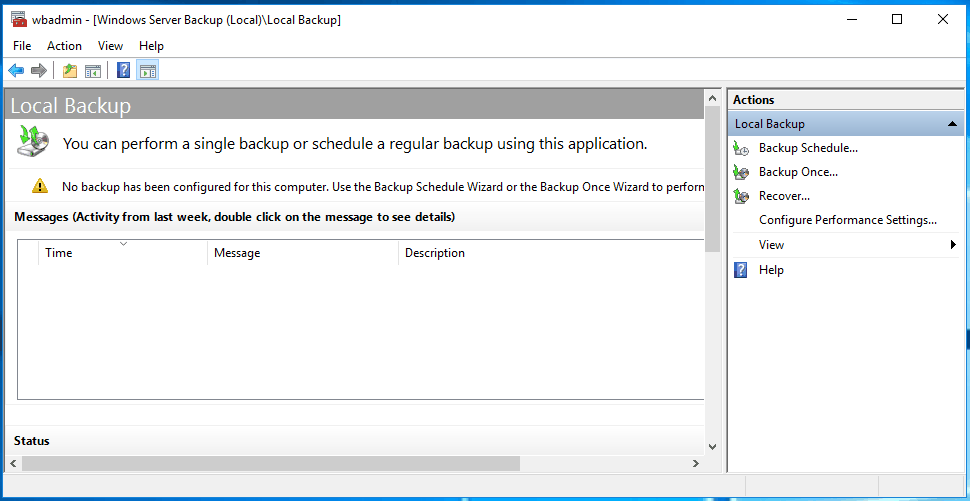
Windows Server Backup is a built-in backup utility in Windows Server 2016. Here's how to use it to create a system image backup:
You can use WSB to perform a full server backup (including all volumes), specific volumes/partitions backup, system state backup, specific files or folders backup. Since Windows Server 2012, WSB supports 4K sector advanced format hard drive and partitions larger than 2TB, so you can create a full server backup more easily.
When it comes to protecting your data, creating a system image backup is a crucial step. With Windows Server backup images, you can ensure that your data is safe and can be recovered in case of any unexpected events. In this article, we'll explore the importance of creating a system image backup for Windows Server 2016 and other operating systems.
Windows Server 2016 System Backup with Windows Server Backup
When it comes to protecting your data, creating a system image backup is a crucial step. With Windows Server backup images, you can ensure that your data is safe and can be recovered in case of any unexpected events.
- Go to Server Manager > Role-based or Feature based installation > Server.
- To install Windows Server Backup, follow these steps:
After installing Windows Server Backup, you can continue to see below and learn how to backup Windows Server 2016 using Windows Server Backup.
1. Click Start > Administrative Tools and then select Windows Server Backup.
2. Under Actions tab, click Backup Once for a one time backup job, and click Next to continue. If you want to create a scheduled backup, click Backup Schedule instead.
3. Tick Different options if you have not created a scheduled task. Then, click Next.
4. Check Custom for backup configuration and click Next.
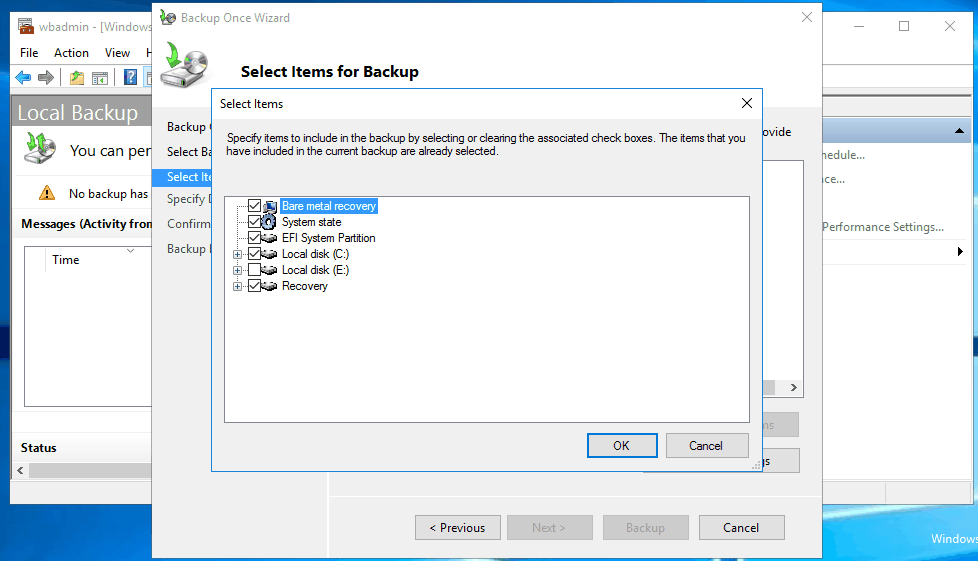
5. Click Add Items option in the Select Items for Backup and then check Bare metal recovery. It will automatically check the required items for bare metal recovery.
6. Specify destination location to save the Windows Server 2016 system backup, you can choose the local drives or remote shared folder.
7. Click Backup to create system image backup for Windows Server 2016.
You're right that creating a system image backup for Windows Server 2016 can be a time-consuming process. Once the backup is complete, it's essential to consider the destination location to avoid overwriting previous backups.
You're right that Windows Server Backup will automatically delete old backup images to free up space if the target storage location is full. However, you might experience issues with the backup process, such as the backup failing and not deleting old backups.
You're right that the default behavior of Windows Server Backup might not be ideal if you want to keep more backups and ensure there's always enough space to store new ones. In that case, you might want to consider a more flexible approach.
Backup Windows Server 2016 via Easiest Server Backup Tool🔥
You're right that Qiling Disk Master Server is a powerful Windows Server backup software. It allows you to create system image backups for Windows Server 2016 with just a few mouse clicks. This feature is especially useful for system administrators who need to create backups of their servers.
- Schedule Backup: You can create schedule automatic backup in Windows Server with Daily, Weekly, Monthly, Event trigger or USB plug in feature.
- Backup Scheme: You are allowed to backup system image in full, incremental or differential backup and set the backup retention policy to free up space for new backup.
- Bootable rescue media/recovery environment: You are able to create a bootable device or recovery environment so as to recover a crashed system.
- Support multiple storage devices. You could store backups in local disk, external hard disk, USB drive, CD/DVD, network or NAS, clouds.
- Support Windows 11/10/8/7 and Server 2022/2019/2016/2012.
- Support all the file systems like FAT32, FAT16, EXT2, EXT3 and NTFS, etc.
You're right that Qiling Disk Master Server has an intuitive main interface that makes it easy to backup Windows Server 2016 like an expert. The software's user-friendly design ensures that even those who are new to system image backups can navigate the process with ease.
You're right that Qiling Disk Master Server is a powerful Windows Server backup software that can help you backup Windows Server 2016 to an external hard drive. Here's a step-by-step guide to get you started:
1. Connect the external storage and make it can be detected. Launch the Windows Server backup software - Qiling Disk Master.
2. Under Backup tab, select System Backup for Windows Server 2016 OS backup.
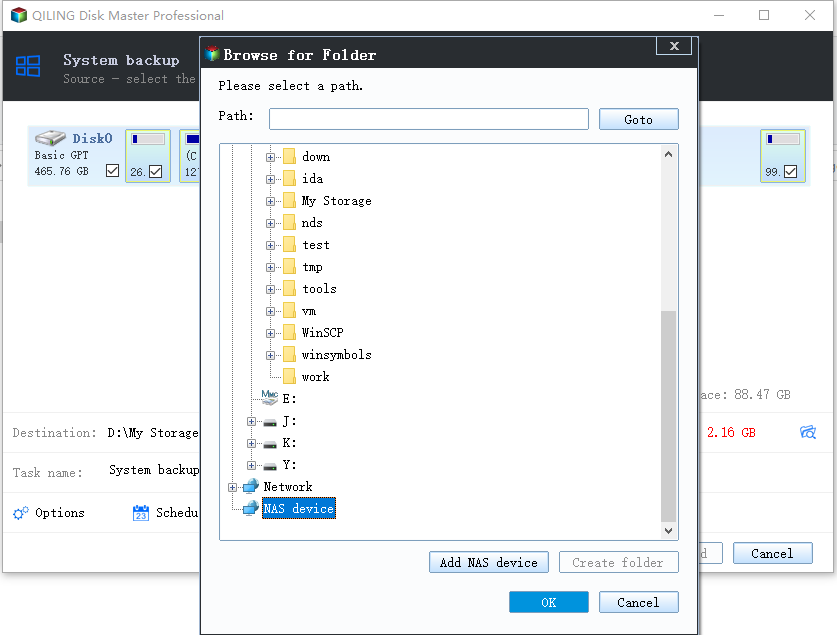
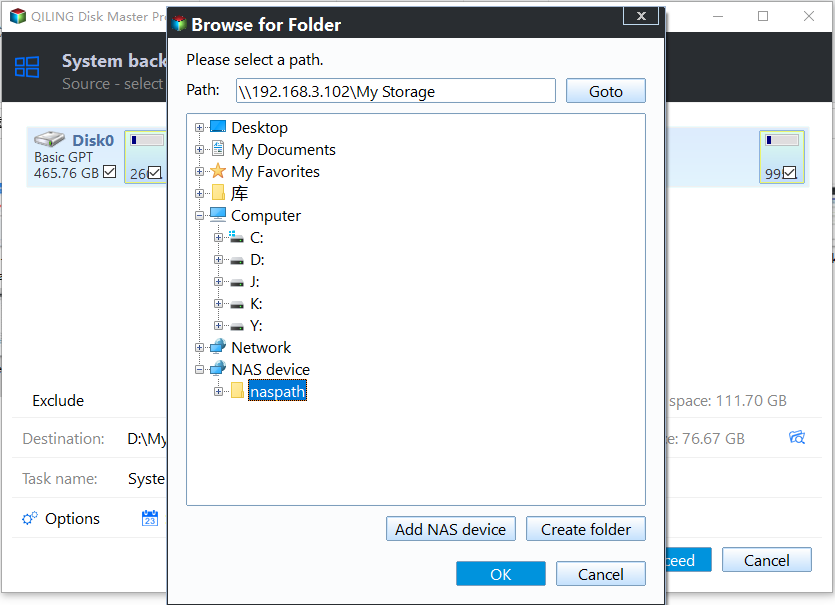
3. Choose the external hard drive as the destination to save the Windows Server 2016 image backup.
★ Tip: The program will automatically select the system partitions as backup source, including the boot partition, system reserved partition, etc.
4. Then, press Proceed to create a system image backup for Windows Server 2016.
There are some useful backup settings you can make before imaging Windows Server 2016:
👉 Options allow you to comment on the backup task, encrypt, split and compress the Server 2016 backup file, enable email or SMS notification, use VSS, etc.
👉 Schedule Backup provides you with five modes: Daily, Weekly, Monthly, Event triggers, USB plug in.
- Event triggers allow you to trigger the backup task via the four events: User logon, User logoff, System startup, and System shutdown.
- USB plug in is capable of backing up Windows Server 2016 automatically when the related USB is plugged in.
👉 Backup Scheme includes three backup methods and four cleanup methods.
- The backup methods are full, incremental and differential backup. Incremental backup will backup the changed part since the last incremental/full backup while differential backup will backup changed files since the last full backup.
- The cleanup methods are By quantity, By time, By daily/weekly/monthly and By space. You can choose one to automatically delete old backup images.
Backup Server 2016 OS using Best Enterprise Backup Software👍
Qiling Backup is a powerful and user-friendly solution for centralized backup management of all Windows operating systems. It provides a comprehensive set of features to ensure the security and reliability of your data.
- It enables you to create a system image, disk image or partition image for client Windows PCs and Servers.
- You are allowed to save backup images on a local disk, external hard drive, network share or NAS device, etc.
- You can schedule a backup task to run every day/week/month using the full/incremental/differential backup method.
Qiling Backup is a feature-rich solution that enables you to create a system image, disk image, or partition image for client Windows PCs and Servers. This powerful tool provides a convenient and reliable way to manage backups and system imaging for all Windows operating systems.
1. Install and run Qiling Backup. The default username and password for Qiling Backup are both "admin". Enter them and click Log in.
2. Click Source Device > Windows > Add Windows Device to add the Windows Server 2016 device that you want to backup. You need to enter the IP address, username and password of it.
3. Create Windows Server 2016 system backup.
- Click Backup and recovery main tab page.
- Choose System Backup as the Backup Type.
- Edit Task Name based on your need.
- In the Device Name field, click Select + to select the device you just added.
- In the Target field, click browse icon. If you want to backup to a local directory of the computer with Qiling Backup installed, click Add a new local storage. If you want to backup to a network share or NAS, click Add a new network storage.
- Change the default schedule settings in the Schedule field.
- Click Proceed > Add the schedule and Proceed now to begin creating system state backup for Windows Server 2016.
To Sum up
In a short while, Windows Server Backup, Qiling Disk Master Server and Qiling Backup can help you create a system image backup in Windows Server 2016 completely. Once the backup task is finished, you can use it to restore system image with identical hardware or dissimilar hardware (if you create a bare metal backup).
By comparison, the second one is more flexible, it allows you to create multiple backups with the help of its schedule backup feature. And it also allows you to delete old backup images to free up space for new backups. In addition, it has the ability to create bootable rescue media or Qiling PXE Tool for Windows Server 2016 system state backup restore when it is unable to boot.
For businesses with an unlimited number of PCs and servers, Qiling Disk Master Technician Plus is an ideal choice. This advanced backup and recovery solution offers a wide range of features and benefits that can help protect your company's IT infrastructure.
Related Articles
- How to Migrate Windows Server 2016 to New Hardware Effortlessly
You can successfully migrate Windows Server 2016 to new hardware with Windows Server Backup or a third-party migration tool. This article also helps to migrate Windows Server 2016 to 2019 or 2022. - Migrate Windows Server 2016 OS to SSD without Reinstalling
You will learn the best Windows Server migration software - Qiling Disk Master Server and how to migrate Windows Server 2016 to SSD by cloning. No need to reinstall system, programs and settings. - How to Create Windows Server 2016 Recovery Disk with Different Tool
Want to create a Windows Server 2016/2016 R2 recovery disk? Follow this article and I will show you two ways to create a recovery disk for your Windows Server. - How to Create A System Image Backup in Windows 10?
Making a complete system restore point is the best way to protect yourself from Windows 10 crashes. Please read this article for detail.


