Delete Shadow Copies in Windows Server 2012 R2 (3 Ways)
- What Is Shadow Copy?
- Why Delete Shadow Copies in Windows Server 2012 R2?
- How to Delete Shadow Copies in Windows Server 2012 R2
- Method 1. Delete Shadow Copies in Windows Server 2012 R2 via Vssadmin Command
- Method 2. Delete Shadow Copies in Windows Server 2012 R2 via System Properties
- Method 3. Delete Shadow Copies in Windows Server 2012 R2 via Disk Cleanup
- More Powerful Way to Protect Windows Server 2012 R2 and Delete Shadow Copies
- Summary
What Is Shadow Copy?
Shadow Copy is a powerful technology in Microsoft Windows that allows you to create backups of your files and volumes, even if they are in use. This feature is available in various versions of Windows, including XP, Vista, 7, 8, 10, 11, and Windows Server 2003, 2008 (R2), 2012, 2016, 2019, and 2022.

Why Delete Shadow Copies in Windows Server 2012 R2?
There are two main reasons why you should delete volume shadow copies.
- Occupy lots of storage space: Too many volume shadow copies can take up a lot of storage space, then causing disk space shortage, the computer running slowly, or even the system becoming unstable.
- Bring security risks: Volume shadow copies may bring some security risks, such as attackers may find SAM files in the shadow copies and read user password hashes or even use them to log in to remote servers.
Therefore, it is necessary to delete volume shadow copies in Windows Server 2012 R2, which not only helps you save disk space but also protects your data.
How to Delete Shadow Copies in Windows Server 2012 R2
So, how to delete shadow copies for a specific folder? This article will introduce you to 3 useful ways to delete shadow copies in Windows Server 2012 R2 in turn, you can choose any one of them according to your own needs. Please read on.
Method 1. Delete Shadow Copies in Windows Server 2012 R2 via Vssadmin Command
The Vssadmin command can delete all shadow copies or specific shadow copies from the volume. You can follow the steps below to use the vssadmin delete shadows command.
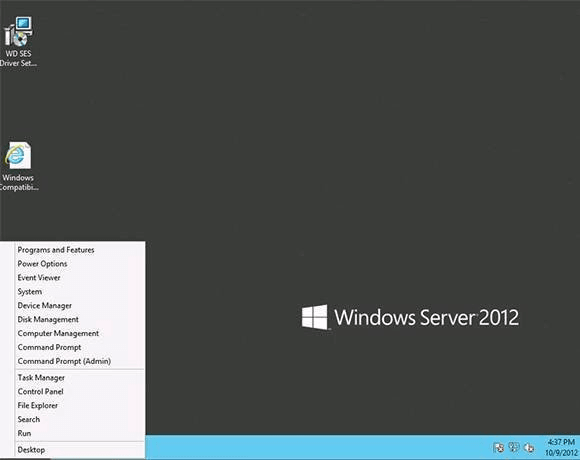
Step 1. Right-click on the Start icon and select Command Prompt (Admin).
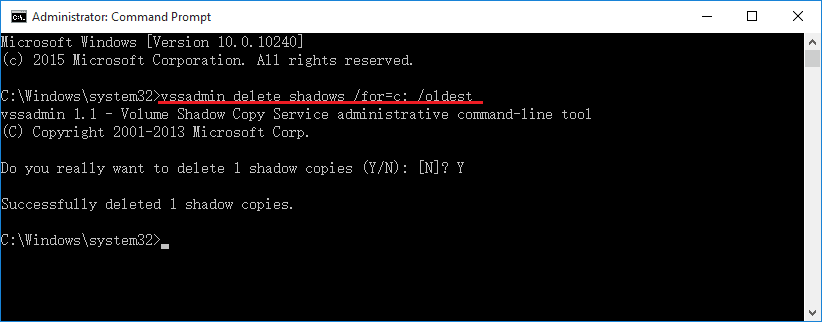
Step 2. Enter the corresponding command according to your needs.
- To delete all shadow copies on a Specific Volume, type the command below and press Enter.
vssadmin delete shadows /for=c: /all
- To delete a specific shadow copy from any volume, type the command below and press Enter.
vssadmin delete shadows /shadow=[Shadow ID].
- To delete the oldest shadow copy on a Specific Volume, type the command below and press Enter.
vssadmin delete shadows /for=c: /oldest
Step 3. Type exit and press Enter to exit Command Prompt.
Note: Before using the Vssadmin command to delete the oldest shadow copy on a specific volume, it's essential to understand the basic syntax and its parameters.
▶ The sync task:
vssadmin delete shadows /for= [/oldest | /all | /shadow=] [/quiet]
▶ The parameters and meanings:
- /for=: To delete the oldest shadow copy on a specific volume, you can use the `vssadmin delete shadows` command with the `/for` option. This option specifies the volume for which the shadow copy is to be deleted.
- /oldest: Deletes only the oldest shadow copy.
- /all: Deletes all of the shadow copies for the specified volume.
- /shadow=: To delete a specific shadow copy, you can use the `vssadmin delete shadows` command with the `/shadow` option. This option specifies the ID of the shadow copy to be deleted.
- /quiet: To suppress messages while running a command, you can use the `/quiet` option with the `vssadmin` command.
Method 2. Delete Shadow Copies in Windows Server 2012 R2 via System Properties
The second method to delete shadow copies in Windows Server 2012 R2 is through the system properties. And you can follow the steps below.
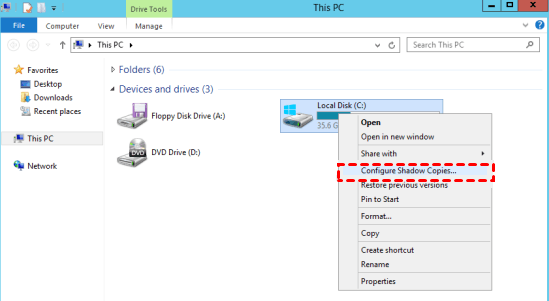
Step 1. Open File Explorer and right-click the drive you want to delete volume shadow copies. Select Configure Shadow Copies.
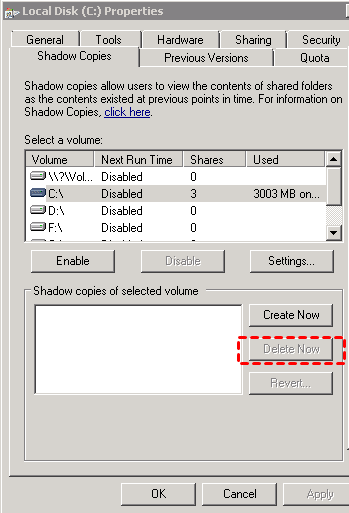
Step 2. Select the volume and click Disable, then, click Delete Now and click OK.
Method 3. Delete Shadow Copies in Windows Server 2012 R2 via Disk Cleanup
You can also use Disk Cleanup to delete all shadow copies and restore points saved to the selected hard drive letter except the most recent copy. Please follow the steps below.
Step 1. Open the Start Menu, type cleanmgr into the search box, and press Enter.
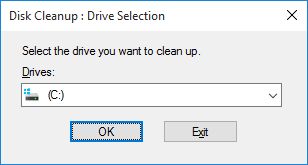
Step 2. Select the drive that you want to delete shadow copies, and click OK.
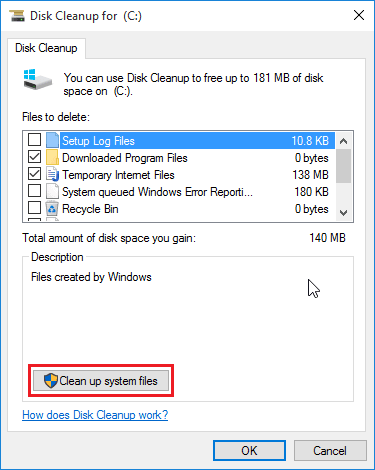
Step 3. Click on the Clean up system files button, choose the partition again and press OK.
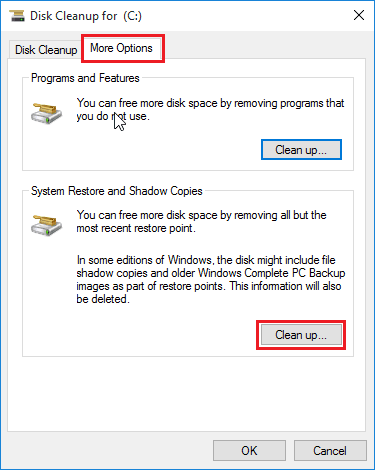
Step 4. Click on the More Options tab, and click the Clean up button in the bottom System Restore and Shadow Copies section.
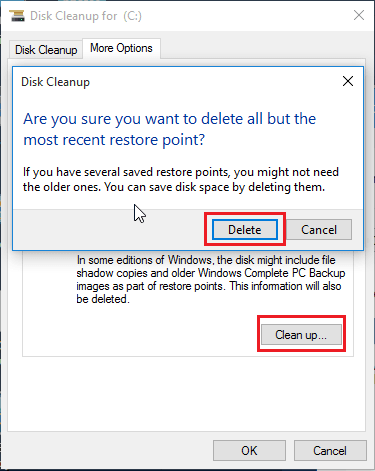
Step 5. Click on the Delete button to delete all shadow copies but the most recent one, then click OK.
More Powerful Way to Protect Windows Server 2012 R2 and Delete Shadow Copies
In fact, the Volume Shadow Copy Service is able to restore your computer to the previous date without downtime, but it's limited to drivers or program issues. If the OS or disk is damaged, it will become useless, resulting in heavy data loss, and you may need to reinstall Windows.
To prevent data loss and ensure business continuity, it's recommended to create a backup image in Windows Server 2012 R2 using professional backup and restore software like Qiling Disk Master Server. With Qiling Disk Master Server, you can:
- choose to backup files, partitions, system, or disk. And there are two ways to back up files, namely, File Backup and Cloud Backup. The former is more compatible.
- create a VSS backup and always be sure your backup is working without interrupting via VSS (default) and Qiling Backup Service. Even if there is a problem with VSS, the other service will continue to work to keep the backup process going.
- schedule backup files automatically with fixed intervals, such as daily, weekly, or monthly, or based on specific events in Event trigger and plug-and-pull backup feature - USB plug in.
- delete the older backups automatically to save the target disk space and free up more space for new backups.
To delete shadow copies in Windows Server 2012 R2, you can follow the graphic tutorial below. This process is also applicable in other Windows versions, including Windows Server 2003/2008 (R2)/2011/2012/2016 (R2)/2019/2022/SBS and Windows XP/Vista/7/8/8.1/10/11.
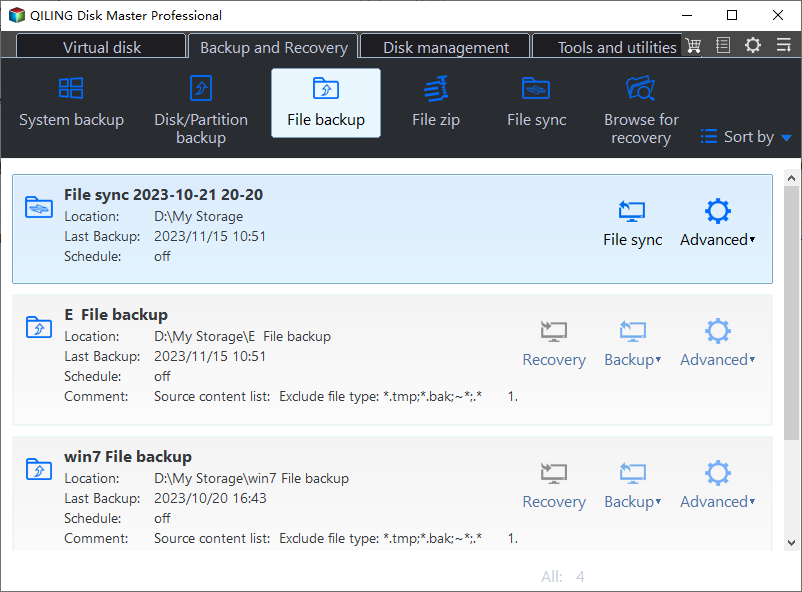
Step 1. Download Qiling Disk Master Server, install it, and open it. You can click Backup > File Backup.
Tip: To protect unlimited PCs or servers, consider using the Qiling Backup TechPlus edition. This edition offers a portable version of the software, allowing you to create a backup of files on any computer without the need for reinstallation.
Step 2. Click Files or Folder to select the files/folders you want to backup.

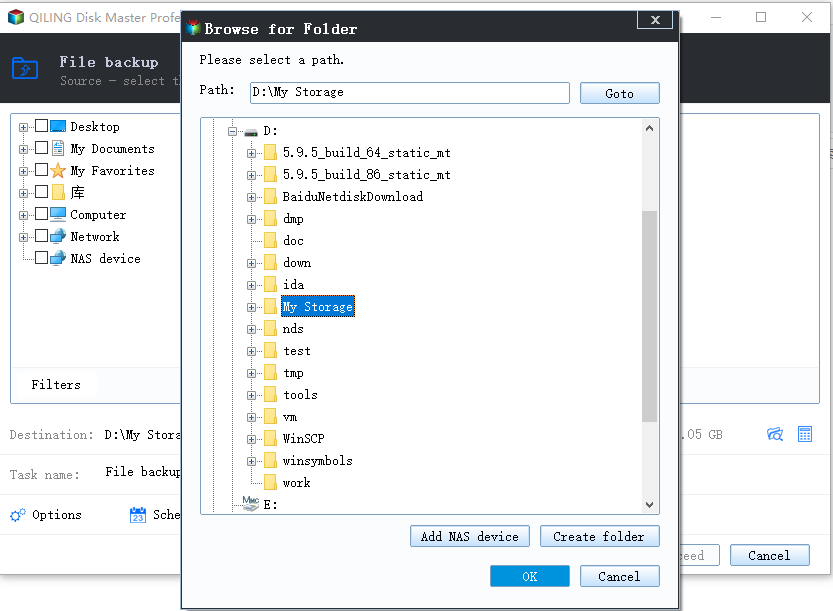
Step 3. When it comes to backing up your files, selecting a suitable destination is crucial. You have several options to consider, each with its own benefits and considerations.
Step 4. Click the following three options to set backup settings, and be sure the backup task is running without interrupting and makes up space for new backups.
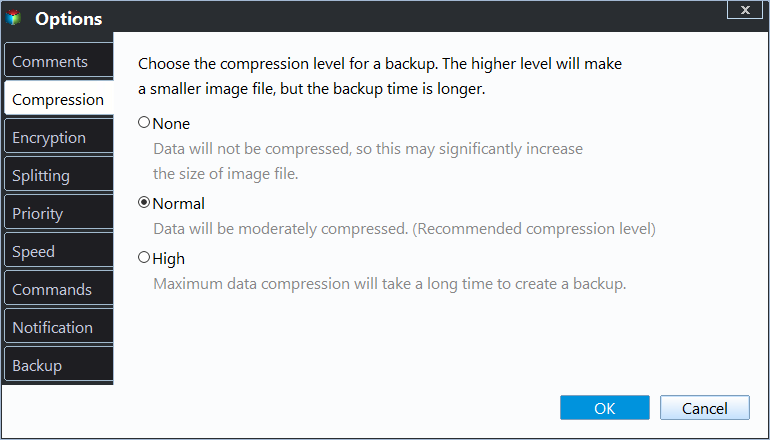
- To backup files as well as changes without interrupting, click Options and select one of the Backup Services. By default, this software will enable Use Microsoft VSS Backup under Backup Mode.
- To efficiently manage shadow copies and delete them when necessary, follow these steps:
▶ For schedule backup, you can use Daily, Weekly, Monthly, Event triggers, and USB Plug in. Since the last one is a plug-and-pull method, you can use it if you want to backup files to USB drive automatically when connected.
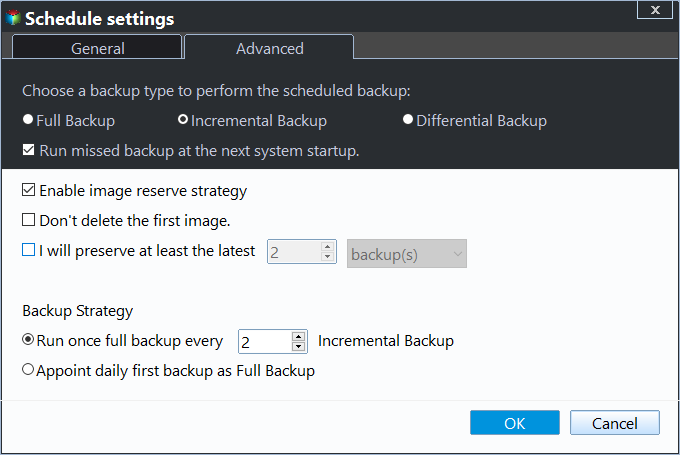
▶ For the backup scheme, You can configure automatic backup cleanup to ensure that your backups do not consume too much storage space. Here are some options you can consider:
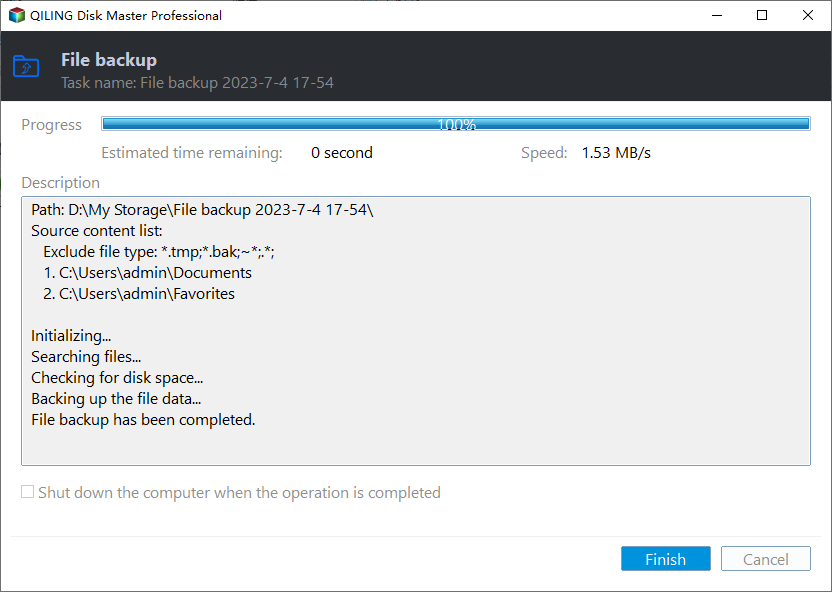
Step 5. Confirm all your operations and click Proceed to backup your files and delete shadow copies in Windows Server 2012 R2 automatically.
Bonus Tip: Best Enterprise Data Backup Solution
For enterprise users managing multiple Windows Server devices, Qiling Backup offers a comprehensive solution for data backup needs. This software provides a range of features and benefits, including:
- It enables you to create system/disk/partition backup for a bunch of Windows PCs and Servers, supporting Windows 11/10/8.1/8/7 and Windows Server 2022/2019/2016/2012 (R2)/2008 (R2).
- You are allowed to save backup images on a local disk, external hard drive, network share or NAS device, etc.
- You can schedule a backup task to run every day/week/month using the full/incremental/differential backup method.
Take the first step towards protecting your business data with Qiling Backup. This powerful enterprise backup software is designed to provide a reliable and efficient solution for all your backup needs.
Backing up client computers is a crucial step in ensuring business continuity and protecting valuable data. Qiling Backup makes this process easy and efficient, allowing you to manage and schedule backups for all your client computers from a single interface.
Note: Managing backups for virtual machines can be a complex task, but Qiling Backup simplifies this process, allowing you to backup both Hyper-V and VMware virtual machines with ease.
Summary
Shadow copies, also known as Volume Shadow Copies (VSCs), are snapshots of your system's state at a particular point in time. They are created to help with data recovery and backup purposes.
Therefore, it protects your data security and saves disk storage space. This software supports both VSS and Qiling Disk Master Service, so you don't need to worry that the backup process will be interrupted due to problems with one of the services. In addition, you can use its advanced edition to protect the unlimited servers of your company.
Related Articles
- Windows Server Backup Not Deleting Old Backups - Fixed
Find Windows Server Backup not deleting old backups? Do not worry! You can find effective solutions to this problem in this article. You can also find another way to delete old backups automatically in Windows Server systems. - 5 Quick Solutions to Windows Server 2012 Backup Disk Full
You will learn 5 quick solutions to fix Windows Server 2012 backup disk full. Get details below. - Windows Server 2012 (R2) Shadow Copy Best Practices
You will learn the Windows Server 2012 (R2) shadow copy best practices as well as more safer way to backup files. Anyway, check out these useful ways first. - How to Delete Shadow Copies in Windows 10 [4 Solutions]
4 ways provided in this article to delete shadow copies in Windows 10 easily. Just follow the steps to delete shadow copies here.