Easiest Way to Sync Data between 2 Servers Automatically
Need help: how to sync data between 2 servers automatically
Syncing data between two servers automatically can be a game-changer for teams and individuals alike. It ensures that everyone has access to the latest files and updates, making collaboration and productivity a breeze. However, some users may not know where to start. Here are some examples from a forum to help illustrate the process.
Hi there! I'd be happy to help you set up a shared folder between your two servers.
I see you've done some research on the topic. Yes, DFS (Distributed File System) is a popular option for synchronizing data between two computers, especially when it comes to Windows-based systems.
- it only works when you have an Active Directory Domain.
- That's an important limitation of DFS. It only synchronizes files stored on partitions with the NTFS file system, which means it won't work with files on partitions formatted with other file systems, such as FAT32, HFS+, or ext4, among others.
- in addition, the steps are quite complicated.
If you're looking to synchronize files between Windows Servers and don't have any concerns about file system compatibility, you can refer to the article on sync files between Windows Servers for detailed instructions and steps.
If you're looking for an easy and automated way to sync data between two servers, I highly recommend using a professional file sync software like Qiling Disk Master Server.
Best file sync software for Windows Servers - Qiling Disk Master Server
Qiling Disk Master Server is a top-notch file sync software that makes it incredibly easy to sync data between two servers automatically.
- Qiling Disk Master Server offers three sync solutions to cater to different needs: Basic Sync, Mirror Sync, and Two-Way Sync.
- Qiling Disk Master Server offers a feature to schedule a backup task, allowing you to automate the process.
- Qiling Disk Master Server offers a feature to synchronize data between two servers automatically.
- It supports Windows Server 2003/2008/2012/2016/2019/2022 including the R2 version, and Windows 11/10/8/7/XP/Vista.
To initiate the process, please download and install Qiling Disk Master Server on the first server computer.
Sync data between 2 Windows Servers automatically in 4 steps
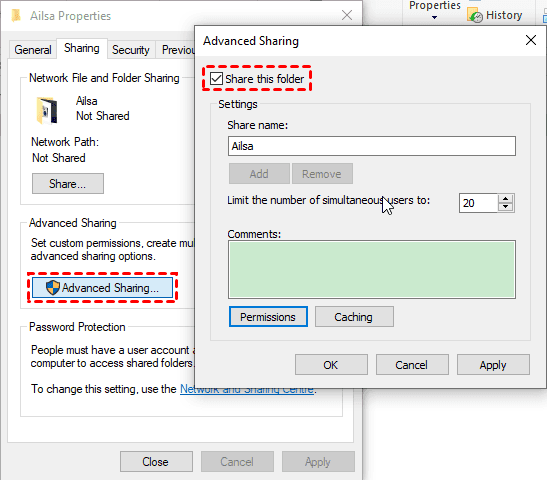
To sync folders between Windows Servers, we'll use Windows Server 2012 as an example. Ensure both server computers are connected to the same network and that you have the necessary access permissions to the shared folder on the target computer. If you don't have access, create a shared folder on the target computer and set the necessary permissions for your first computer. For more information on creating a shared folder, please refer to our guide on how to create a shared folder.
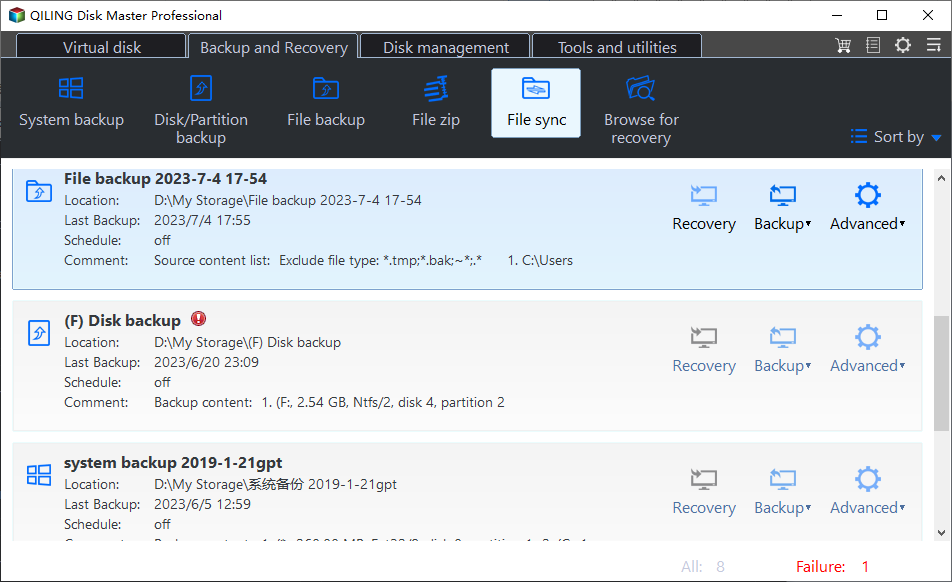
Step 1. Launch this software, click Backup and recovery and File Sync subsequently.
Quick tips how to select sync methods:
- To determine the best sync method for your needs, consider how frequently you make changes to your data. If you make changes daily, weekly, or monthly, Basic Sync, Mirror Sync, or Two-Way Sync might be suitable. However, if you require real-time synchronization, consider Real-Time Sync. This will ensure that your data is updated instantly, as soon as changes are made.
- To further refine your sync method, think about the direction of data flow. Do you need to sync data from one source to another, or do you want to sync data in both directions? If you need to sync data in both directions, consider using Two-Way Sync. This will allow you to update data on both the source and destination, ensuring that your data remains consistent across both platforms.
- To further refine your sync method, think about the importance of preserving the original file structure and contents in the destination path. If maintaining the integrity of the destination files is crucial, consider using Mirror Sync. This sync method ensures that any changes made to the destination files are avoided, effectively mirroring the source files in the destination path.
Step 2. Click Folders > This PC to add files or folders you want to sync in the first server computer.
Step 3. To add a new share or NAS device, click the inverted triangle and select the option to Add Share or NAS Devices. Then, enter the IP address of the other server computer and choose the shared folder where you'd like to save your data. This will allow you to access and sync data with the new device.
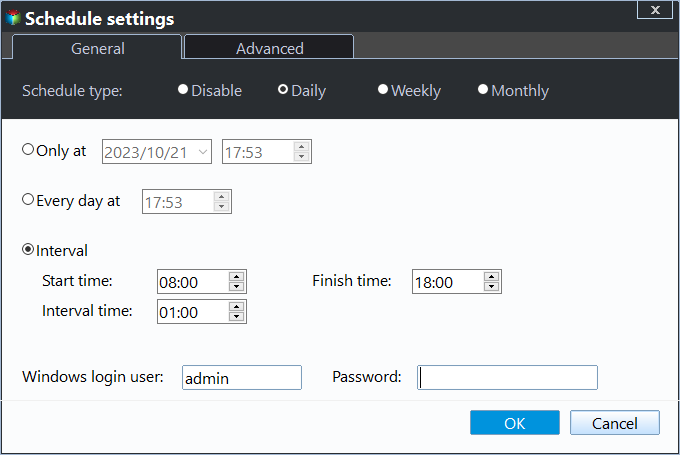
Step 4. To schedule a sync, click on Schedule Sync and choose the frequency that suits your needs. You can select from Daily, Weekly, Monthly, or even set up Event triggers or USB plug in to initiate the sync process. Once you've made your selection, click Proceed to keep your files in sync between servers.
Notes:
Be cautious when scheduling a sync task, as modifying the name of the source folder can prevent the program from synchronizing it. Ensure that the source folder name remains unchanged to maintain smooth synchronization.
Be aware that the "Basic Sync" feature does not automatically sync deleted files from the source directory to the destination. To enable this functionality, you need to go to Options and select the option "Sync the deletions in source directory to destination".
If you're looking to sync folders between two servers using a USB drive, you might want to consider using the "USB plug in" feature. This feature allows for automatic syncing between the two servers, making it a convenient and hands-off process.
Conclusion
To sync data between two servers automatically, consider using a powerful server backup software like Qiling Disk Master Server. This software enables you to sync data between the two servers in just 4 easy steps, using one of its sync methods. You can also customize the syncing frequency to suit your needs, such as daily, weekly, monthly, or even real-time syncing.
To safeguard data on an unlimited number of servers within a single company, consider utilizing Qiling Disk Master TechPlus. This solution allows for the creation of a portable version of the software, which can be run directly from a removable device on the target computer without the need for installation. Additionally, it supports the deployment of system images or disk images to multiple computers over a network, providing a convenient and efficient way to manage and protect your data.
Related Articles
- Freeware to Sync Files Between 2 Computers on the Same Network
- Transfer Files from One Computer to Another in Windows 10/8/7
- How to Automatically Sync Windows Server with OneDrive
- WD My Passport Backup with Free Software in Windows 10/8/7 | 2 Ways
WD My Passport comes with WD Backup software to auto backup PC files to WD Passport drive. But it has some compatibility and functional limitations. Try the 2nd way to protect your important files better.


