2 Ways to Migrate Windows Server 2012 R2 to New Hardware
Scenario: I want to migrate Windows Server 2012 R2 to new server
I am running Windows Server 2012 R2 at my office. Nowadays, I have got a new server with a better configuration. It does not have the OS yet. Can I migrate Windows Server 2012 R2 to new hardware without losing any settings or data?
Why migrate Windows Server 2012 R2 to new hardware
You're right, modern technology is constantly evolving, and it's essential to stay up-to-date with the latest equipment and software. Here are some reasons why you might want to migrate your Windows Server 2012 R2 to new hardware:
Server upgrade: You're right, older hardware can lead to various issues, and upgrading to a new server is often the best solution. However, reinstalling the operating system and applications on the new server can be a time-consuming and complex process. Fortunately, migrating Windows Server 2012 R2 to new hardware directly can be a more straightforward and efficient approach.
Unify configuration: In large organizations, deploying the same system and applications across multiple computers can be a time-consuming and labor-intensive process. Installing Windows Server 2012 R2 and other applications on each machine individually can be a daunting task, especially when dealing with a large number of devices. However, by leveraging direct migration, you can simplify and accelerate this process.
How to migrate Windows Server 2012 R2 to new hardware
System or disk cloning is a familiar concept for many users. When migrating Windows Server 2012 R2 to another disk on the same machine, using built-in Windows Server migration tools is often the most straightforward approach. However, migrating Windows Server to a different machine can be more complex, as it involves ensuring the compatibility of boot files with the new hardware.
Bare-metal backups are a popular method of data protection on Windows Server. These backups capture the entire system, including the operating system, applications, and data, and can be used to recover a machine that has no system or the system has crashed. However, according to Microsoft, bare-metal backups are only guaranteed to restore the same physical machine, or different physical computers with the same hardware (same make, model, and configuration).
While some articles suggest that it's possible to recover an Active Directory (AD) forest from a full server backup on a different machine, this approach is not always guaranteed to work in practical scenarios. However, in most cases, it's unlikely to encounter issues with AD forest recovery from a full server backup on a different machine.
👉Transferring Windows Server 2012 R2 to a machine with the same hardware is a relatively straightforward process. You can use the built-in Windows Server backup and system image recovery to transfer the operating system and all installed applications.
👉Migrating Windows Server 2012 R2 to different hardware can be a complex process. Unlike transferring the operating system to a machine with the same hardware, which can be done using the built-in Windows Server backup and system image recovery, migrating to different hardware requires a more sophisticated approach.
Migrating Windows Server 2012 R2 to a new hardware can be a complex process. However, with the right approach, it can be done successfully.
Way 1: Migrate Windows Server 2012 R2 via Windows Server Backup
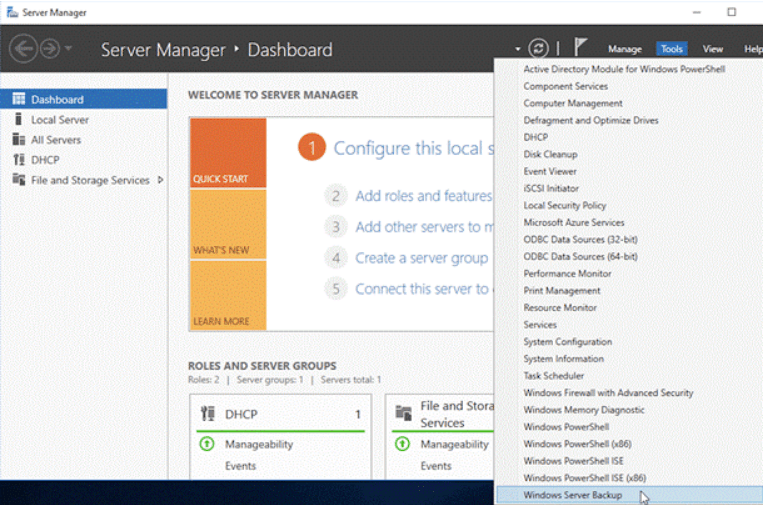
Windows Server has its built-in migration tool called Windows Server Backup. With it, you could create a system image and then restore image to your new hardware. If you don't have this tool on your computer, you can install Windows Server Backup first from Server Manager.
Steps to migrate Windows Server using Windows Server Backup
Here I will show you how to migrate Windows Server 2012 R2 with via the backup and restore way. Before restoration, you need to create a system image backup that includes everything you want to migrate, and complete some other preparations step by step.
✬Create Windows Server Backup
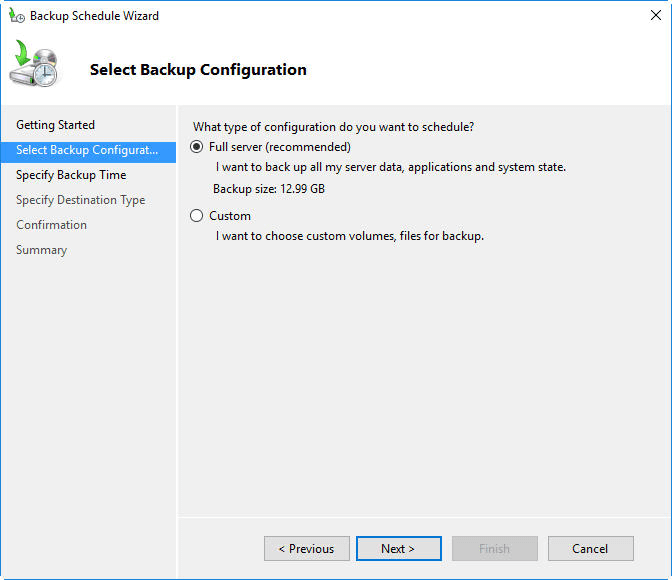
Use Windows Server Backup to create a full backup that can be used for bare metal recovery. To be specific, you can either select "Full server" in Select Backup Configuration, or select "Customize" -> "Bare metal recovery".
When it comes to backing up your Windows Server 2012 R2 machine, you have two primary options: **Full server** and **Bare metal recovery**. While both options are designed to protect your system, they serve different purposes and include different types of data.
✬Prepare recovery disk or installation disk
To perform a system image recovery, you need a Windows Server recovery disk or installation disc of corresponding OS to access Windows Recovery Environment. For example, if you want to restore Windows Server 2012 R2, the recovery disk must be made in Windows Server 2012 R2.
*If the target machine has no system, you need to use Windows installation disk because system repair disc, because recovery drive won’t work on non-system computers.
✬Make sure the target drive has enough disk space
If you want to restore Windows Server to a new machine, the new hard drive needs to be in the same size or larger than the source disk.
✬Make sure the boot mode is correct
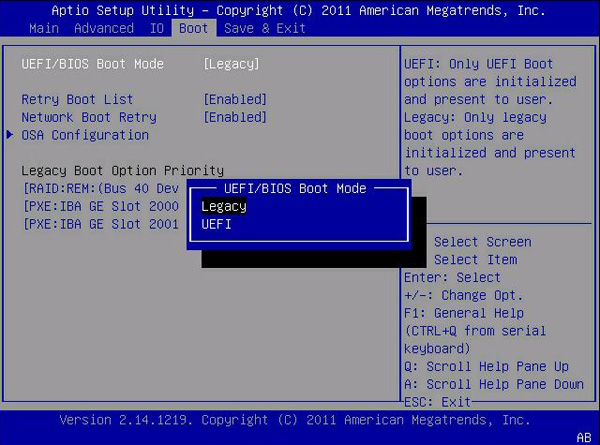
The target computer should have the same boot mode (Legacy/UEFI) as the source computer. Otherwise, you will likely receive errors during restoration.
You can boot into BIOS to ensure the boot mode is the same, or manually reconfigure it. If you change the boot mode, remember to convert disk into the corresponding partition style.
Steps to restore Windows Server 2012 R2 step-by-step:
1. Follow the wizard to create a full backup in Windows Server Backup.
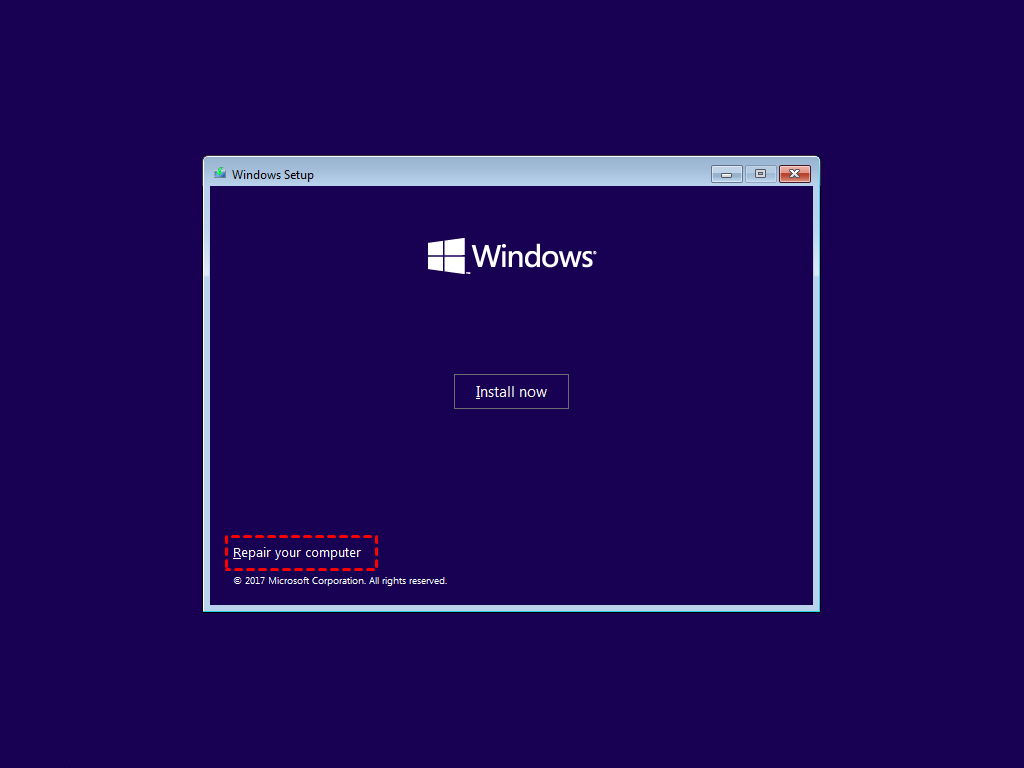
2. Boot your new server machine with a Windows Server 2012 R2 installation disk. Select Repair your computer at the lower-left corner.
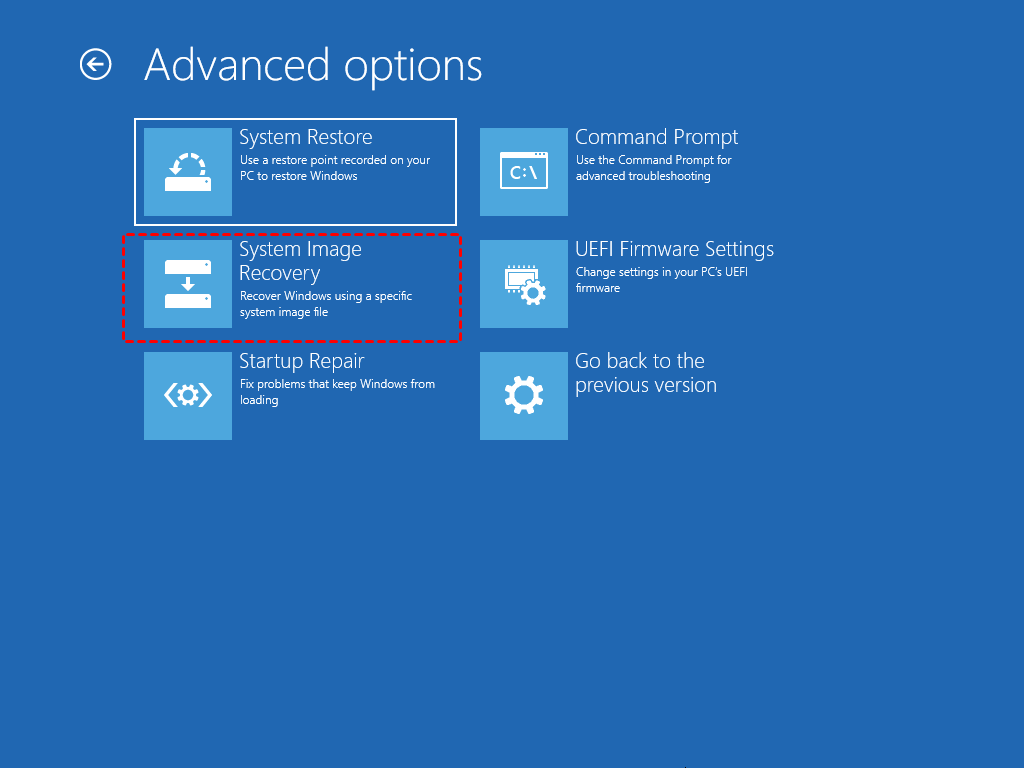
3. Select Troubleshoot > Advanced Options > System Image Recovery.
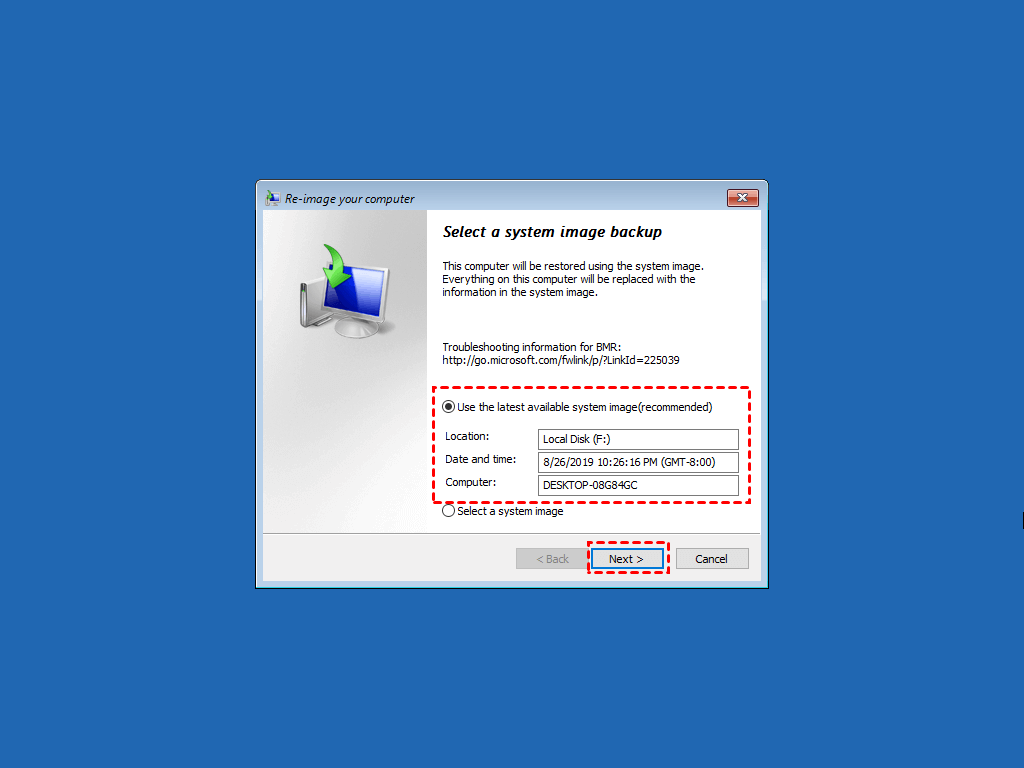
4. In the Re-image your computer screen, select the available system image to perform the restore.
After restoring, you could boot the new Windows Server 2012 R2 machine. And system, settings, and installed programs are the same as the old machine.
Way 2: Migrate Windows Server to Dissimilar Hardware Securely
If you want more flexibility and avoid errors such as system image restore fails because of UEFI/BIOS, you may consider using the professional Windows Server migration software - �iling Disk Master Server.Qiling Disk Master Server.
Qiling Disk Master Server is a powerful tool that allows you to create a complete system or disk image and restore it to a smaller disk using bare metal technology.
Qiling Disk Master Server is a powerful tool that allows you to create a complete system or disk image and restore it to a smaller disk using bare metal technology.
Qiling Disk Master Server is a powerful tool that allows you to create a recovery disk that can be used on any Windows computer for disaster recovery.
It supports all Windows Servers including Windows Server 2003, 2008, 2011, 2012, 2016, 2019, 2022 (including R2), Windows SBS 2003, 2008, 2011 and Windows 11, 10, 8.1, 8, 7, Vista, XP.
Download the 30-day free trial to give it a try:
Before migrating Windows Server 2012 R2, ensure that you have completed the following preparations:
✬Before migrating your system to a new machine using Qiling Disk Master, it is essential to create a system image or disk image of your current system. This will ensure that you have a complete and accurate copy of your system, including all data, applications, and settings.
✬To use Qiling Disk Master to migrate your system to a new Windows Server machine, you need to boot the target machine using Qiling Disk Master bootable media or a PXE boot tool. If you need to open multiple destination computers, we recommend using the PXE boot tool, as it allows you to boot multiple machines on the same network.
Steps to migrate Windows Server using Qiling Disk Master:
Before restoring, you need to insert the boot media created to your computer and enter BIOS to make your computer boot from the bootable disk firstly. Then, Qiling Disk Master will automatically be loaded on your new computer. Then the main page of the software will pop up.
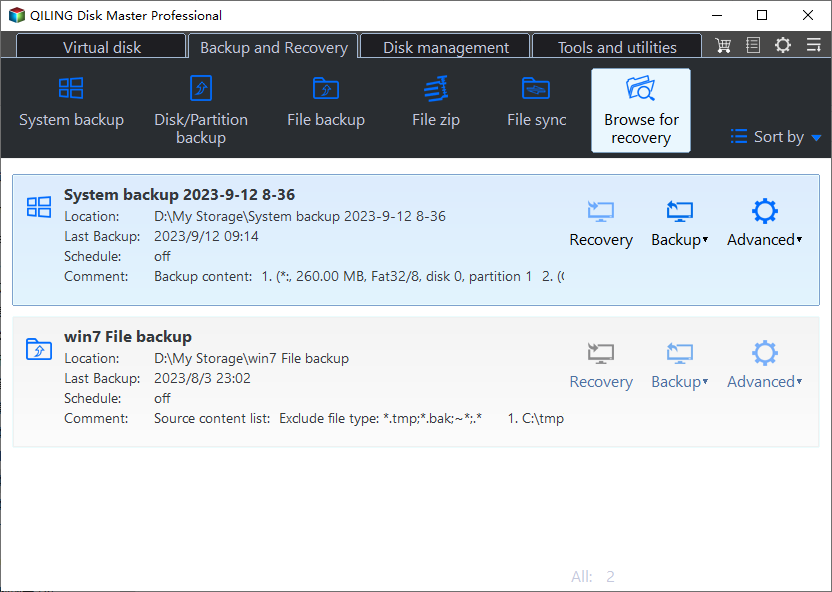
1. Click Restore and then click Select Image File to select the backup image you prepared before.
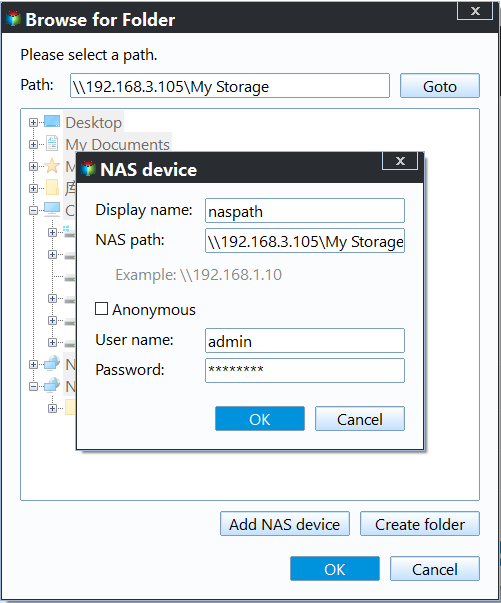
2. Click Share or NAS. Then, click Add Network Location.
3. Type display name, network path, user name, passwork and click OK to connect the path.
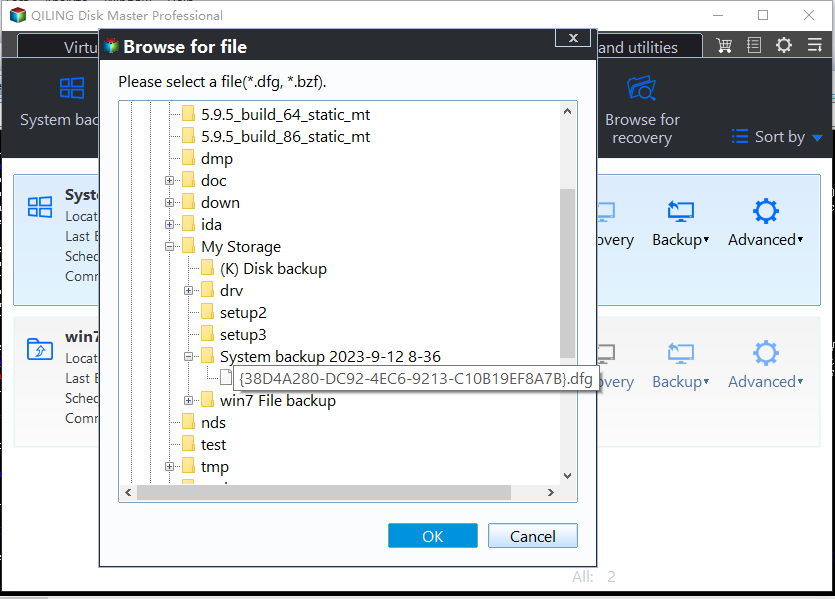
4. The select image in the network share or NAS path.
5. Select to restore entire backup or a part and click Next.
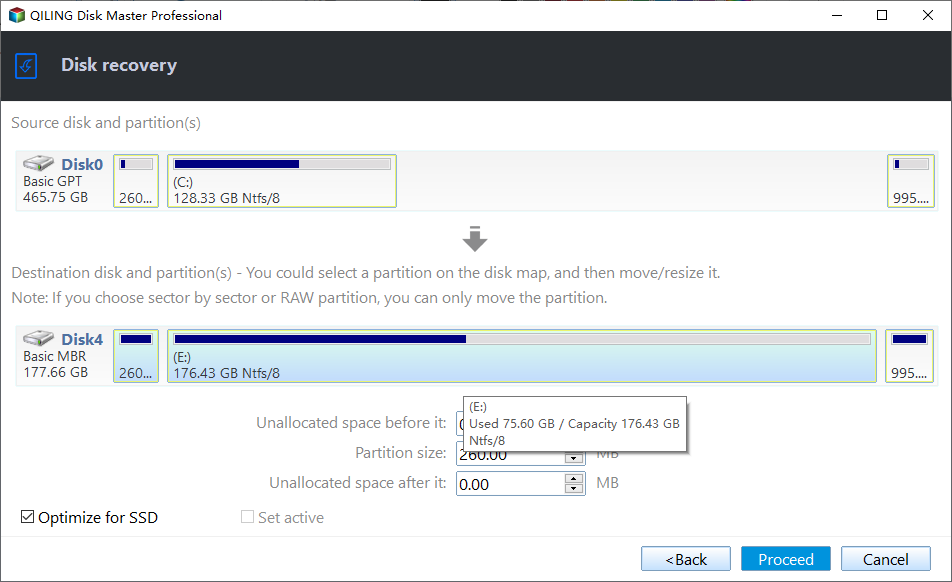
6. Select the destination disk on the new hardware to restore system image and then click Next.
7. Make sure the option Universal Restore is checked. Then click Proceed to start to migrate Windows Server 2012 R2 to new hardware.
After successfully migrating Windows Server 2012 R2 to new hardware using Qiling Disk Master, you may need to re-enter the registration code. To avoid any issues, please make sure to remember the registration code before completing the migration process.
Verdict
Migrating Windows Server 2012 R2 to new hardware has never been easier with Qiling Disk Master. This powerful software not only simplifies the migration process but also offers a range of additional features to help you transfer and protect your data.
Looking for a solution to protect unlimited PCs and servers within your company? Look no further than Qiling Disk Master Technician Plus.
Related Articles
- Migrate Windows Server 2016 to New Hardware Effortlessly (2 Ways)
- How to Migrate to a New Server with Different Hardware Easily?
- How to Use Windows Server Migration Tools | Tutorial and Easier Alternative
- Copy vs Xcopy vs Robocopy: Which is Better for File Backup
You can figure out the difference between Copy, Xcopy, and Robocopy from this article, and learn about their features and how to use them.

