Easily Migrate Windows Server 2016 to New Hardware or System
Quick Navigation:
- Can You Migrate Windows Server2016 to New hardware?
- Migrate Windows Server 2016 to New Hardware via Windows Server Backup
- Another Way to Migrate Windows Server 2016 to New Hardware
- Migrate Windows Server 2016 to 2019 and Be Sure It Is Bootable
- Final Words
Can You Migrate Windows Server2016 to New hardware?
In fact, there are different situations you may want to migrate Windows Server 2016 to new hardware or migrate old server to a new server. Below are some common ones:
- When your Windows Server machine has aged badly and is in dire need of an upgrade.
- Your computer runs into some severe problems caused by hardware failures, system crashes, natural disasters, or human error.
- You don't want to reinstall the Windows Server system from scratch.
Of course, you can. Microsoft offers you Windows Server Backup utility including the bare metal recovery capability, which allows you to restore Windows Server backup images to dissimilar hardware efficiently and bootable. Also, you can use a third-party migration tool like Qiling Disk Master Server to help you.
Both of them handle incompatible drivers between different computers well. Besides, you may need to pay more attention to the license issue. If it does not work, you may encounter a lot of follow-up problems. It depends on the license type and you can check it beforehand.
Migrate Windows Server 2016 to New Hardware via Windows Server Backup
You are able to move server 2016 to a new server with different hardware if your license is transferable. Here is the first method to help you, you can create a bare metal backup with Windows Server Backup, and then restore backup image to new hardware machine step by step.
Preparations for Server 2016 Migration
1. Check if your license is transferable.
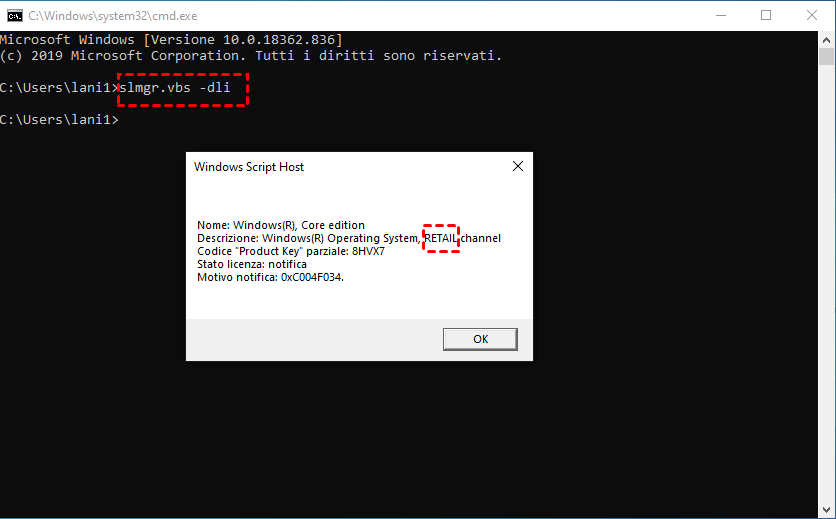
To check your license type, you can open Command Prompt or PowerShell, type "slmgr.vbs –dli" and press Enter. Then there will be a pop-up window showing your license type.
- If it's a Retail license, there should be no problem with migration, whether to the same or dissimilar hardware. Click here to learn more about moving Windows license to new computer.
- If it's an OEM license, however, it is tied to the motherboard and cannot be migrated to dissimilar hardware.
2. Install the built-in backup software - Windows Server Backup.
Please note that WSB is not pre-installed in Windows Server 2016 as well as later system, so you need to install it first from Server Manager if Windows Server Backup not showing up. After the installation, navigate to Start > Administrator Tools > Window Server Backup and then select Backup Once and follow the wizard to create a full backup or bare metal backup.
When choosing what to include in the backup, you need to check the item Bare metal recovery as shown below.

Perform Windows Server 2016 Migration to New Hardware Step by Step
Step 1. After the backup completes, boot your new server machine with a Windows Server 2016 installation disk. Instead of Install now, select Repair your computer at the lower-left corner.

Step 2. Select Troubleshoot > Advanced Options > System Image Recovery.

Step 3. In the Re-image your computer screen, select the available system image to perform the dissimilar hardware restore in server 2016.

Normally, the restoring process will take a few hours. After that, you can boot the new Windows Server 2016 machine with the system, settings, and installed programs the same as the old machine.
Error: Windows Server 2016 Bare Metal Recovery Failed to Complete
However, there are some known cases listed below have shown that the Windows Server 2016 migration will fail using this method:
- System restore fails because of EFI/BIOS. Windows Server cannot restore a system image to a computer that has different firmware. The system image was created on a computer using BIOS and this computer using UEFI, or vice versa.
- Windows Server will fail to boot if you restore to the hard drive with a different partition style.
Therefore, it's necessary to be sure the old server and new server use the same firmware (BIOS/UEFI)and both disks have the same partition style(MBR/GPT). And usually, the MBR disk supports BIOS mode while the GPT disk uses UEFI mode.

Most of the recent server machines, if not all, support UEFI and are compatible with BIOS Legacy boot mode. So you can boot into BIOS to change it to the corresponding boot mode if the firmware is different.
At the same time, you can choose to convert MBR to GPT or vice versa if the hard drive on the new hardware machine is blank or a new one. Otherwise, you will lose data on the new hardware.
Another Way to Migrate Windows Server 2016 to New Hardware
Here is the second way to migrate Windows Server 2016 to new hardware. With reliable backup and recovery software - Qiling Disk Master Server and its Universal Restore feature, you can restore system image to different hardware successfully regardless of firmware and partition style.
It will check the Universal Restore feature automatically if your computer has new hardware and install proper drivers for essential server hardware abstraction Layer (HAL) and mass storage devices. Besides, you are beneficial from its easy-to-use user interface.
In the advanced edition, such as Qiling Disk Master Technician or TechPlus, you are able to restore system image to multiple computers over the network, whether it's with the same hardware or different hardware. And you are capable of creating a portable version of this software and running this operation on any computer without installing again.
Why don't you download its free trial and have a try?
This software works with all Windows PCs (11, 10, 8, 7, etc.) and Servers (2022, 2019, 2016, 2012, 2008, etc.). The following uses Windows Server 2016 as an example.
Preparations before Windows Server 2016 Migration
Similar to Windows Server Backup, you need to be sure your license is transferable and create a full system or disk backup for dissimilar hardware restore. If your new server is a bare metal machine, you still need to create a bootable meta (USB, CD/DVD or ISO) to boot from it.
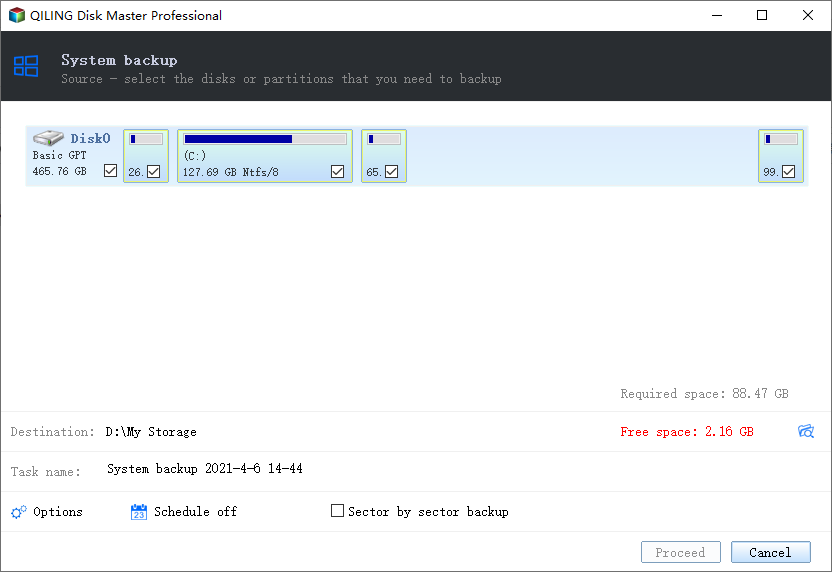
>> For backup, system backup or disk backup is workable.
Just open this software after installing, select the corresponding backup feature under the Backup tab and follow the wizard to complete the backup task. It is suggested to save the backup image to external drive, cloud drive, network path, or NAS.
>> For bootable media, it helps you boot the new server and restore system image to it.
Just switch to Tools > Create Bootable Media, select Windows PE disc type and storage device - USB, CD/DVD or ISO file, and click Next.

To boot from multiple Windows Servers, try Qiling PXE Boot Tool or Qiling Image Deploy.
Step-by-Step Guide: Restore Windows Server 2016 to New Hardware
After making preparations, you can then restore Windows Server 2016 to new hardware. The following guide will take restore image from the network path to a single new hardware machine for example.
Step 1. Boot your Windows Server 2016 from bootable media.
- Insert the created bootable media in Qiling Backuper.
- Restart your computer, press a specific key to access BIOS when prompted, it's usually F2, ESC, F11, etc, and set the bootable media as the first boot option, save changes and boot from it.

Step 2. When the Qiling Disk Master interface is loaded, click Restore and then Select Image File.

Step 3. Click Share or NAS to add the network path of your backup.

Step 4. Click Add Share or NAS Devices, type display name, network path, username, password in the pop-up window, click OK to connect the network path and select image on it.

Step 5. Select to restore entire backup and click Next.

Step 6. Select the destination disk on the new hardware to restore system image in Windows Server 2016 and then click Next.

Step 7. Make sure the Universal Restore feature is checked. If not, please check it manually. Check SSD Alignment to improve SSD disk performance if you are migrating Windows Server 2016 to SSD. Then click Proceed to start migrating Windows Server 2016 to new hardware.

Finally, restart your Server 2016 to experience the familiar operating system on the new Server. If you want to restore Windows Server 2016 backup image to multiple new Servers, you could complete it with the Qiling Image Deploy feature.
✌ Notes:
★ This software is also applicable to migrate Windows Server 2012(R2) to new hardware and other server systems, such as, Server 2003, 2008 (R2), 2011, 2016 and 2019.
★ The Universal Restore feature only installs drivers for system startup if it's on a dissimilar hardware machine. For other drivers, such as video/sound card drivers, display drivers, NIC drivers, etc, you need to install them manually following the restoration.
★ If your new hardware uses different firmware, please change the boot mode to BIOS or UEFI. The MBR disk supports BIOS mode while the GPT disk uses UEFI mode.
Migrate Windows Server 2016 to 2019 and Be Sure It Is Bootable
Besides, some users still want to migrate from Windows Server 2016 to 2019 or the latest Windows Server 2022, and the easiest way is to restore system image from Windows Server 2016 to Windows Server 2019 or 2022 if you have a computer running on these systems.
Except for the backup image and installation disc, it needs to be the corresponding operating system, all the steps are exactly the same as migrating Windows Server 2016 to new hardware. If not, you can then choose to perform a Windows Server in-place upgrade or clean install.
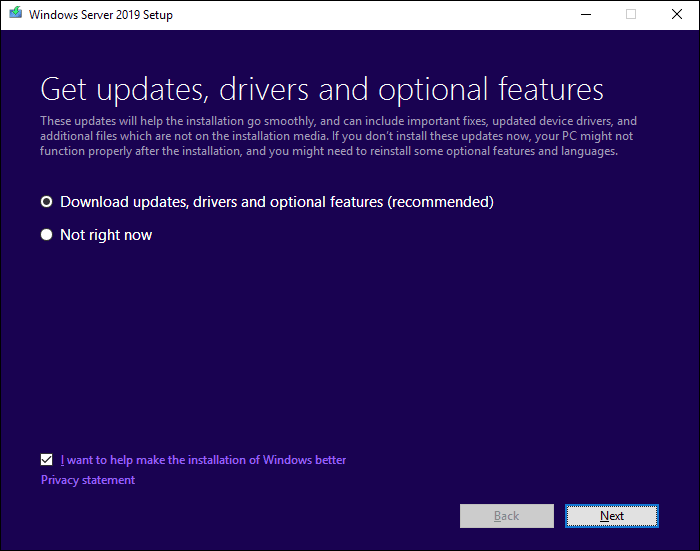
To perform a Windows Server in-place upgrade:
Download the Windows Server 2019 or 2022 ISO from Microsoft and launch the Setup.exe file to start the upgrade process. Select Download updates, drivers and optional features (recommended) > the operating system > keep personal files and applications or nothing, finally, click Install to start the in-place upgrade process.
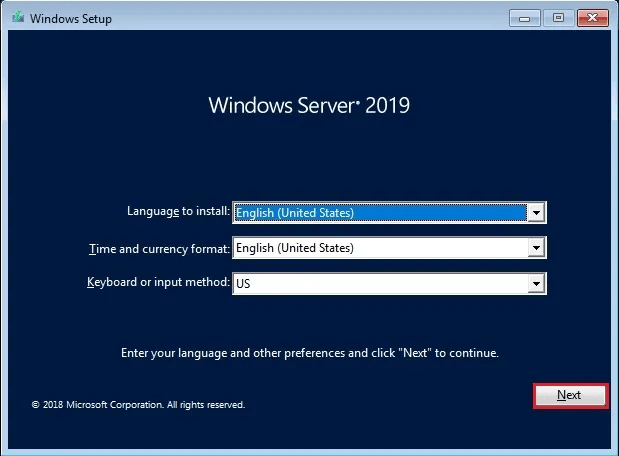
To clean install Windows Server 2019 or 2022:
Restart your computer and boot from the installation disc, then select language, and other preferences, and click Next. In the next window, click Install Now and then select the operating system you want to install, installation type - Custom, and destination path to save the OS. Finally, click Next.
If you migrate a Windows Server Essentials with domain controller to new hardware, you still need to prepare the forest and the domain.
Open Command Prompt with Administrator priority and navigate to the adprep folder within installation folder (eg:C:\ISO\support\adprep). Then, run the following commands and hit Enter in order.
- adprep.exe /forestprep
- adprep.exe /domainprep
Final Words
With the above methods, you can migrate Windows Server 2016 to new hardware or system and boot from it with everything on the old server. And it is also suggested to keep Qiling Disk Master on the new Server for it provides the best backup solution for the installed system, applications, personal data, etc.
For administrators of the company, the Qiling Disk Master Technician Plus edition is the most suitable one since it can be to be installed on unlimited Servers and PCs and offers complete billable technical services to clients. In addition, it allows you to copy the installation directory for portable version creation and restore backup image to multiple computers easily.
Related Articles
- Windows Server Backup Bare Metal Recovery to Different Hardware
- How to Create Windows Server 2016 Recovery Disk with Different Tool
- Clone Windows Server 2011 to New Hard Drive with Two Methods
- How to Migrate to a New Server with Different Hardware Easily?