Synchronize Files between Windows Servers Easily (Video)
- What is the best way to sync files between servers?
- Why do you synchronize files between Windows Servers?
- Sync files between two Windows Servers via Qiling Disk Master (Recommended)
- Perform Windows Server file sync using DFS Replication
- Part 1: Install DFS replication for sync
- Part 2: Configure DFS Replication and perform the first file replication
- How does DFS replication work?
- FAQs
- Conclusion
What is the best way to sync files between servers?
I have multiple server-based computers, but they are in different places. I need to use files on other computers frequently. Is it possible to synchronize files between Windows Servers for share? Any suggestion and comment are welcome.
- Question from Microsoft.com
Syncing files between Windows Servers is a common practice, especially for companies and organizations that require seamless file sharing and collaboration. In this response, we'll delve into the various methods for syncing files between Windows Servers, including built-in role services and third-party file sync software.
Why do you synchronize files between Windows Servers?
Before you start to sync folders between Windows Server 2012(R2)/2016/2019/2022 or all the previous versions, let's get the three main reasons.
- Easy access to team files. When it comes to working with a team, having access to shared files and folders is essential for collaboration and productivity. By syncing folders between Windows Servers, team members can access the latest versions of their files, reducing the time spent searching for and updating files. This leads to improved productivity and efficiency.
- Track the latest changes. In team environments, data is constantly being created, modified, and deleted. This can lead to a situation where important files are lost due to lack of backup. To prevent this, it's essential to implement a robust backup system that ensures all data is safely stored and can be recovered in case of any issues.
- Other reasons. Data loss prevention(i,e, customer's info), file transfer, and centralized file management can still be a reason why you need to synchronize files between two Windows Servers or more.
Syncing folders on Windows Server is a crucial task that ensures data consistency, redundancy, and accessibility across all servers. In this guide, we'll explore two solutions to sync files on Windows Server: a third-party software with advanced features and a free solution.
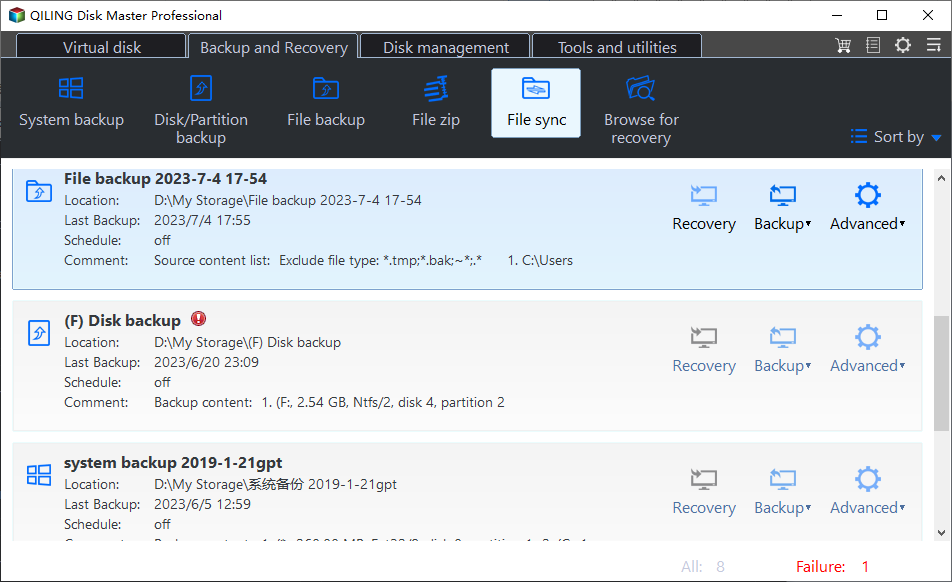
Sync files between two Windows Servers via Qiling Disk Master (Recommended)
Qiling Disk Master Server is a trusted and reliable file sync software designed for Windows Server operating systems, including Server 2008, 2012, 2016, 2019, 2022, and their respective R2 versions, as well as Windows 7, 8, 8.1, 10, 11, XP, and Vista. This software provides a robust and efficient solution for synchronizing files across multiple servers and devices.
Qiling Disk Master Server makes file syncing a breeze, allowing you to effortlessly synchronize files or folders between various storage devices and platforms. Its user-friendly interface enables seamless operations, making it easy to set up and manage syncing operations.
Qiling Disk Master Server is a powerful file sync software that offers a range of features to make the syncing process seamless and efficient. With its user-friendly interface, you can easily sync files or folders between various storage devices and platforms.
- Sync files by preference: You can sync files and their change from source to destination regularly, or keep your preferences, such as syncing files in real-time, deleting any unknown files or undoing changes made in the destination folder, or syncing changes in source or destination to the other side automatically.
- Schedule Sync: You can sync files daily, weekly, and monthly, and then you don't need to worry about forgetting to sync someday. And more precisely, you can set the backup date, backup time, and backup intervals.
- Sync off-peak hour: You can wake up your computer from sleep or hibernate mode with the Wake the computer to run scheduled tasks feature. This is especially useful when you don't want to sync files during working hours.
- Preconfigure the operation after sync tasks: You can shut down, restart your computer, or put it into sleep or hibernate mode. It depends on your next move.
Qiling Disk Master Server is a powerful file sync software that offers a range of features to make the syncing process seamless and efficient. With its user-friendly interface, you can easily sync files or folders between various storage devices and platforms.
Syncing files between two Windows Servers can be a complex task, but with the right tools and guidance, it can be done efficiently and effectively. Qiling Disk Master is a powerful file sync software that can help you sync files between two Windows Servers in a few simple steps.
- It applies to all Windows Server and PC systems. You can use it to sync folders between Windows Server 2012 or synchronize files between Windows Servers in Windows 10.
- Please don't modify the source folder name, otherwise, the sync task will fail.
Example: Sync folders between Windows Server 2012 over network
Step 1. Create a shared folder.
Syncing folders between Windows Servers can be a complex task, but with the right tools and guidance, it can be done efficiently and effectively. In this guide, we will walk you through the steps to sync folders between Windows Server 2012.
Step 2. Run Qiling Disk Master. Then, select Basic Sync under the Sync tab.
- Real-Time Sync: Real-time file syncing is a crucial aspect of disaster recovery, ensuring that your data is always up-to-date and can be recovered quickly in case of a disaster. This process involves monitoring and syncing files and their changes in real-time, reducing data loss and minimizing downtime.
- Mirror Sync:Automated file syncing is a crucial aspect of data management, ensuring that your files are accurately synced between two locations without any manual intervention. This process helps you to avoid arbitrarily adding, modifying, or deleting files in the destination folder, reducing the risk of data inconsistencies and errors.
- Two Way Sync: Automated file syncing is a powerful tool for maintaining data consistency across multiple locations. It monitors changes in both the source directory and the destination, and syncs to the other side if any change is made in either one of them.
Step 3. Click Folder to select the files you want to sync.
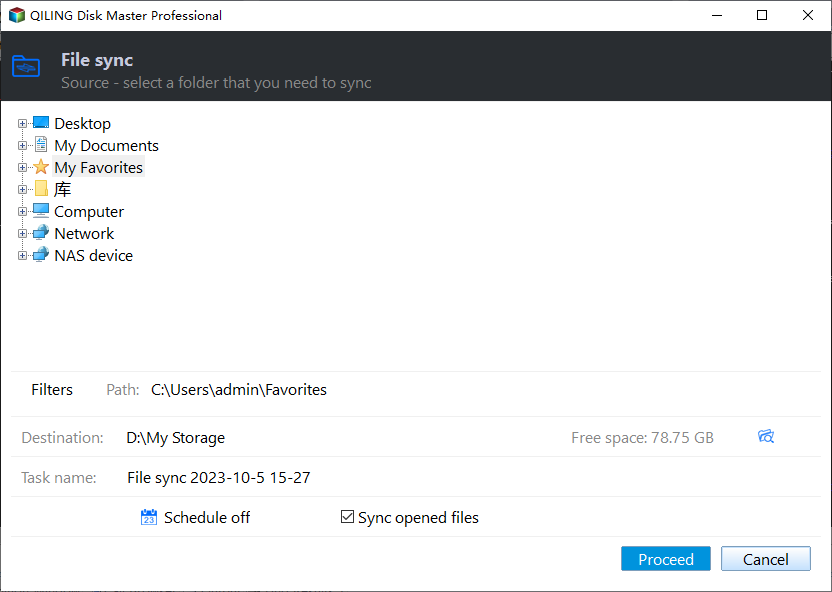
Step 3. Expand the drop-down menu of the second bar > select Add Share or NAS Devices. Then, type the network path and select the shared folder you made before in the network location.

Step 4. Now, the sync task is almost done. To keep all the changes made later automatically, click Schedule Sync > Enable Schedule Sync and select Daily. Then, you can further set backup date, backup time, or intervals.

- Weekly and Monthly Sync: Compared with daily sync, weekly sync, and monthly sync are less frequent. They ensure data security while using less disk space.
- Event Triggers: You can sync files at a specific event, including system shutdown, user logoff, system startup, and user logon.
- USB plug in: To take advantage of the convenience of a USB drive, you can sync files to it automatically. This feature allows you to easily transfer files to a USB drive without having to manually select them each time.
- Wake up computers and reconfigure operation after sync: Syncing files during off-peak hours can be a great way to save time and resources. Both the **Automatic Sync to USB Drive** and **Scheduling the Sync Task at a Specific Event** features can help you achieve this goal.
- Sync the deletions in source directory to destination: Syncing deleted files can be a crucial feature for maintaining data consistency and integrity. In the Basic Sync feature, deleted files are not synced automatically by default.
Step 5. Confirm the operations and click Proceed to automatically sync folders between Windows Server 2012. Then, you can access data in the shared folder by its network path.
Perform Windows Server file sync using DFS Replication
DFS Replication is a crucial role service in the File and Storage Services role, designed to synchronize files between multiple servers. This technology has been a part of Windows Server since its introduction in Windows Server 2003 R2 and has been retained in subsequent versions, including Windows Server 2008, 2008 R2, 2012, 2016, and 2019.
Part 1: Install DFS replication for sync
DFS Replication is a role service in the File and Storage Services role, designed to synchronize files between multiple servers. To use DFS Replication, you need to install it on your Windows Server.
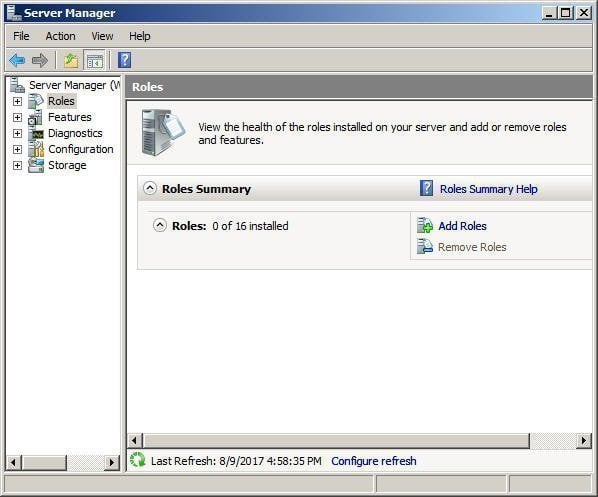
Step 1. Open Server Manager and click Role on the left panel > tag on Add Roles on the right panel.
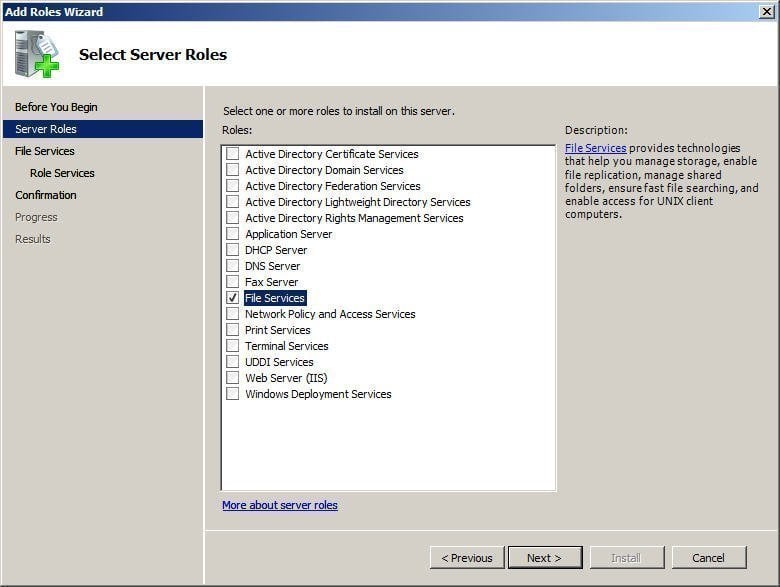
Step 2. Click Next on the Before You Begin page. Then, tick File Services role in the Service Roles page and click Next.
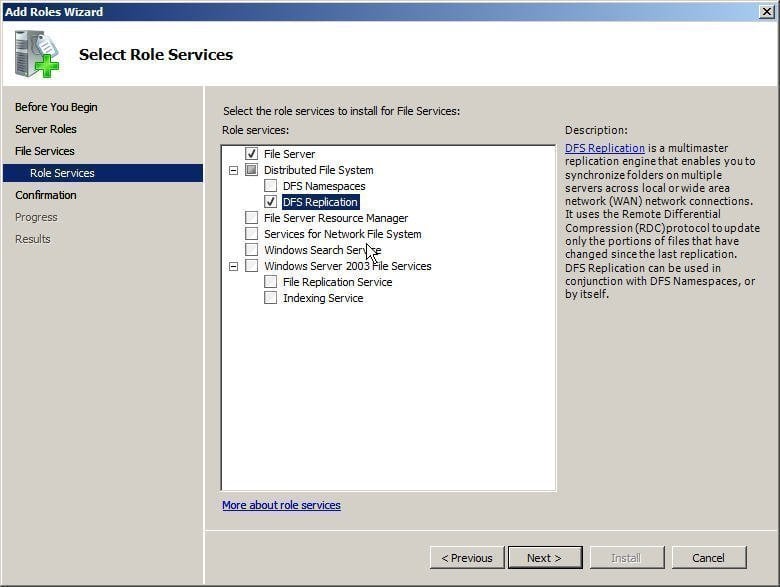
Step 3. Select DFS Replication role service and click Next.
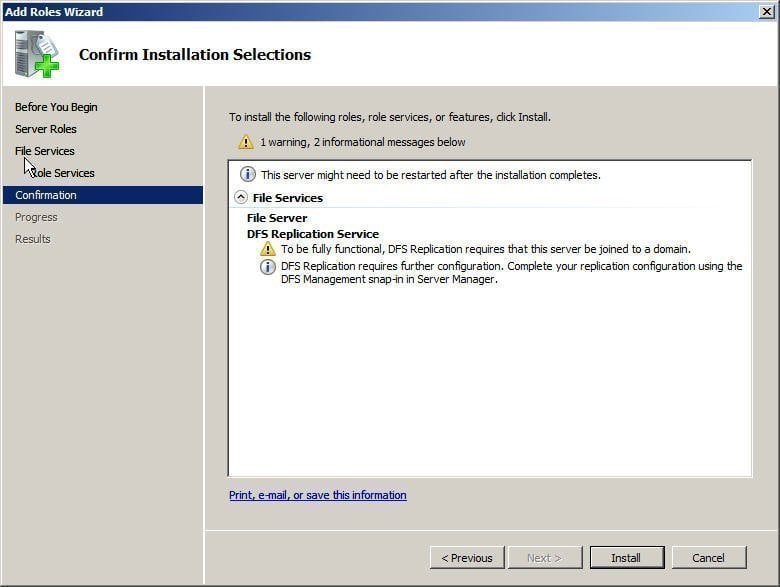
Step 4. Confirm this installation and click Install to ensure you want to install the selected roles, role services, or features.
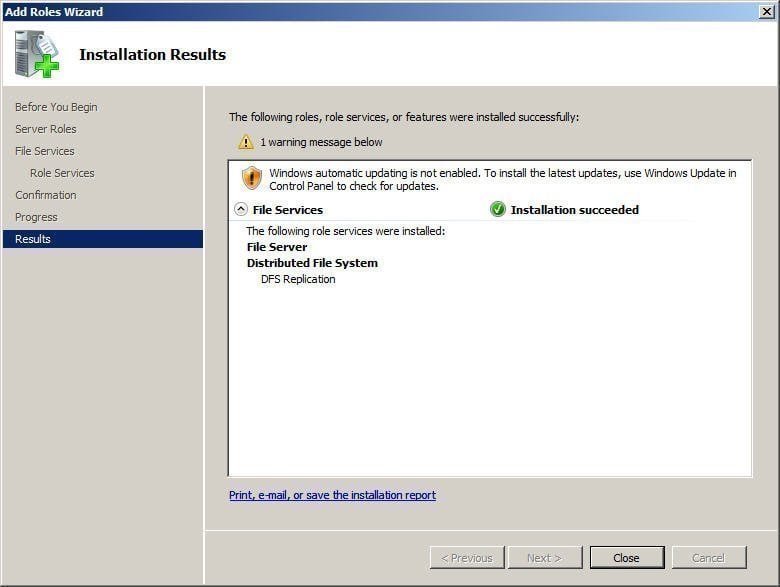
Step 5. Wait for a while, the installation process will be completed with the words "Installation succeeded" displayed, and then click Close to close this page.
Part 2: Configure DFS Replication and perform the first file replication
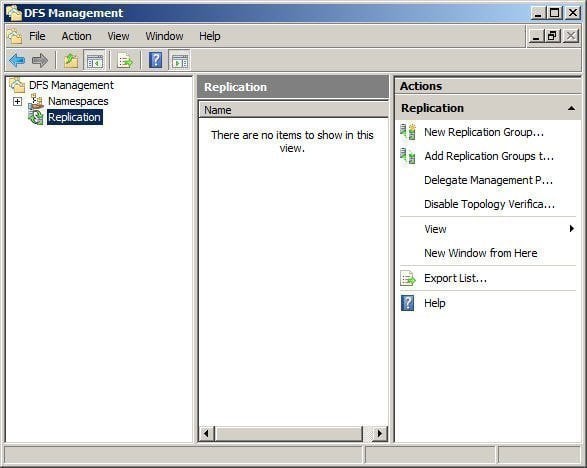
Step 1. Start new replication. Click Start -> Administrative Tools -> DFS Management subsequently, then Right click Replication and choose New Replication Group in the DFS Management console.
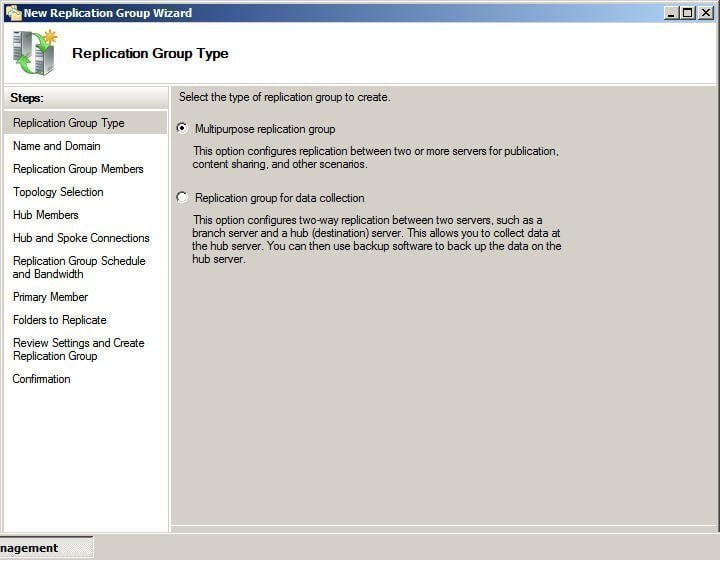
Step 2. Choose Replication Group Type.
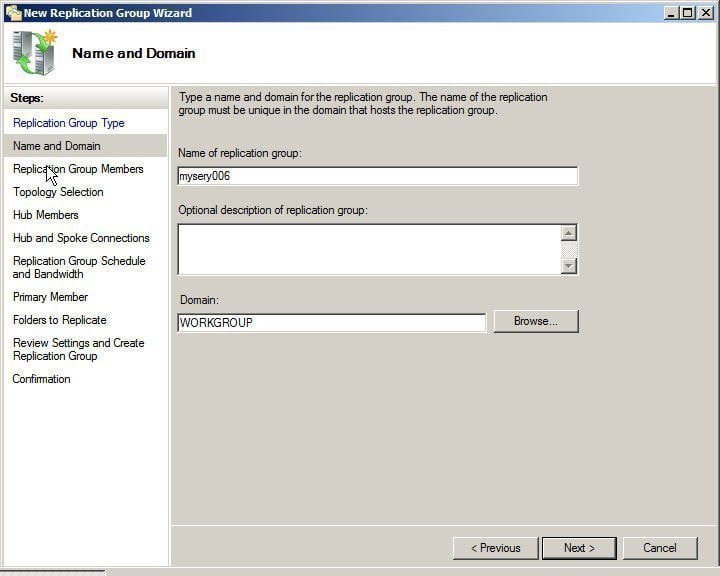
Step 3. Set name and domain for replication group.
Step 4. Add server computer you want to share files with.
Click Add and look up the servers in Active Directory, then select the servers you want to share files or folders and click Next.
Step 5. Select Full Mesh Topology.
DFS Replication is a powerful feature in DFS Management that allows you to synchronize files across multiple servers, ensuring that all servers have the same files and folders. This feature ensures that the shared files or folders stay synced among all of the servers, regardless of where the files are updated.
- You need at least three servers to execute this operation.
- In DFS Replication, you have the option to use a hub-and-spoke topology, where one server (the hub) serves as a central point for replication, and other servers (the spokes) replicate from the hub. However, in most cases, you can use a simple replication group without a hub-and-spoke topology.
Step 6. Choose full bandwidth to keep the files in sync all the time.
Step 7. Set a primary member.
In DFS Replication, you can designate a primary member for each replication group. The primary member plays a crucial role during the first synchronization, and its benefits extend beyond the initial sync.
Step 8. Select files or folders you want to sync.
Click Add and you will enter a new window, then select the folders you want to replicate and click Next. You can use the default existing permissions because it works in most cases. However, you still can set custom permissions.
Step 9. Choose a local folder to store files or folders.
Now, you will see all the selected servers and you will be noted that the local path is not set and it's disabled. Then click Edit and select enabled as well as choose the local folder on the remote server.
Step 10. Once you've selected the servers and configured the replication group, it's time to start the initial replication. This process can take some time, depending on the size of the data and the network connection.
How does DFS replication work?
Although DFS replication is really complicated and has many limitations, many users still want to use it. It is completely free and more suitable for small and medium-sized company users who don't have much budget. If you are an administrator or the people who manage resources for the company, you can try it! Here is how it works.
It uses a compression algorithm known as remote differential compression (RDC) to detect changes to the data in a file, then enables DFS Replication to replicate only the changed file blocks rather than the entire file. And it can resolve the administrative issue that XCopy and Robocopy cannot.
FAQs
1. how to synchronize files between two computers in Windows 10
2. How do I share a folder between two Windows servers?
Sharing a folder between two Windows servers can be a bit complex, but it's a necessary step for many businesses. Here's a step-by-step guide to help you set up shared folders and grant permissions:
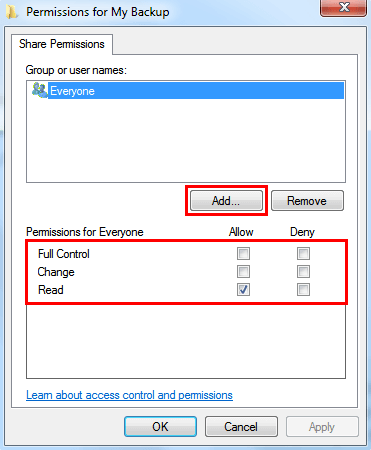
- Right-click the folder you want to share and select Properties.
- Go to the Sharing tab, and click on Advanced Sharing.
- In the new window, check Share this folder and click on Permissions.
- Click Add to add users using the other server and grant permission to it. It can be full, read, or write permission.
- Finally, click Apply and OK to confirm it.
3. How do I transfer files from old server to new server?
Conclusion
When it comes to synchronizing files between Windows Servers, you have two options: Qiling Disk Master Server and DFS replication. While both tools can get the job done, Qiling Disk Master Server is the recommended choice due to its rich features and ease of use.
To further ensure the security and integrity of your data, you can leverage the backup features available in Qiling Disk Master Server. This tool allows you to backup files between Windows Servers, providing an additional layer of protection against data loss.
Related Articles
- Top Two Ways to Set up One-way File Sync in Windows 7/8/10
- 3 Ways to Make Windows Sync Folders between Computers
- Sync Folders between Drives in Windows 10/8/7 (with Video)
- Copy Only Newer Files: XCopy or Robocopy vs Easier Ways
- Easiest Way to Sync Data between 2 Servers Automatically