[Solved] Windows Server Backup 2012 Not Showing
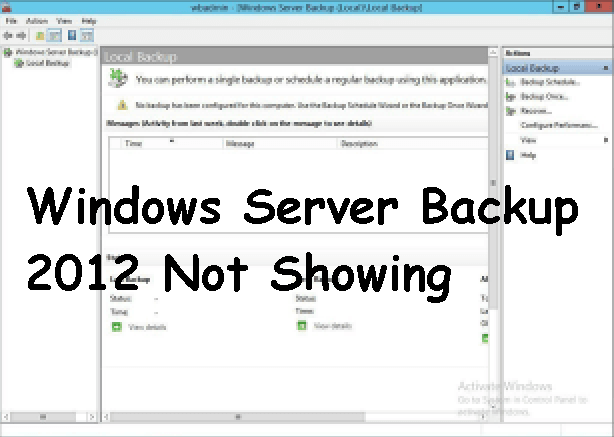
Windows Server Backup in 2012 not showing in tools
"New Windows 2012 server installed and I tuned on the Windows Server Backup feature but when I look in Tools in Server Manager or even Administrative Tools, I don't see anything. Rebooted and still nothing. What could this be?"
In fact, Windows Server Backup 2012 not showing, is a problem annoying many users, and along with it, the wbadmin.msc is also missing. This also occurs in 2008, 2012 R2, 2016, 2019, 2022. If you are experiencing this error, you may be curious to know why this problem is occurring and how to fix it, please continue to read below.
Why Windows Server Backup 2012 missing?
There are two common reasons why Windows Server Backup 2012 missing, you can check them in the following.
1. Windows Server Backup is not installed. If you have ever used a server computer, you may know that Windows Server Backup is not installed by default. In this case, you need to manually install it from Server Manager.
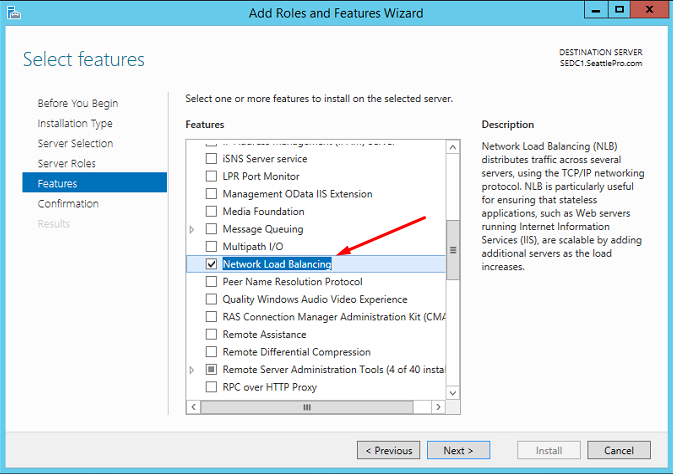
2. Windows Server Backup service is missing. If the problem is Windows Server Backup installed but not showing, then most likely you don't have the Windows Server Backup service - Network Load Balancing (NLB) installed during the Windows Server Backup installation process.
Then, after getting the reasons, you can continue to fix this error in the next part.
How to fix Windows Server Backup 2012 not showing
According to reasons above, to fix Windows Server backup 2012 not showing error, you have two ways in the following:
- if you have not installed Windows Server Backup, please install Windows Server Backup manually throgh Server Manager.
- if your situation is Windows Server Backup installed but not showing, you need to unistall Windows Server Backup and then install Windows Server Backup service - Network Load Balancing (NLB) first.
To perform Windows Server Backup and Network Load Balancing (NLB) installation, you can use Server Manager or powershell.
Way 1: Install Windows Server Backup manually through Server Manager
Step 1. Open Server Manager by clicking on it in the taskbar. Then, go to Manage > Add roles and functionalities in the right Menu.
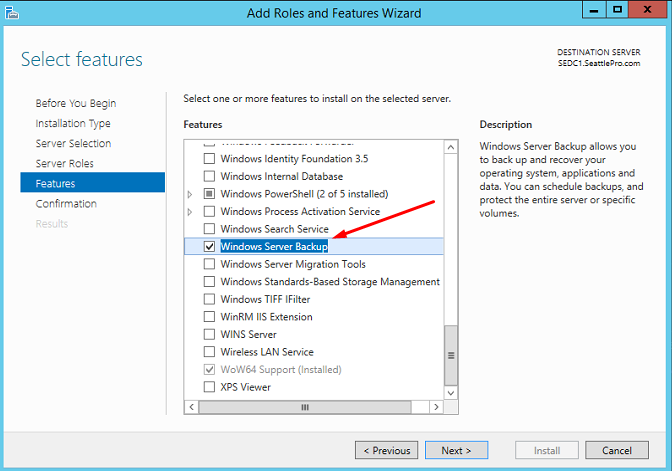
Step 2. In the Add Roles and Features Wizard, you will be asked to select installation type, server, roles, features. Please select them and then in the “Features” tab, check “Windows Server Backup” and click “Next".
Step 3. Click on “Yes” and “Install” to start installing Windows Server Backup.
Then you can close this window to do other things when Windows Server Backup is being installed in the background. You can check if the installation is complete by clicking on Notifications Center icon.
Way 2. Install Windows Server Backup service via Server Manager
Before install the Windows Server Backup service - Network Load Balancing (NLB), you need to remove Windows Server Backup first. Then, install both features in the Server Manager. You can follow the steps below.
Step 1. In the Server Manager, select Manage and Remove Roles and Features.
Step 2. Then, it will open Remove Roles and Features Wizard. Click Next until you see the Features tab, uncheck Windows Server Backup and click Remove.
Step 3. Wait for the installation process to complete.
Step 4. After you successfully remove Windows Server Backup, open the Add Roles and Features Wizard again and check both Windows Server Backup and Network Load Balancing in the Features tab.
Step 5. Click Next and Install to start the installation process.
Way 3: Install Windows Server Backup and Service using Powershell
Step 1. Search powershell in the Start menu and select Run as administrator.
Step 2. In the Windows Powershell window, type the following commands and hit Enter to run.
- Uninstall - WindowsFeature Windows-Server-Backup - Remove
- Install - WindowsFeature NLB
- Install - Windows Feature Windows-Server-Backup
Step 3. Exit the powershell and run Windows Server Backup.
Windows Server Backup limitations
After fixing Windows Server Backup 2012 missing issue, you can choose to create a system state backup, bare metal backup, full backup, selected storage volumes, or specific files and folders. But there are limitations in the following:
- Windows Server Backup only backs up volumes formatted with NTFS.
- Windows Server Backup only files or folders in volumes.
- Windows Server Backup does not shrink volumes to less than 1/8.
- You are only allowed to perform full backup or bare metal backup recovery in the recovery environment. It requires an installation disc or Windows Server 2012 recovery disk.
- The operating steps is quite complicated.
Thus, if you are in these situations, it's suggested to you need to the best Windows Server 2012 backup software - Qiling Disk Master Server. It makes the backup and restore process much easier.
Easier Way to create a system image backup in Windows Server 2012
Qiling Disk Master Server is a greate backup and restore software for Windows Server and you can use it on Windows Server 2012, 2016, 2019, 2022, including the R2 versions, and Windows 11, 10, 8, 7, XP, Vista. Following are its main features:
★ Backup types: It offers users System Backup, Disk Backup, Partition Backup, File Backup, and Cloud Backup. Thus, you can easily backup individual files, server system, entire server, or selected volumes in simple steps.
★ Backup schedule: It lets you set Windows Server Backup multiple schedules via Daily, Weekly, Monthly, Event triggers, and USB plug in.
★ Backup scheme: It provides you three backup methods (full, incremental, differential backups) and three cleanup methods (By quantity, By time, By daily/weekly/monthly). So you can choose to backup only changed files or make an exact copy and automatically delete old backups to free up space.
In addition, this software still allows you to create recovery disk in Windows Server 2012. Thus, if your server is in a serious problem, you can use it to boot your computer and then restore system image or disk image to new hard drive. And you can even restore system to new server with dissimilar hardware. You can download this software to have a try!
Step 1. Open this backup software, click “Backup” in the left pane and then select “System Backup” in the right panel.
Tip: To backup the entire server, select “Disk Backup” instead.
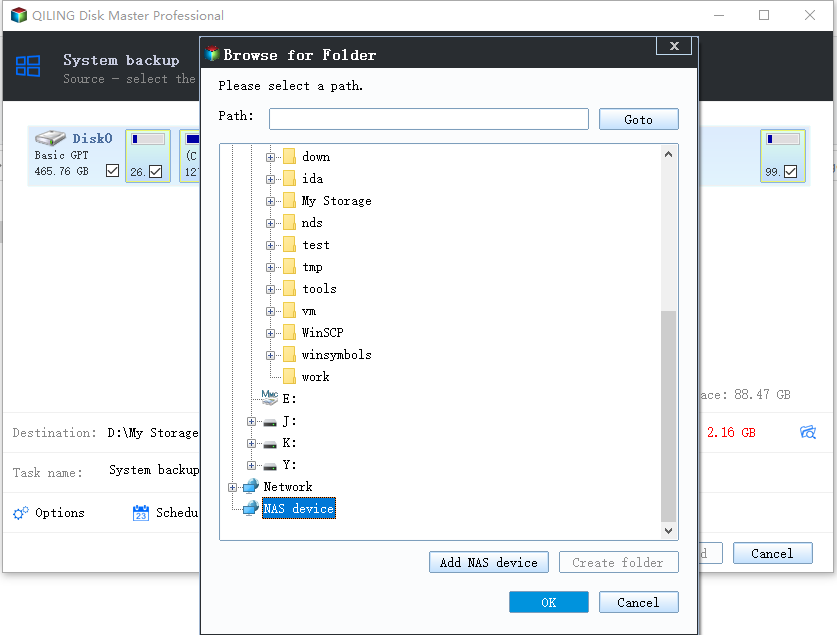
Step 2. In this screen, all needed partitions for system restore are selected automatically. You just need to specify a destination location to store your backup image. You can backup to external hard drive, network location, cloud drive and other locations.
Step 3. Confirm the backup operation and click “Proceed” to create a system image backup in Windows Server 2012.
★If you want to make the backup task automatic and smart, you can set some helpful backup settings.
Options: You can make a comment for task to distinguish it from others clearly, avoid any unwanted access by adding a password, enable email notification for backup task, etc.
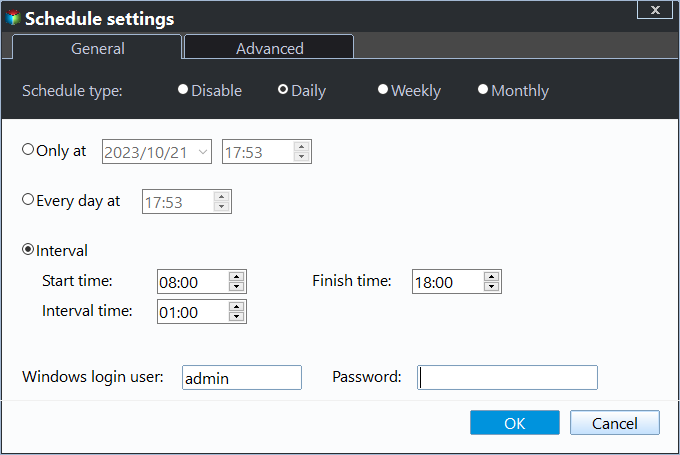
Schedule Backup: You can backup system at a prefer frequency, from daily to weekly, the fastest interval is every hour. For off-peak hour backups, you can still wake the computer to run scheduled task from sleep or hibernate mode.
Backup Scheme: The backup method is incremental backup by default. You can also change it to differential backup for time and space saving and set cleanup method. For example, if you use By quantity, you can choose to keep the latest 1 sets of backups, it means the first set of backups will be deleted when the 2nd set of backups is created.
★ More advanced way to backup Windows Server
If you want one key system backup & recovery solution for Windows Server 2022/2019/2016/2012, etc, you can resort to specialized onekey recovery software - Qiling OneKey Recovery. It enables you to create a custom recovery partition and system image backup, and you can launch the system restore process by pressing "F11" or "A" during computer startup (Legacy boot) or choosing "Qiling Disk Master" in boot menu (UEFI boot).
Conclusion
Windows Server Backup 2012 not showing occurs in 2 situations, either don't install it or lack of theNetwork Load Balancing (NLB) feature, you just need to install them with above methods. Then, you are able to backup Windows Server 2012 image and perform Windows Server Backup how to restore if necessary.
If you don't want to restore full backup or perform bare metal recovery from recovery environment, the best server backup software - Qiling Disk Master Server will be a better choice. And it offers you different tools to create bootable media if your system is unbootable. For IT technicians, try Qiling Disk Master Technician Plus.
Related Articles
- Create Backups with Windows Server Backup Command Line
You will learn how to use Windows Server Backup command line with Wbadmin or third-party tool. Besides, you can use the GUI version of backup software if you want a simpler way. - Windows Server Backup Differential Backup Instead of Incremental Backup
Understand how Windows Server Backup differential backup works (although Microsoft calls it incremental backup) and get the methods to take differential or incremental backup in Server 2008, 2012, 2016, etc. - The Solution to Windows Server Backup Disk Full
Why does Windows Server Backup disk full error occur and how to solve it? This article shows you how to free up backup disk space in Server 2008, 2012, 2016, etc. and offers a workaround to avoid the issue in the long term. - Windows Server Backup Retention Policy-Can It be Specified
You will learn the Windows Server backup retention policy precisely and how to delete old backups using Wbadmin and professional server backup software.
