Create Windows Server Backup Incremental to Network Share
Can I create Windows Server incremental backup to network share?
Is there any way to do incremental backup of Windows file servers to a network location? We keep running into the crippled Windows Server Backup which doesn't allow saving incremental backups to network locations. But we need the ability to go back in time on our file servers and retrieve files from dates in the past.
Windows Server has its built-in utility Windows Server Backup or WBadmin Proceed to create scheduled backup to a network share, but only full backups will be performed.
Since Server 2008, you are only allowed to keep one backup on remote shared folder. Even if you map the network shared folder as a network drive, it will still fail to create incremental scheduled backup.
Luckily, Windows Server Backup staill allows you to schedule an incremental backup task to local disk. This way you can still try some little "tricks" to make Windows Server backup incremental to a network share.
How to perform Windows Server Backup incremental to network share
To make Windows Server backup to network share with incremental mode, you can try to let the system regard the network shared folder as a local drive. That is, you can create a virtual hard drive (VHD) on the network location as the destination, and then use Windows Server Backup to create incremental backups as normal.
However, this method is time-consuming, and only let you schedule one incremental backup at a time. Actually, there is another way that can help you perform Windows Server Backup incremental to network share easily and supports multiple schedules. Just refer to Method 2 to get it.
- Way 1. Window Server Backup incremental network share (VHD files)
- Way 2. Easier way to make Windows Server Backup to network share incremental
Way 1. Window Server Backup incremental network share (VHD files)
Windows Server built-in tool Disk Management is able to create VHD/VHDX files, which can be displayed in File Explorer as a local drive. In that way, you can let Windows Server backup to network share. Then you can use the VHD to perform incremental backups to Windows Server 2008/2012/2016, which is quicker and less disk consuming than full backups.
1. Type "diskmgmt.msc" in the search box or Run box and press Enter to launch Disk Management.
2. Click Action and select Create VHD.
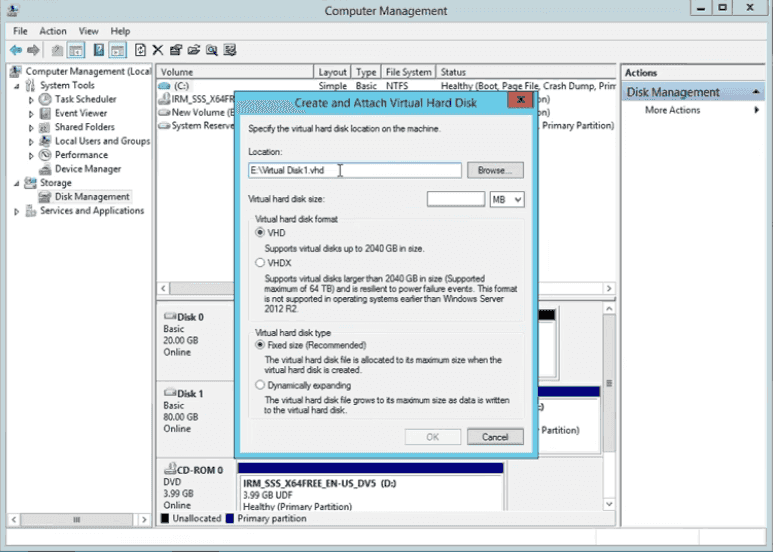
3. Enter a network location and disk size. Then click OK.
4. Right-click on the new created disk and choose Initialize Disk.
5. Right-click on the unallocated space and choose New Simple Volume.
6. Follow the wizard to create a new partition.
7. Type "backup" in the search box and select Windows Server Backup.
8. Click Backup Schedule and follow the Backup Schedule Wizard to schedule an incremental backup task to the virtual drive.

Only in this way, will Windows Server Backup allow you to schedule incremental backup to network share folder. You cannot set another scheduled backup but modify or stop the existing schedule backup. Rather than spend time creating one schedule backup, you can also create incremental backups directly to network share folder with backup software.
Way 2. Easier way to make Windows Server Backup to network share incremental
If you prefer an easier way to perform Windows Server Backup incremental to network share, one Windows backup utility named Qiling Disk Master Server is here to help.
- It supports Windows Server 2003, 2008, 2012, 2016 (including R2), SBS 2003, 2008, 2011, 2019, 2022 and Windows Client OS.
- It allows you to schedule multiple incremental or differential backup to network share effortlessly.
- It provides System Backup, File Backup, Disk Backup, and Partition Backup to backup Servers.
Example: create system backup to network share
1. Download, install and launch this program. Select System Backup under Backup tab.

2. The program will automatically choose the system-related partitions to be backed up. You just need to expand the drop-down menu of the second column and click Select a network location.

3. In the pop-up window, click Add Network Location and type in the network path. Then, choose a shared folder under the path.

4. After specifying the backup target location, you can click Backup Schedule to configure a specific time that you want the backup performed. Under Backup Scheme tab, you can see Incremental Backup is set as default. You may change it to Full Backup or Differential Backup based on your need.

5. (Optional) In case of running out of space after several runs of backups, you can enable Automatic Backup Cleanup in Backup Scheme to auto delete old backups.

6. Review the backup task. Then click Proceed.
Note: If you want to get notified whether the backup runs successfully or not, click Options to enable Email Notification. And also set a password to protect the backup image.
Conclusion
Now you know two methods to perform Windows Server Backup incremental to network share. To make things easier, Qiling Disk Master Server is the way to go. It can help you schedule multiple incremental Windows Server 2008/2012/2016 backups to network share. Besides, you can also perform System Clone, Disk Clone, and Partition Clone to protect your data.
In addition, if you're a service provider, you can try Qiling Disk Master Technician to offer charged technical service to unlimited companies or individuals.
Related to network backup, Qiling Technology released Qiling Centralized Disk Master to backup computers and manages backup tasks within LAN on a central management console.
Related Articles
- How to Let Windows Server Backup Overwrite Old Backups?
You can perform Windows Server backup overwrite old backups manually with 3 methods in simple steps, to make it flexible and automatic, try professional backup and restore software. - Windows Server Backup Not Deleting Old Backups-Fixed
Find Windows Server Backup not deleting old backups? Do not worry! You can find effective solutions to this problem in this article. You can also find another way to delete old backups automatically in Windows Server systems. - Fixed: Windows Server Backup Service Missing in 2008/2012/2016
Find the Windows Server Backup service missing from the Tools menu in Server 2008, 2012 or 2016? You'll get effective solutions to the issue and a powerful Windows Server Backup alternative. - How to Backup to OneDrive Without Sync? Step-by-step Guide
OneDrive is a cloud storage service and enables file hosting and synchronization. This page covers the importance of backing up and how to back up to OneDrive without sync. Hope it can help with your backup issues.