(Fixed)Windows Server Backup Keep Only One Copy
How does Windows Server Backup work?
Before deep learning, we need to get more about Windows Server Backup and understand how it works during the backup process.
Windows Server Backup (WSB) is a feature that provides backup and recovery options for Windows server environments. Thus, the Administrators can use it to back up a full server, system state, selected storage volumes or specific files or folders, as long as the data volume is less than 2 terabytes. Then, how it works?
If you run a backup, especially Windows Server Backup to network share incremental, it will create a VHD file for the source volume, then create a shadow copy of target backup drive where stores the image backup. Finally, the backup time, shadow copy identifier (Shadow Copy ID) and Version identifier will be input in backup catalog. After that, you can restore your server with shadow copies. If you keep running scheduled backups, a lot of shadow copies will be taken.
Does Windows Server Backup keep only one copy?
Why Windows Server backup keep only one copy? You must think that Windows Server Backup delete old backups automatically. But that is not the case.
As a matter of fact, after you configure a disk for schedule backup in Windows Server, it will automatically enable backup version and space management in Windows Server Backup to delete old backups and reuse the space to create new backup. So, you will never encounter Windows Server Backup out of space when creating a schedule backup.
Before reusing these space, it will confirm if shrinking the storage space allocated for snapshots (called diff area ) can get enough space for new backup and then shrink, but it will not shrink the diff area to less than 1/8 of target volume size. Thus, in normal situation, Windows Server Backup keep multiple copies instead of only one.
Causes and solutions to Windows Server Backup keep only one copy
So why do you encounter the error "Windows Server Backup keep only one copy" and how to fix it? Below are main reasons of this error and corresponding solutions to it.
- First, the backup mode was automatically changed from incremental backup to full backup. You can check it and then set to normal full backup if this is the cause.
- Second, your disk may be corrupted. To ensure that, you can do disk check on the current disk. If so, you need to create schedule backup using a new hard drive in Windows Server Backup.
- Third, you adjust the disk space used by VSS by vssadmin resize shadowstorage. In this case, you choose to recreate Windows Server Backup multiple schedules. If you really need to adjust the space, you can do it in the Shadow Copies.
Note: There is no such thing about Windows Server Backup number of copies to keep nor limit number of copies in Windows Server Backup. You only ensure is that Windows Server Backup will not shrink all space occupied by old backups to fit one new backup.
Easier way to keep multiple backup copies
According to casuse and solutions to Windows Server backup keep only one copy, you can fix it and recreate Windows Server backup to keep multiple copties. But there is a possibility that you cannot fix this problem with given solutions in this article.
To make things simple, you could try an easy way to keep multiple backup copies, it's using a reliable backup software like Qiling Disk Master Server. It supports Windows Server 2003/2008(R2)/2012(R2)2016(R2)/2019/2022 and Windows XP/Vista/7/8/10/11.
By using it, you can easily and quickly create multiple backup copies, specify the number of backup copies you want to keep and then delete old backup images when it exceed the number you set. So, how to make all of them work? Below are some features you may use:
- Daily/weekly/monthly schedule backup: it allows you backup any items you want at a regular basis, and and further you can set specific backup time or backup intervals.
- Wake the computer to run scheduled tasks: after you tick this option, it wake your computer 2 minutes before the task and execute it automatically. it's especially useful when your backup was set to off-peak hours.
- Incremental or differential backup: this option is set to backup only changed files, which will include the latest upates, newly installed apps, modified files etc.
- Backup scheme: It allows you to specify the number of backup copies you want to keep and then delete old backup images when it exceed the number you set. 5 options provided in total.
Now, let's start to create multiple schedule backup with Qiling Disk Master Server:
1. Download, install and launch Qiling Disk Master Server. Then, in the main page of it, click "System Backup" under the Backup tab.

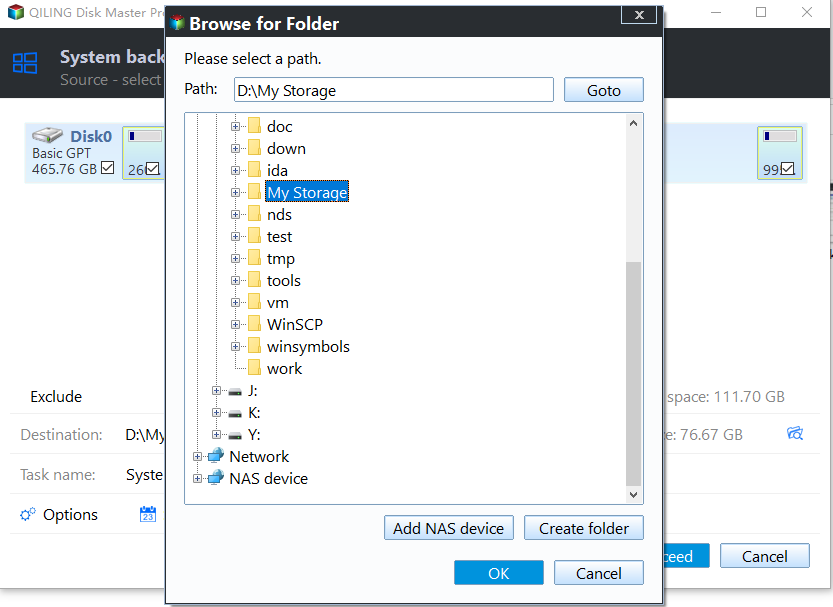
2. Click the folder shaped button and select a destination path for your schedule backup.
By default, this software will automatically select all needed items for system restore. That's because there is a hidden boot related partition on your computer and you may ignore it, which will lead to system restore failure.
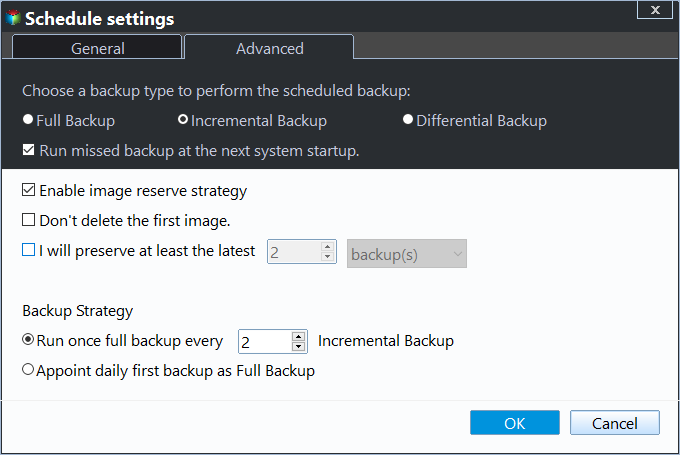
4. Click Schedule and select settings you like, you have 5 options, namely Daily, Weekly, Monthly, Event triggers and USN plug in.

5. To set backup method, go to the Backup Scheme tab below and select Incremental or Differential Backup. Also, you can select the way you want to delete backup image by enabling automatic backup cleanup.
Step 6. After all settings are done, click "Proceed" to start the first backup.
How to manually free up space using wbadmin delete backup
Wbadmin delete backup is actually a command line, which is used to delete non-system backup in Windows Server 2012 and later operating system. If you happen to use these systems, you can learn the wbadmin syntax and some necessary parameters.
wbadmin delete backup syntax:
wbadmin delete backup
{-keepVersions: | -version: | -deleteOldest}
[-backupTarget:]
[-machine:]
[-quiet]
Note: One and only one of these parameters must be specified: -keepVersions, -version, or -deleteOldest.
Parameters you may use in "wbadmin delete backup" command:
- -keepVersion: specifies the number of the latest backups to keep. The value must be a positive integer. The option value -keepVersions:0 deletes all the backups.
- -version: Version identifier of the backup in MM/DD/YYYY-HH:MM format.
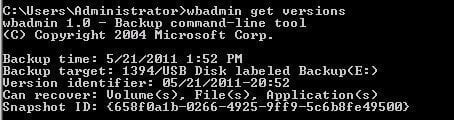
If you don't know it, type "wbadmin get versions" to confirm which version can be deleted and type "wbadmin get times" to view the version type.
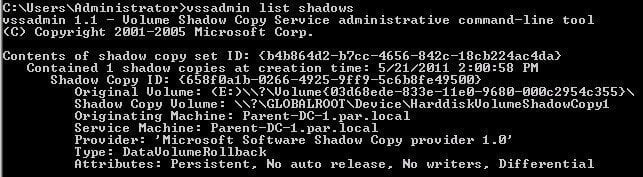
Also, you can type "vssadmin list shadows" in the elevated command prompt. If you are still not sure about this, you can assign a drive letter to the shadow copies, and then view the contents in File Explorer using "Diskshadow".
- -deleteOldest: delete the oldest system state backup.
- -backupTarget: locate backups not of the local computer. It can be a drive letter, a mount point, or a GUID-based volume path.
- -machine: specify the computer containing backups you want to delete. It's usually used when you backup multiple computers to the same location and used with -backupTarget parameter.
Then, let's get more space by wbadmain delete backup:
1. Right click on the Start icon and select Command Prompt (Admin) from the menu.
2. specific the backup you want to delete by wbadmin delete backup syntax.
For example, you just want to keep the lastest 3 backups on the F: drive in the machine WIN-9814GD4FH95, you can type as follow.
wbadmin delete backup -keepVersions:3 -backupTarget:F: machine:WIN-9814GD4FH95
3. Type exit and press Enter to leave this window.
As mentioned earlier, wbadmin delete backup only works for non-system backup in Windows Server 2012 and later operating systems.
Thus, if you are using Windows Server 2008 or other previous systems, you can choose to delete its shadow copies by diskshadow. For details, please refer to wbadmin delete backup for Windows Server 2016/2012/2008.
Also, you may want to delete system state backup to gain more capacity. To make it you can use another command-line tool, it's wbadmin delete systemstate backup.
After learning syntax of wbadmin delete backup and parameters you will use, the wbadmin delete systemstate backup will be much easier. All the syntas and parameters are the same and you just need to replace wbadmin delete backup with wbadmin delete systemstatebackup.
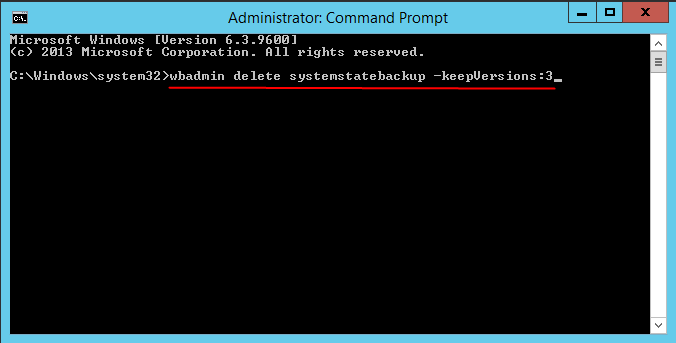
To delete all system state backups, except the most recent 3 backups, type the following commands in the command prompt window and hit Enter to execute.
Type wbadmin delete systemstatebackup -keepVersions:3
Written in the end
Although Windows Server Backup can create multiple schedule backups, it does not allow you to specify number of copies to keep and may not work as normal, throwing out errors, like "Windows Server Backup keep only one copy". So, why not try an easier to keep multiple copies?
Qiling Disk Master Server can be one of the best options to achieve this goal easily and quickly. It provides you multiple schedule backup options and backup methods, so you backup your server computer by one or more features in this software. And you can specify the number of backup copies you want to keep in advance in the backup scheme.
For business users within one company, you could consider using Qiling Disk Master Technician Plus. It can be used on unlimited servers and computers, so you can use it to create schedule automatic backups for all of them, deploy system image to multiple computers simultaneously, Create bootable media of this software on a removable device, etc.
Related Articles
- Windows Server Backup: Differential & Incremental Backup
Understand how Windows Server Backup differential backup works (although Microsoft calls it incremental backup) and get the methods to take differential or incremental backup in Server 2008, 2012, 2016, etc. - How to Let Windows Server Backup Overwrite Old Backups
You can perform Windows Server backup overwrite old backups manually with 3 methods in simple steps, to make it flexible and automatic, try professional backup and restore software. - How to Create Multiple Schedules in Windows Server Backup
Read this guide to get three practical ways to create multiple schedules in Windows Server Backup. Applied to Windows Server 2003, 2008, 2012, 2016, etc. - Top 3 Best Download Free Backup Tools Work with A Restore Tool
Backup tools work with a restore tool is a term that Windows users search a lot. Check the backup tools list and examples in the article and select a suitable backup and restore tool according to your needs.