How to Create Multiple Schedules in Windows Server Backup
Can you create multiple schedules with Windows Server Backup?
Windows Server Backup (WSB) allows you to protect your data automatically by configuring scheduled backups. But with the WSB user interface, you can only create one backup schedule. Once a scheduled backup was created, you can either delete it or modify it using the Backup Schedule Wizard if you want to create another scheduled task.
This causes some inconvenience: sometimes you may need more than one backup task with different schedules, such as a Windows Server weekly backup for system state drive, plus a daily backup task for folders you use every day. Is it possible? Well, the answer is Yes. There are 2 methods you can try to create multiple schedules for Windows Server backup.
Methods to create multiple schedules to backup Windows Server
Here in this part, you will know two methods to create multiple backup schedules for Windows Server 2003, 2008, 2012, 2016, 2019, 2022.
▶The first method is using Windows built-in Task Scheduler and Wbadmin. It allows you to have as many scheduled backups as you want without worrying Windows Server Backup overwrite old backups. However, for anyone who’s not familiar with the Windows Task Scheduler, this method can be complex and error-prone.
Besides, there are some limitations of Windows Server Backup you should note:
▪ The WSB in Windows Server 2008/2008 R2 cannot include volumes larger than 2040GB (2TB) in a backup.
▪ Scheduled backup on network share will only be completed with full backups instead of incremental backups.
▪ Only partitions formatted with NTFS file system can be included in the backup.
▪ You can not set the critical volumes as the target destination.
▶▶If you prefer an easier way to create multiple backup schedules flexibly, you can just refer to Method 2 to use the effective backup tool - Qiling Disk Master Server, it helps you to create multiple Windows Server backup jobs in full/incremental/differential mode, and also enables you to customize backup retention policy.
Create backup schedules flexibly as you want
One easier way to create multiple schedules for Windows Server backup is using automated backup tool. Details »
- Way 1. Create multiple schedules via Task Scheduler and Wbadmin
- Way 2. Create multiple schedules with effective Server backup tool
Way 1. Create multiple schedules via Task Scheduler and Wbadmin
To create multiple scheduled backups, you can use Task Scheduler to run Wbadmin command. With Task Scheduler, you can create weekly scheduled backups or less frequent schedules rather than daily backups.
Step 1. Click Start and type “task scheduler” in the search box. Select Task Scheduler in the listed results.
Step 2. Under the Action tab, select Create Task.
Step 3. In General, you can name the task and write a description if needed. Then check the option Run whether user is logged on or not.
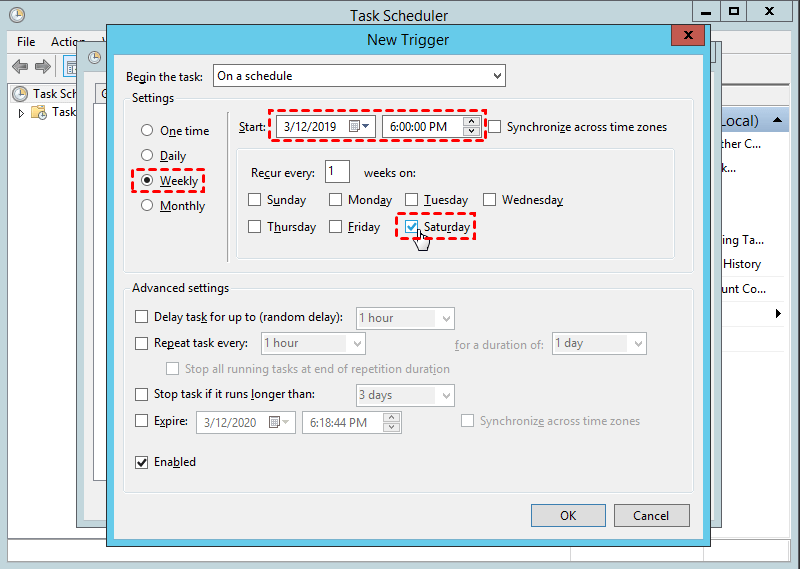
Step 4. Then go to the Triggers tab and click New to choose when you want the backup to run. You can set one time, daily, weekly, and monthly tasks.
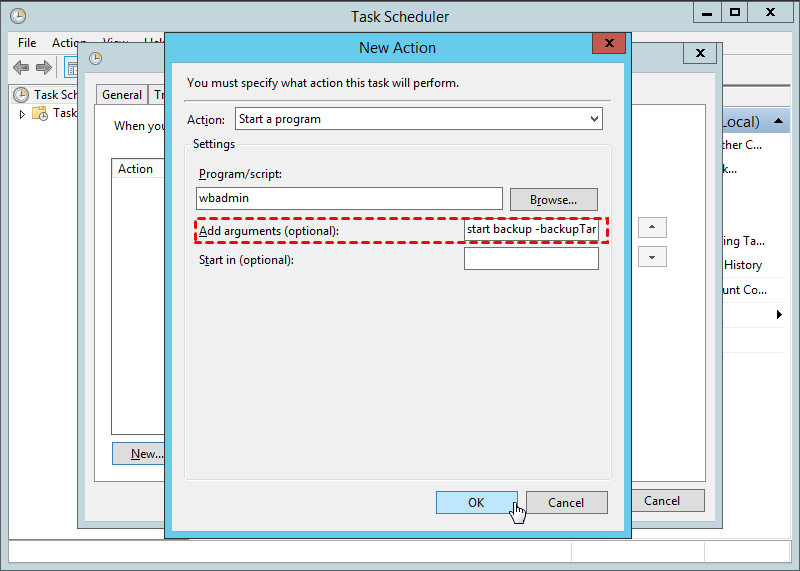
Step 5. Go to the Actions tab, and click New to begin as well. Type “wbadmin” in the Program/script box, and write a backup command in Add argument (optional) box. If you are not familiar with wbadmin in Windows Server 2012/2008, here is an example to back up the entire C to the H: drive:
Descriptions:
- Proceed: tell wbadmin.exe to start a backup.
- -backupTarget: the target volume to store the backups.
- -include: the volume(s) to backup. To backup more than one volume, separate them with a comma.
- -allCritical: tells the backup program also includes any other data that are required for a full server recovery.
- -quiet: to perform unattended backup tasks.
Step 6. Click OK to finish creating this scheduled task. Or you can also go to Conditions tab and Settings tab to have a check.
If you are neither comfortable with WBadmin command nor with Task Scheduler or you may want a more flexible way to make a backup, then you can switch to third-party server backup program that can have multiple scheduled backups with easy operations. Just keep reading to get it.
Way 2. Create multiple schedules with effective Server backup tool
Qiling Disk Master Server is one professional server backup software which allows you to configure multiple backup schedules running with Task Scheduler or its own service. Let's have a look at its main features:
① Backup schedule
There are five schedule modes available: “Daily”, “Weekly”, “Monthly”, “Event triggers”, and “USB plug in”. You can also perform scheduled full, incremental or differential backup as per your need.
② Backup cleanup
It allows you to create a retention policy for automatic backup cleanup so as to free up disk space. 4 cleanup rules are offered: “By quantity”, “By time”, “By daily/weekly/monthly”, and “By space”.
③ Other features
Partitions that are not formatted with NTFS can be backed up and the destination is not limited.
Qiling Backuppper Server supports Windows Server 2022, 2019, 2016, 2012/R2, 2008/R2, 2003, SBS 2011, 2008, 2003 and Windows 11, 10, 8.1/8, 7, Vista, XP. Moreover, it has a user-friendly interface. You can create multiple scheduled backups in a few clicks. The following are the steps to create multiple scheduled backups with this tool.
Step 1. Download 30-day free trial, install and launch the server backup tool.
Step 2. Under Backup tab, choose what to backup. You can have file/folder, system, partition, and disk backup. We are taking System Backup as an example.
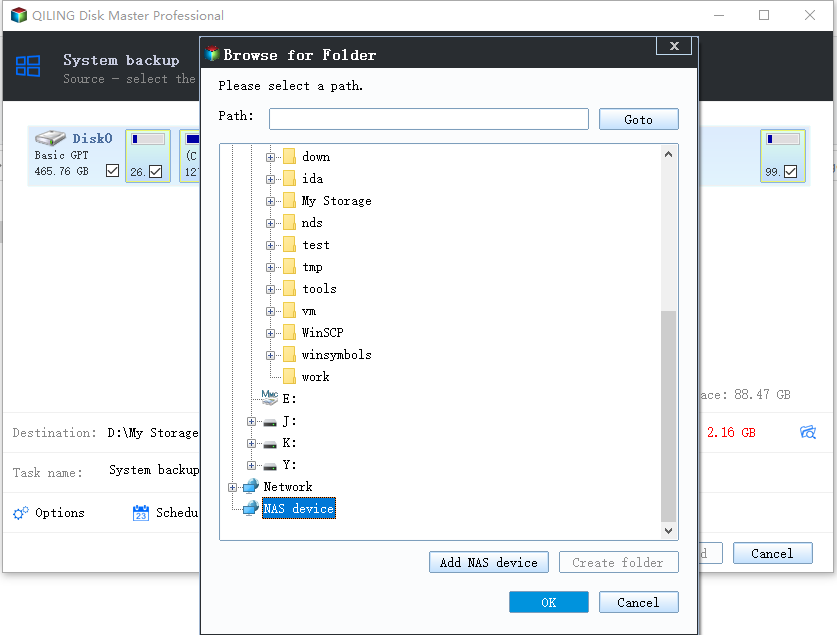
Step 3. The needed volume(s) is (are) selected by default. You can name the task and click the column to select the destination path.
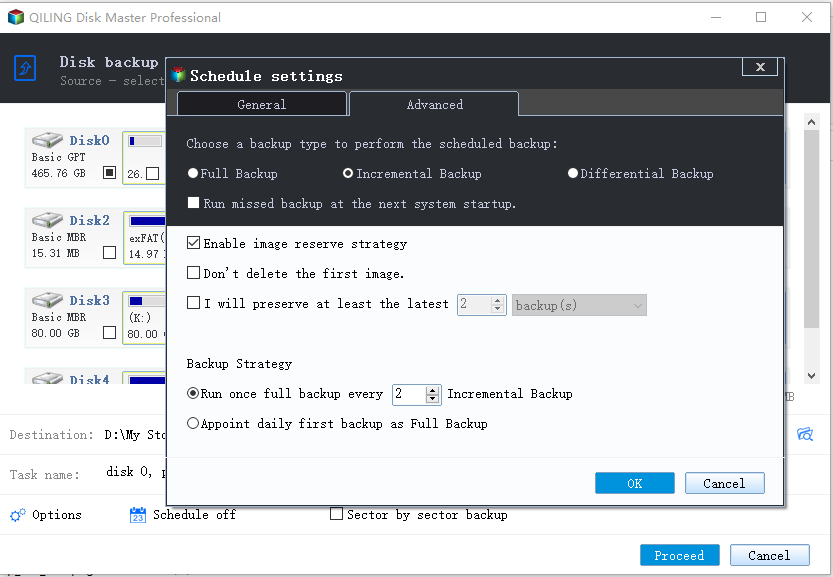
Step 4. Click Schedule Backup to decide when you want the task to run and click OK to confirm. Finally, click Proceed to finish creating this scheduled task.
Other settings you may need:
1. In the Schedule Backup window, you can click Backup Scheme from the left panel and do the following settings:
- Backup Method: choose a way (full/incremental/differential backup) to perform the scheduled backup.
- Enable Automatic Backup Cleanup: enable Disk Space Management to automatically delete obsolete backups if needed.
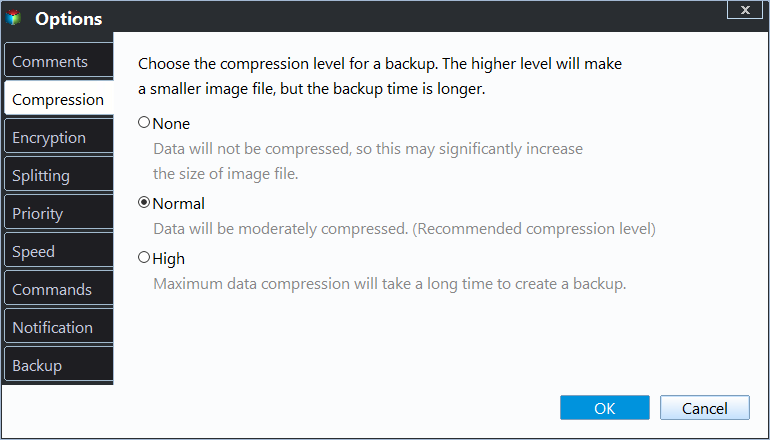
2. You can click Options to set a password to encrypt your backups.
Conclusion
Now you get two ways to create multiple schedules for Windows Server. If you are not content with Windows Server Backup’s multiple schedules feature, Qiling Disk Master Server is the best alternative. Besides backup and restore, Qiling Disk Master also provides you with the option to clone system, partition, or disk to protect your server without imaging.
To protect unlimited PCs and servers within your company, you may choose Qiling Disk Master Technician Plus. It offers unlimited billable technical services to clients. It also enables you to copy installation directory for portable version creation.
Related Articles
- Windows Server Backup Limitations You Should Know
Do you use Windows Server Backup to perform backups in Windows Servers and find it fails sometimes? It's time for you to learn Windows Server Backup limitations and get the best alternative. - Create Windows Server Backup Incremental to Network Share with Ease
Want to perform Windows Server Backup incremental to network share? This guide will show you 2 methods to make it. Applied to Windows Server 2003, 2008, 2012, 2016, 2019 and 2022. - Easiest Way to Clone Windows Server 2012 to New Hard Drive
How to clone Windows Server 2012 to new hard drive? This article provides you with powerful software to help you do this. Read this guide to get the easiest method. - 4 BestBackup Software for Synology NAS[Pros and Cons]
This passage introduces the five best backup software for Synology NAS, including its functions, pros, and cons. Then, you can choose one backup software according to your budget and needs.


