[Solved] Windows Server Backup Schedule Not Running Error
- Windows Server Backup schedule is not running, with no failure messages
- Causes for Windows Server Backup schedule not running
- Solutions to Windows Server Backup not running on schedule
- How to run Windows Server 2012 schedule backup successfully
- 2 easier ways to schedule backup Windows Server (Universal)
- Conclusion
Windows Server Backup schedule is not running, with no failure messages
You create a scheduled backup in Windows Server 2008/2012/2016/2019/2022 (including the R2 version) for regular data backup, but the Windows Server Backup schedule not running on schedule as expected. When you manually start the backup, it runs as successfully. Below is a real case from Microsoft:
"I'm struggling with a problem that I've yet to find a solution to. I have a brand new Windows Server 2012 R2 installation. I've created a scheduled local backup to a local Hard drive, not a network location. The backup configures and schedules properly, but when the time arrives for it to run, it never runs
If I check the Scheduled tasks, I see the backup task changes from ready to queued. The backup job shows as not running, not failed, not anything. Wbadmin just shows the next backup as being tomorrow, with no successful backup and no failed backup. Each day is the same thing.
If I run the backup manually, it will run successfully every time. I have tried to search for similar problems and found a few similar threads, but none of the suggested solutions have done anything. Does anyone have any ideas as to what could be causing this?"
Many users have encountered the issue of Windows Server scheduled backup not working. Don't worry, we're here to help you troubleshoot the problem.
Causes for Windows Server Backup schedule not running
Windows backup schedule not working can be frustrating, especially when you need to ensure your data is safe. Let's explore the possible reasons and solutions to get your backups running smoothly again.
- First, scheduled backup will fail when the target backup location is not available to write data to at the scheduled time.
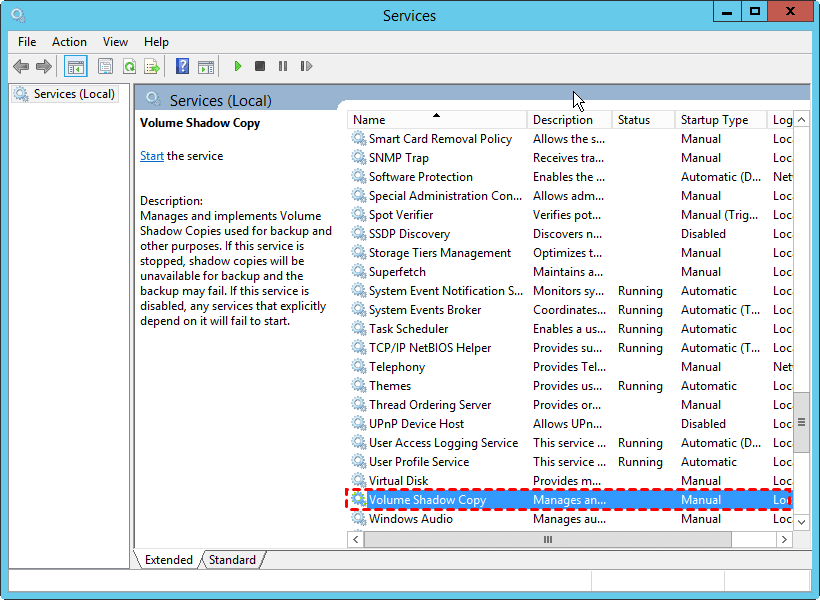
- Next, the scheduled backup is unable to start may also be that the Volume Shadow Services and other related services are neither set to Automatic nor Started.
- At last, if you use Task Scheduler to run Windows Server Backup, the Task Scheduler service or settings may be the cause of Windows Server Backup not running on schedule error.
Solutions to Windows Server Backup not running on schedule
Scheduled backup not working can be frustrating, especially when you need to ensure your data is safe. Let's explore the possible causes and solutions to get your backups running smoothly again.
Solution 1. When your Windows Server backup doesn't run on schedule, it can be frustrating. Let's explore some possible causes and solutions to get your backups running smoothly again.
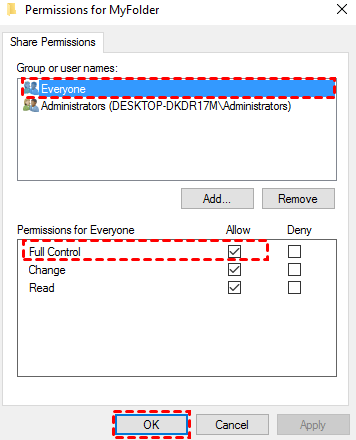
- Right-click it and select Properties.
- Switch to the Security tab and tap Edit.
- When your Windows Server backup doesn't run on schedule, it can be frustrating. Let's explore some possible causes and solutions to get your backups running smoothly again.
- When your Windows Server backup doesn't run on schedule, it can be frustrating. Let's explore some possible causes and solutions to get your backups running smoothly again.
Solution 2. When your Windows Server backup doesn't run on schedule, it can be frustrating. Let's explore some possible causes and solutions to get your backups running smoothly again.
Solution 3. When your Windows Server backup doesn't run on schedule, it can be frustrating. Let's explore some possible causes and solutions to get your backups running smoothly again.
Solution 4. When your Task Scheduler fails to run a scheduled backup, it can be frustrating. Let's explore some possible causes and solutions to get your backups running smoothly again.
How to run Windows Server 2012 schedule backup successfully
Creating a scheduled backup in Windows Server is a straightforward process that can be accomplished using either Windows Server Backup or Task Scheduler. Here's a step-by-step guide to help you get started:
For schedule task with Windows Server Backup: While Windows Server Backup provides a convenient way to create scheduled backups, it has some limitations. Here are some of the limitations and workarounds:
For schedule task with Task Scheduler: To complete the schedule backups, you need to use both Task Scheduler and Wbadmin. In Task Scheduler, you have multiple schedule options, including daily, weekly, monthly, etc.
Thus, if you want multiple schedule backups, the second method will be a better choice. Then, I'll walk you through the steps to schedule backup Windows Server with Task Scheduler and Wbadmin. For the first method, you can refers to: schedule automatic backup in Windows Server 2016.
Step 1. Be sure the user you are login is an administrator. Then, set the Volume Shadow Services and Task Scheduler Service to be automatic.
Step 2. Then, type task scheduler in the search box and select it from the listed results.
Step 3. Select Create Task ... under the Actions tab.
Step 4. In the Create Task window, select the General tab and name it. Then, scroll down to Security options, tick Run whether user is logged on or not and Run with highest privileges.
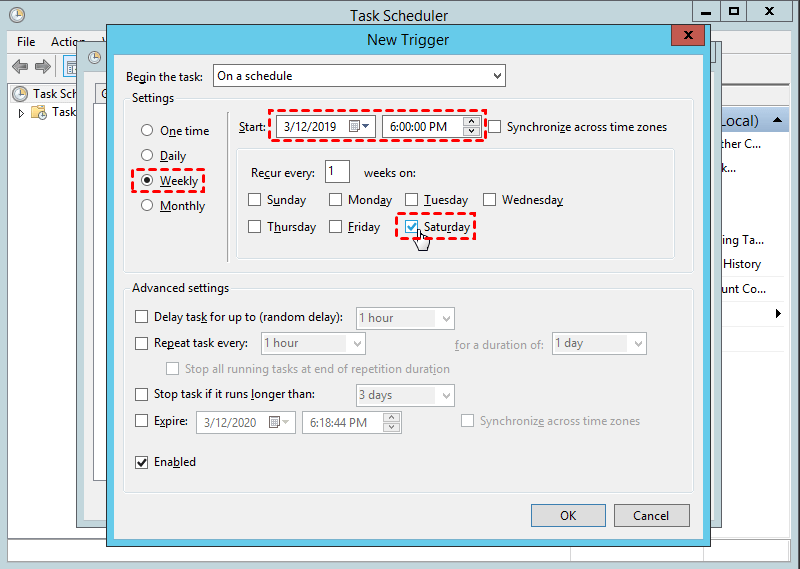
Step 5. Then, turn to the Triggers tab and click New. After that, select On a schedule, you have 4 schedule options, namely One time, Daily, Weekly, or Monthly.
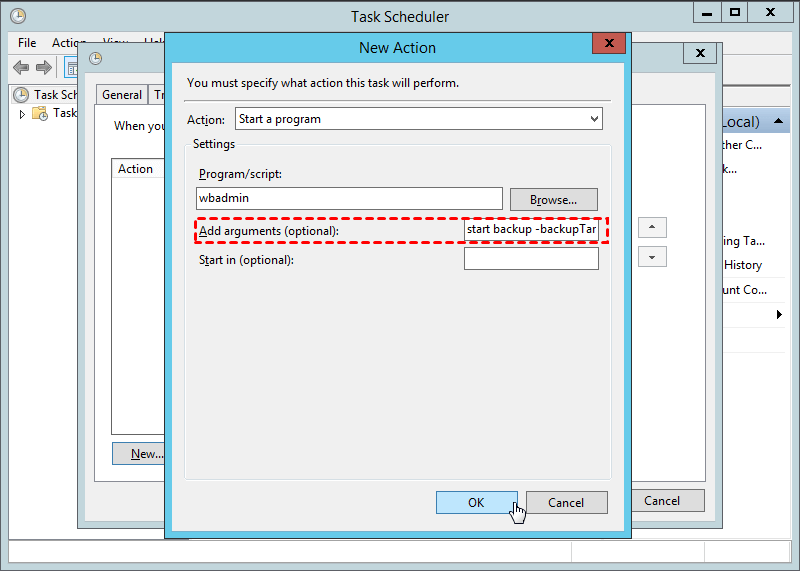
Step 6. Then, start a new action in the Action tab. Select Start a program action, and type wbadmin in the Program/script box and write a backup command in the Add arguments(optional) box. To backup the entire C: drive to H: drive, you can type as follow:
Proceed -backupTarget:H: -include:C: -allCritical -quiet
Note: If you are not familiar with wbadmin Proceed, you can type wbadmin Proceed /? to get details.
Step 7. Go to Conditions and Settings to check if you want to set other settings. After that, click OK to perform Windows Server Backup run scheduled backup now with Task Scheduler and Wbadmin.
If you're not comfortable with the command-line interface or want a more straightforward approach, you can consider using a third-party backup solution or a graphical interface to schedule backups. This can save you time and effort in the long run.
2 easier ways to schedule backup Windows Server (Universal)
1. Using Qiling Disk Master Server
As a user-friendly server backup program, Qiling Disk Master Server can be your best choice. Because it supports multiple schedule backups and enables you to back up any items you want including disk, system, partition, and files. Below are some useful features of it:
- Schedule Backup: Qiling Disk Master Server enables you to create multiple backup schedules, allowing you to back up your data at different times, such as daily, weekly, or monthly.
- Full/Incremental/Differential Backup: 1. **Incremental Backup**: Qiling Disk Master Server allows you to create incremental backups after the initial full backup. This approach saves storage space and reduces the time required for backups.
- Automatic Backup Cleanup: It allows you to delete old backups automatically with one of the cleanup methods in it, such as, By quality, By time, By daily/weekly/monthly, which greatly reduces the risk of backup disk full issue. To keep old backup as long as possible, try the last option.
Qiling Disk Master Server offers a robust backup solution that supports multiple backup destinations and various operating systems. This comprehensive feature allows you to save backups on various storage devices and network locations, ensuring flexibility and convenience.
To begin using Qiling Disk Master Server, follow these steps:
👉 5 steps to create a Windows Server 2012 scheduled backup
To demonstrate the convenience of Qiling Disk Master Server, we'll use system backup as an example. This will show you how the software works and how it can be used to backup specific components of your system.
1. Launch Qiling Disk Master Server, it will bring you to the intuitive interface. Click Backup and then go to System Backup.
2. To complete the backup process, you need to specify the destination location where the backup will be saved. This is a crucial step, as it determines where your system-related data will be stored. Here's how to proceed:
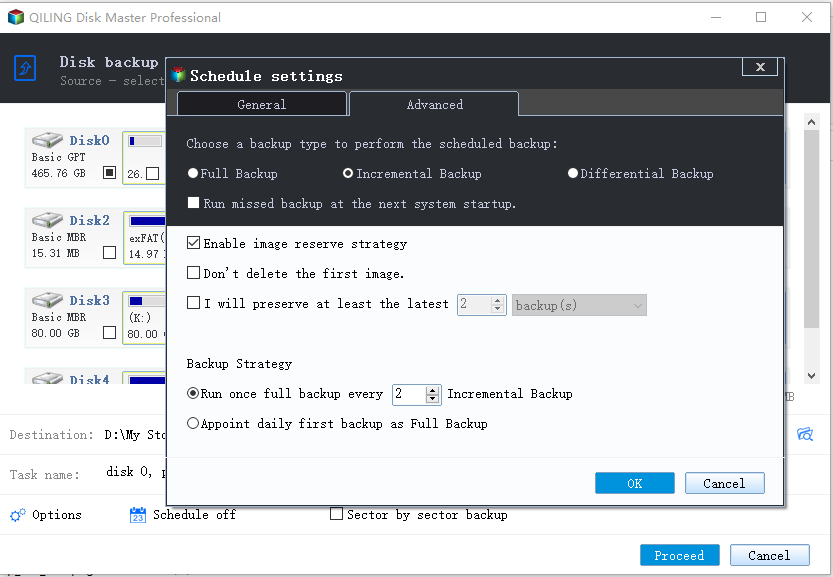
3. After that, click Schedule Backup to enable a schedule to decide when to run the backup or how it runs. The scheduled backup will be performed with incremental backups defautly to save disk space, and you can change it to differential backup under Backup Scheme.
Best practices to run a scheduled task:
- If you want to back up your computer to a flash drive and have it run automatically, you can select the "USB plug in" option. This method is known as a plug-and-pull backup, where you can run the backup task at any time.
- For external hard drive, The "USB plug in" option is not available for schedule settings, which means you cannot schedule a task to run automatically when a USB device is inserted. This is because the "USB plug in" option requires manual intervention, where you need to insert the USB device every time before the scheduled task can start.
- For network drive, NAS, cloud drive, You can select from three scheduling options: Daily, Weekly, or Monthly. This allows you to run the task automatically at regular intervals, without the need to manually connect the disk each time. By choosing one of these options, you can set the task to run automatically, saving you time and effort.
4. To ensure that your backup disk always has sufficient space for new backups, it's essential to enable automatic backup cleanup. This feature allows you to automatically delete old backups as you see fit. To take advantage of this, navigate to the Backup Scheme and look for the option to enable automatic backup cleanup.
Note: You can further personalize your backup experience by exploring the various options available under the Options section. This is where you can tailor your backup settings to suit your specific needs.
5. Back to the System Backup screen and confirm the backup task. If no problem, click Proceed to add or run this scheduled backup.
Conclusion
Troubleshooting the Windows Server backup schedule not running issue can be a frustrating experience, but don't worry, we've got you covered. In this guide, we'll walk you through the step-by-step process of fixing the problem and running a scheduled backup using Task Schedule and wbadmin. If you're looking for a more straightforward solution, consider using reliable server backup software like Qiling Disk Master Server.
Qiling Disk Master Server is a powerful server backup software that offers a range of features to protect your servers and PCs. In addition to its standard edition, it also provides higher editions to cater to the needs of larger organizations. These higher editions, such as Qiling Disk Master Technician and Qiling Disk Master Technician Plus, enable you to protect unlimited PCs and servers within your company and provide unlimited billable technical services.
Related Articles
- Easiest Way to Clone Windows Server 2012 to New Hard Drive
How to clone Windows Server 2012 to new hard drive? This article provides you with powerful software to help you do this. Read this guide to get the easiest method. - File Sync Windows Server 2008/2012/2016
Want to sync files among Windows Servers? Read this guide to get the best file sync software to sync Windows Server 2008/2012/2016. - How to Create Image Backup with Ghost Disk Utility
This article is written for users like you who want to ghost disk to image using Ghost disk utility in Windows 11, 10. Scroll down to learn more. - (FULL FIX 2021) We Couldn't Create a New Partition or Locate an Existing One
Get the full solutions to fix 'we could not create a new partition or locate an existing one' Windows 11/10 USB, error 0x8004240f, 0x80042468, SSD, RAID, unallocated space, and many other related Windows 11/10 install errors.
